Printers Triple Console Cabinet
Build the Stylish Printer’s Triple Console Cabinet — Included Transform your living or dining space with the Printer’s Triple Console Cabinet — a versatile sideboard design featuring three deep drawers and three spacious cupboard compartments behind doors. Inspired by the Restoration‑Hardware Printmaker Sideboard, it brings elegant farmhouse‑charm and generous storage together in one stunning piece. Why you’ll love this build: • Ample storage: With three large drawers plus three large cupboard sections, this console gives you room for tabletop decor, media gear, linens, or whatever you need to tuck away. • Classic design: The look is timeless—clean lines, inset panel doors, and the aesthetic flexibility to stain, paint, or keep natural. It’s listed under “Buffet, Sideboard & Credenza Plans” and “Farmhouse Furniture” styles. • Intermediate‑level build: While not a beginner’s first project, the plans are clear and well‑laid out. If you’ve got some tool and joinery experience, you’ll find it very satisfying. • Customizable: Want to tweak the size, change hardware, or adjust finishes? These plans allow plenty of adaptation — build what fits your space and style. What you’ll need (highlights): • Sheet of ¾″ plywood (or 1½ sheets if you plan fixed shelves) • 2×2 lumber, 1×3 and 1×2 boards for face frames, drawer supports • Euro‑style drawer slides, inset hinges, cup‑style handles • Basic tools: circular saw or table saw, drill, speed square, clamps Where it works best: • Living room or media room: As a console under a TV with hidden storage • Dining room or entryway: Use it as a buffet or entry sideboard with style • Farmhouse, transitional, or modern rustic interiors: Its clean but warm aesthetic fits multiple styles Build tips for your success: • Ensure all your boards are straight and square—take time leveling and clamping before final assembly. • Pre‑drill when using screws near edges to avoid splitting. Glue plus finish nails delivers stronger joints for the face‑frame work. • Sand thoroughly (starting ~120‑grit), remove all dust, then apply your finish (paint or stain + protective top coat) for a lasting finish. Ready to get started? Download the, review the full cut‑list and instructions, and get your materials together. This piece offers big impact with smart storage—for a build you’ll be proud to have in your home.
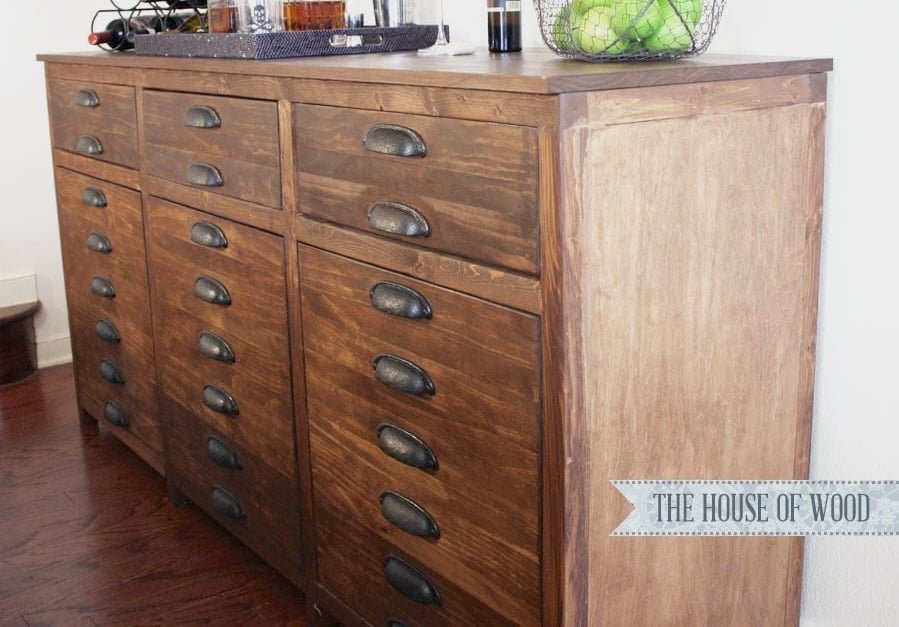
Specifications
| Project type | Buffet, Sideboard and Credenza Plans |
|---|---|
| Room | Storage Solutions |
| Style | Farmhouse Furniture |
| Difficulty | Intermediate |
Dimensions
Use the size-specific shopping and cut lists below.
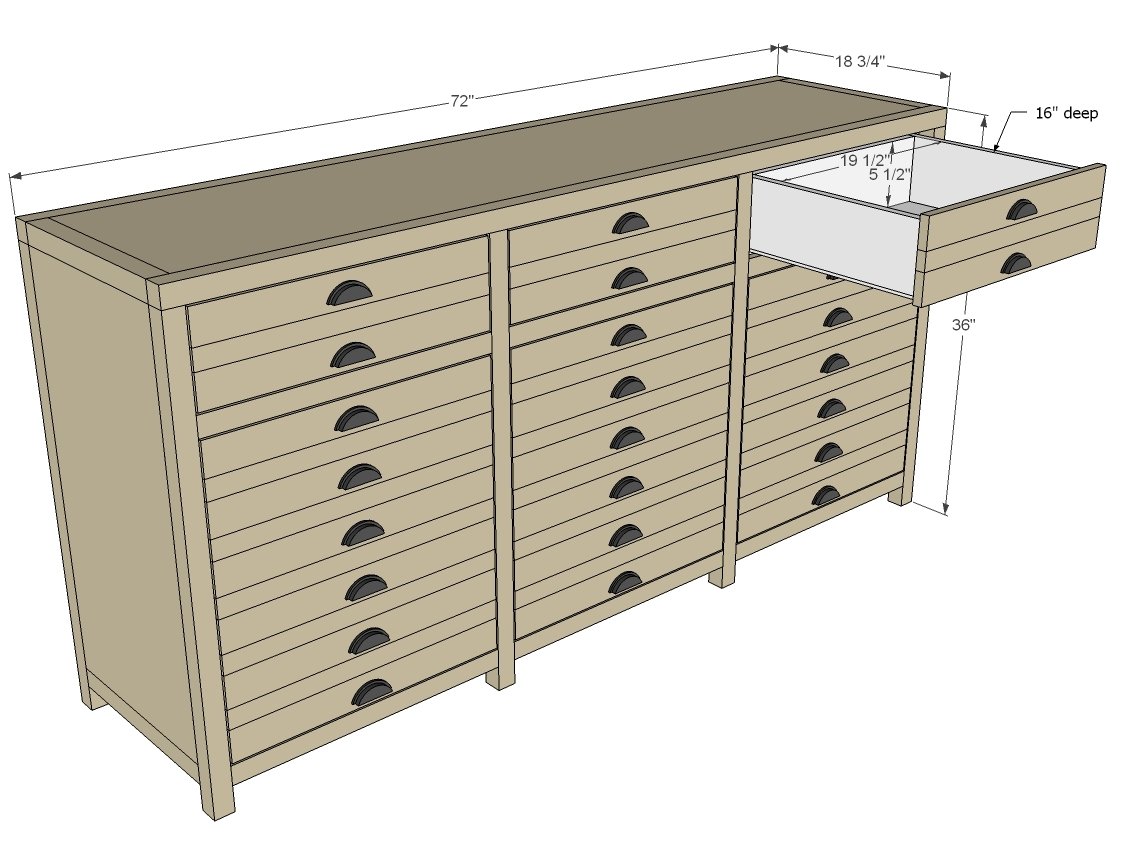
Shopping List
- 3 sets euro style bottom corner mount drawer slides, 16” length
- 3 – sets inset hinges
- 24 – cup style handles
- 8 – 2x2 @ 8 feet long
- 6 – 1x3 @ 8 feet long
- 6 – 1x2 @ 8 feet long
- 1 sheet ¾” plywood (get 1 ½” sheets if you want shelves)
- 2 – 1x6 @ 10 feet long
- 1 ¼” and 2 ½” Pocket Hole (PH) screws
- Wood glue
Cut List
FACE FRAMES
- 2 – 2x2 @ 72”
- 8 – 2x2 @ 34 ½”
- 9 – 2x2 @ 22”
DOOR/DRAWER FACES
- 24 – 1x3 @ 21 ¾”
- 18 – 1x2 @ 21 ¾”
- 6 – 1x2 @ 22 ½”
MAIN BOX
- 4 – 2x2 @ 15 ¾”
- 2 – 1x16 @ 69”
- 4 – 1x16 @ 31”
DRAWERS - CUT TO FIT YOUR CABINET!!!!
- 4 – 1x2 @ 15 ¾” (slide supports)
- 6 – 1x6 @ 19 ½”
- 6 – 1x6 @ 17”
Tools
- measuring tape
- square
- pencil
- safety glasses
- hearing protection
- kreg-jig
- drill
- circular saw
- table saw
- nailer
- sander
- level
Step-by-step Instructions
Step 1
You’ll probably want shelves, so go ahead and get the extra sheet of plywood, and just have all the plywood ripped into 15 ¾” wide strips, referred to as 1x16s throughout this plan. BUT if you don’t want shelves, or have some scraps to use up, here’s how you can get all the pieces on a single sheet.
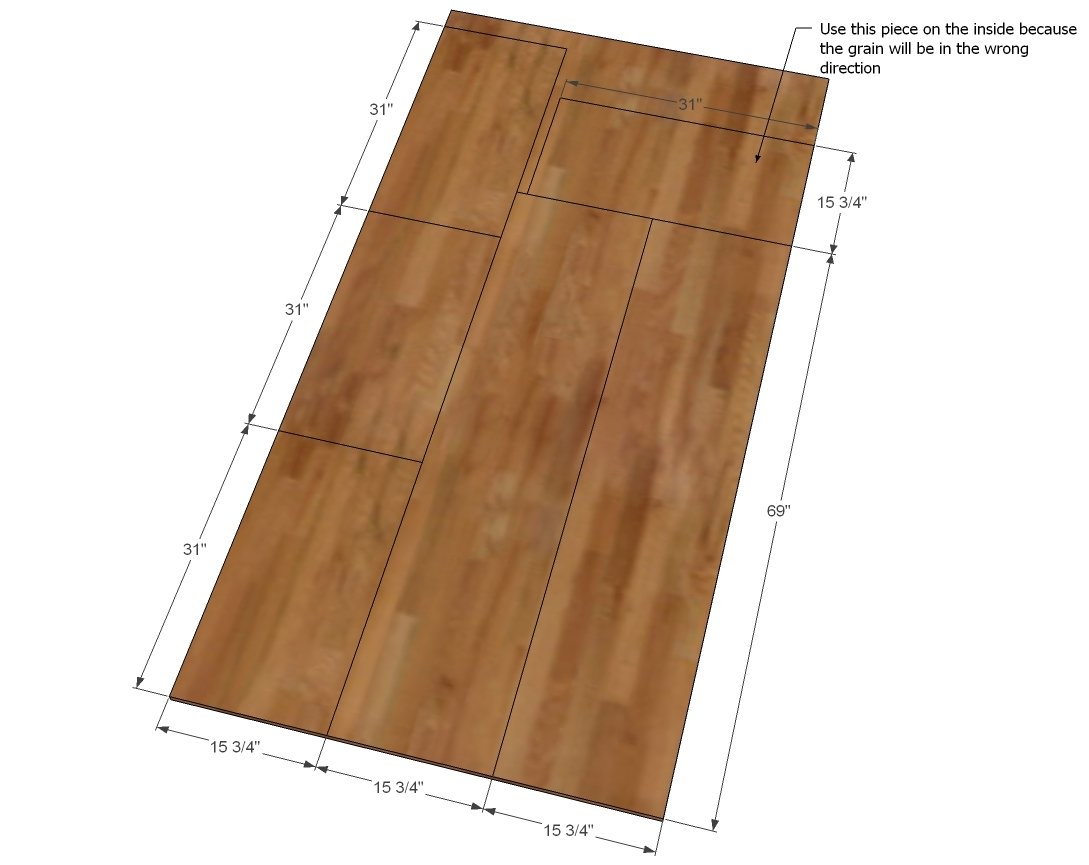
Step 2
Note: Back face frame does not have the middle drawer dividers (2x2 @ 22”)
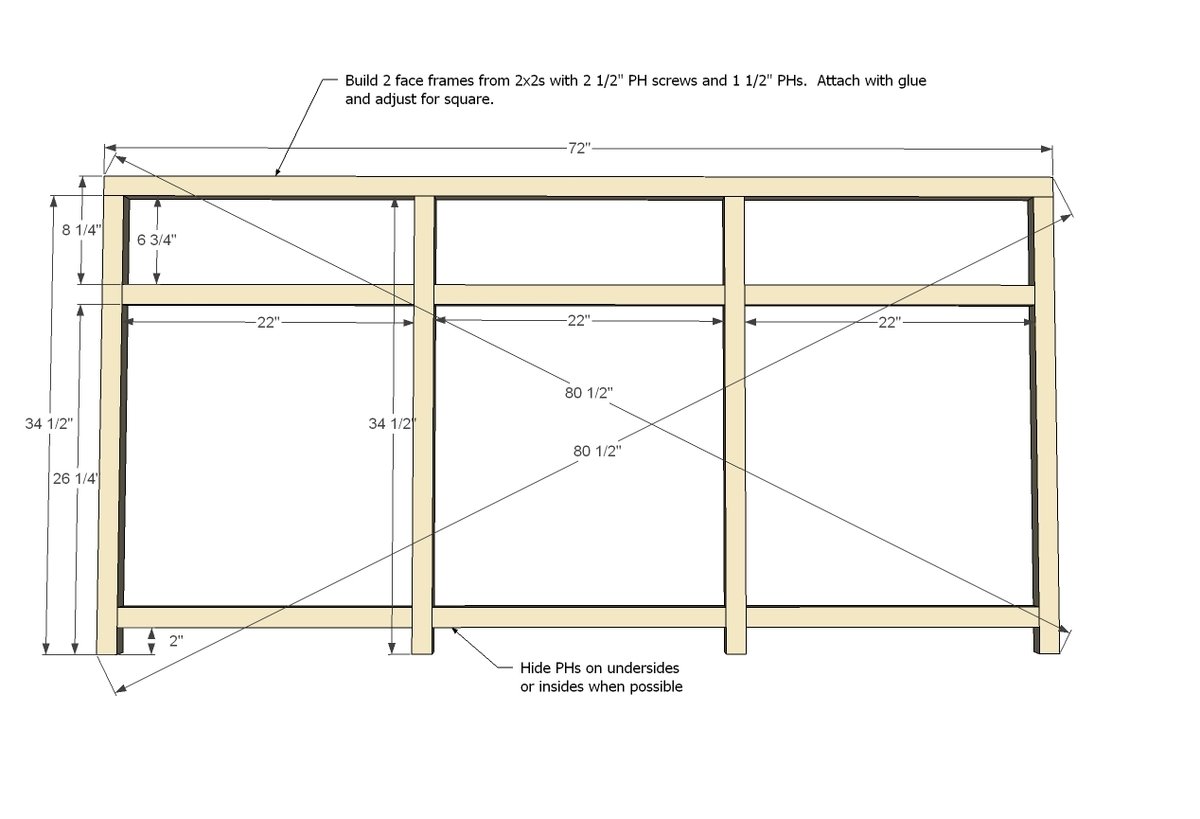
Step 3
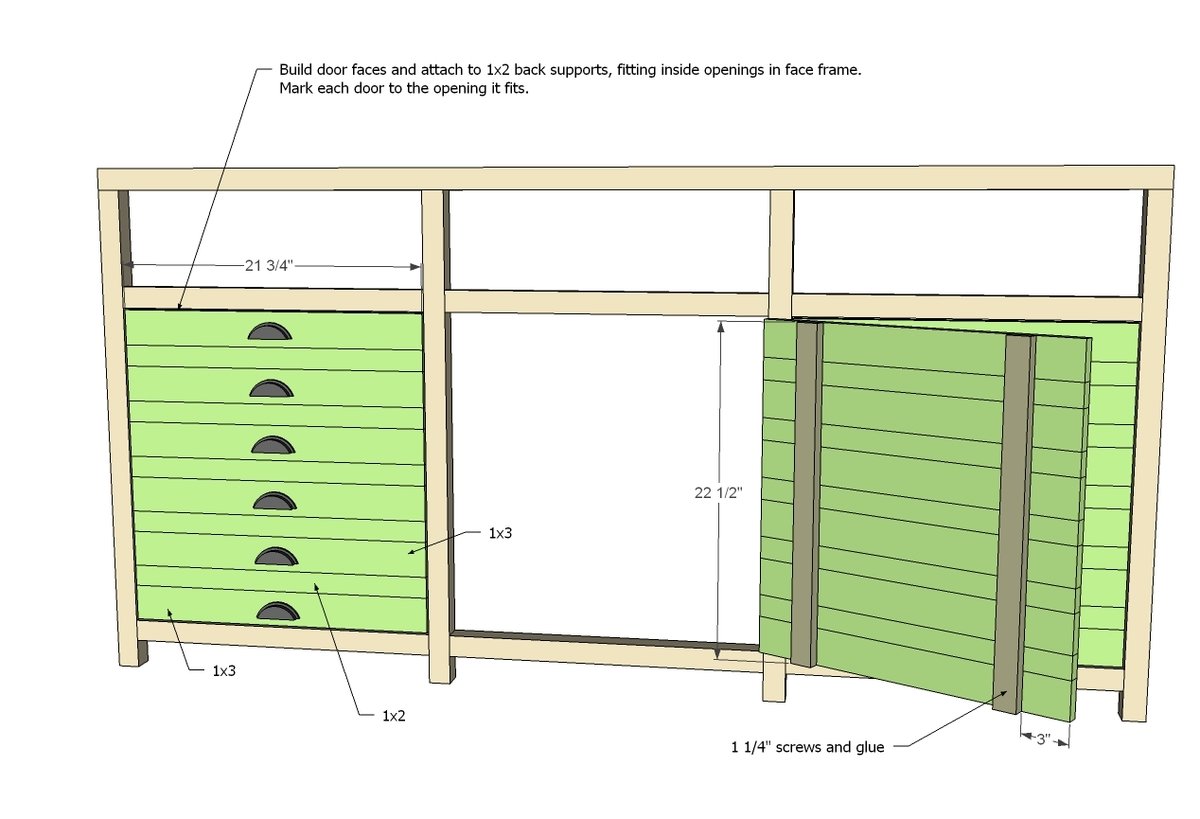
You'll want to build your doors now to fit the frame. Trust me on this one, lining up 11 boards and getting them all square is going to be a trick. Use the frame to help you build the door faces now. On second thought – I’d recommend a 1x3 here on the back but a 1x2 will do the trick. Just a little more to bite into. Once your doors are done, you can put aside. TIP: Test your drawer face boards for fit at this step too - everything is easier to do when your frame is laying flat down.
Step 4
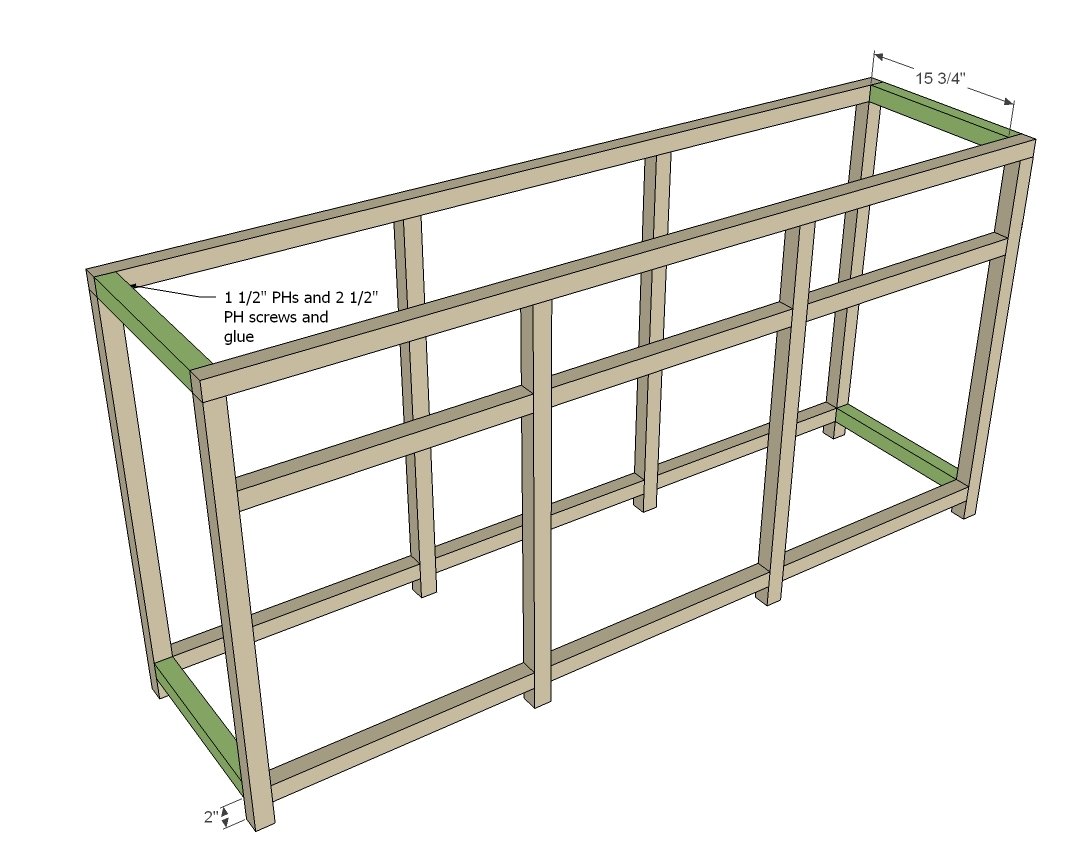
Now connect the two frames. Use glue and screws and check for square.
Step 5
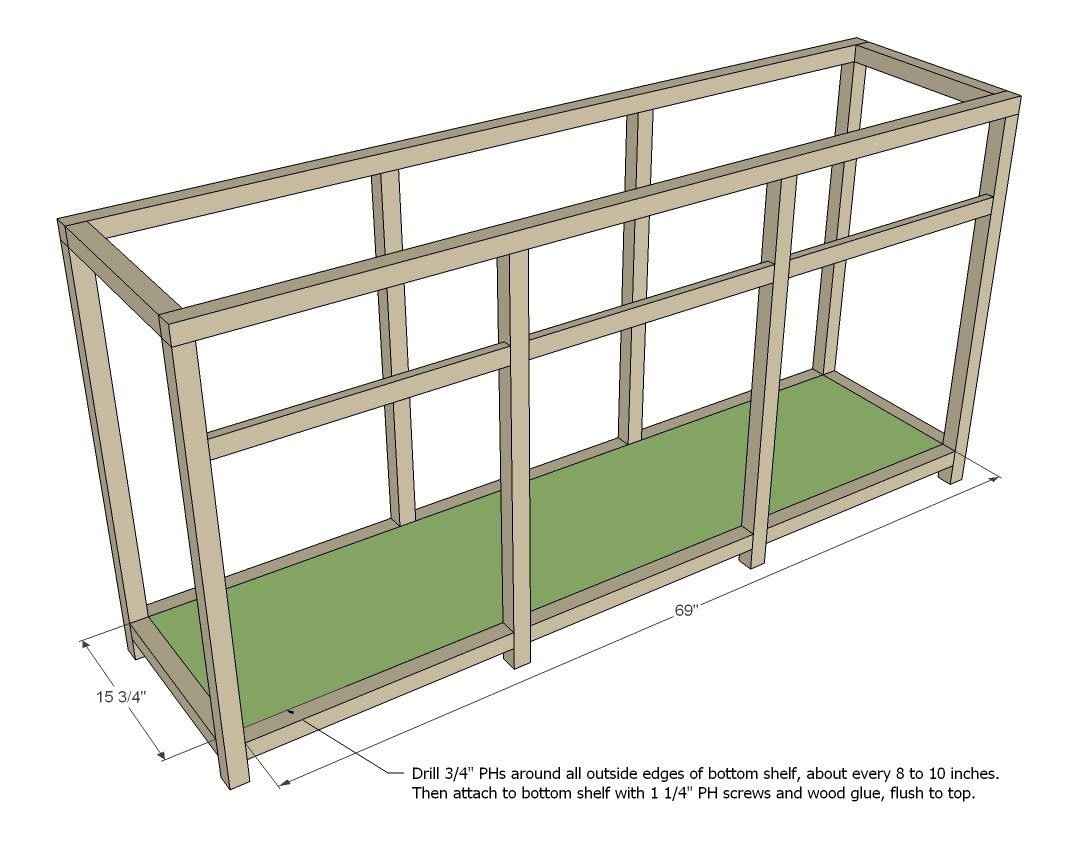
Step 6
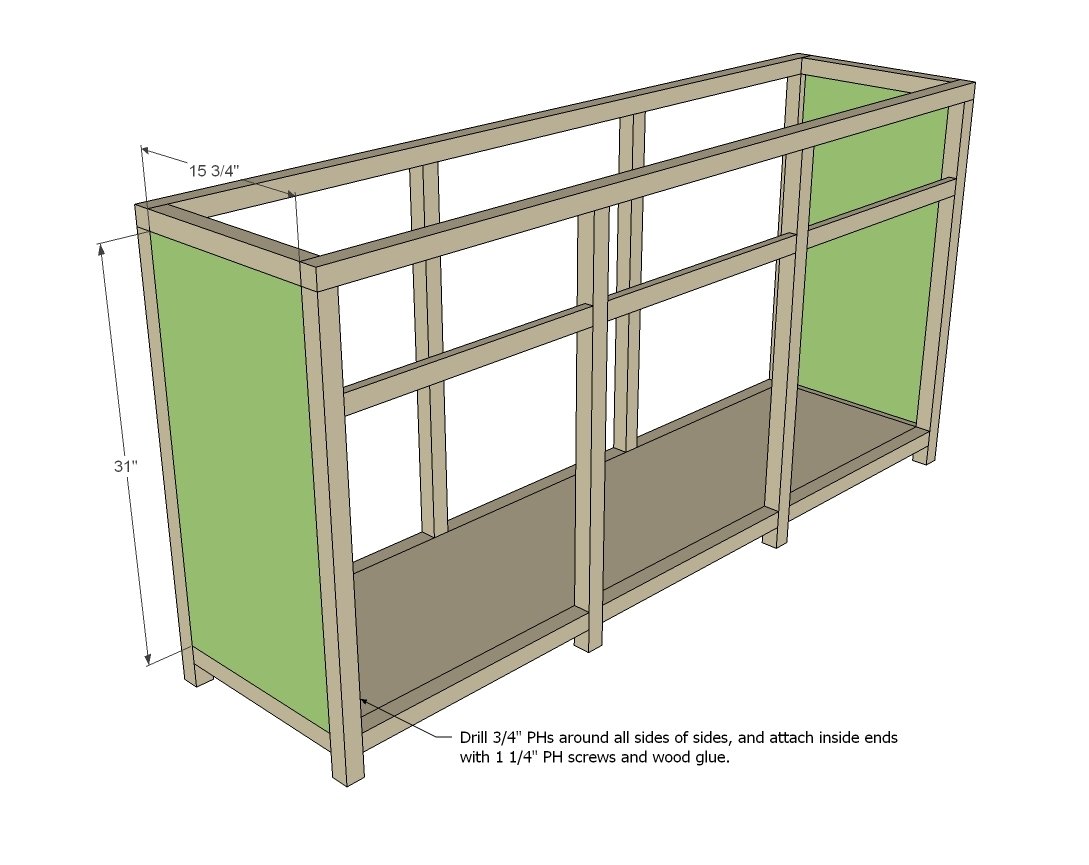
And then sides. Check everything for square here.
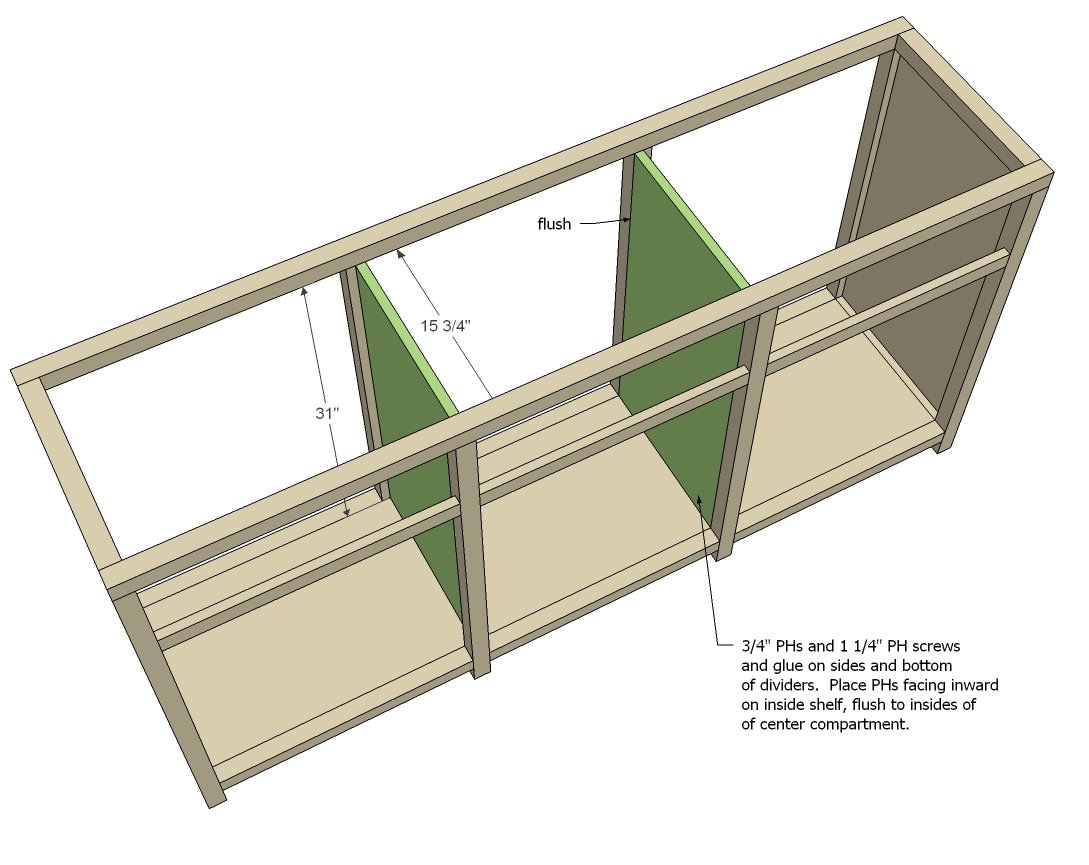
Step 7
And then add the dividers. Keep dividers flush to inside compartment.
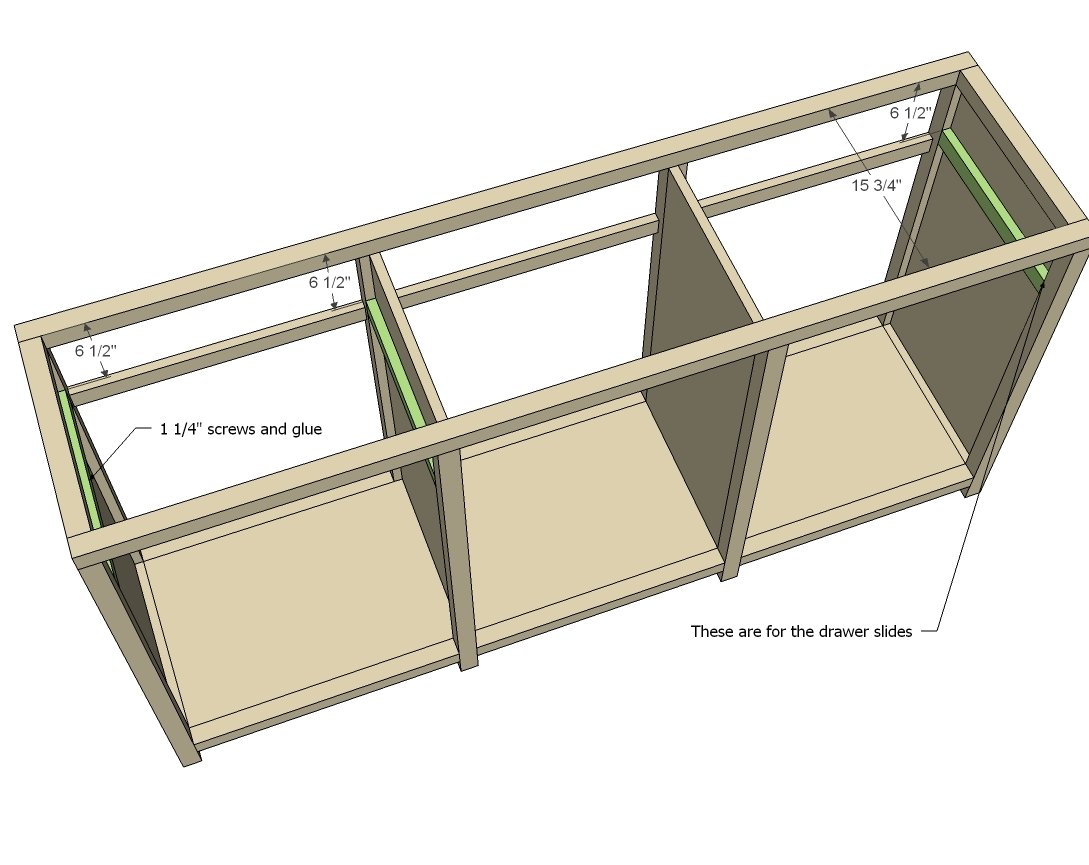
Step 8
These guys are for attaching your drawer slides to later on. They only go on the outer compartments, and are not needed on middle compartment.
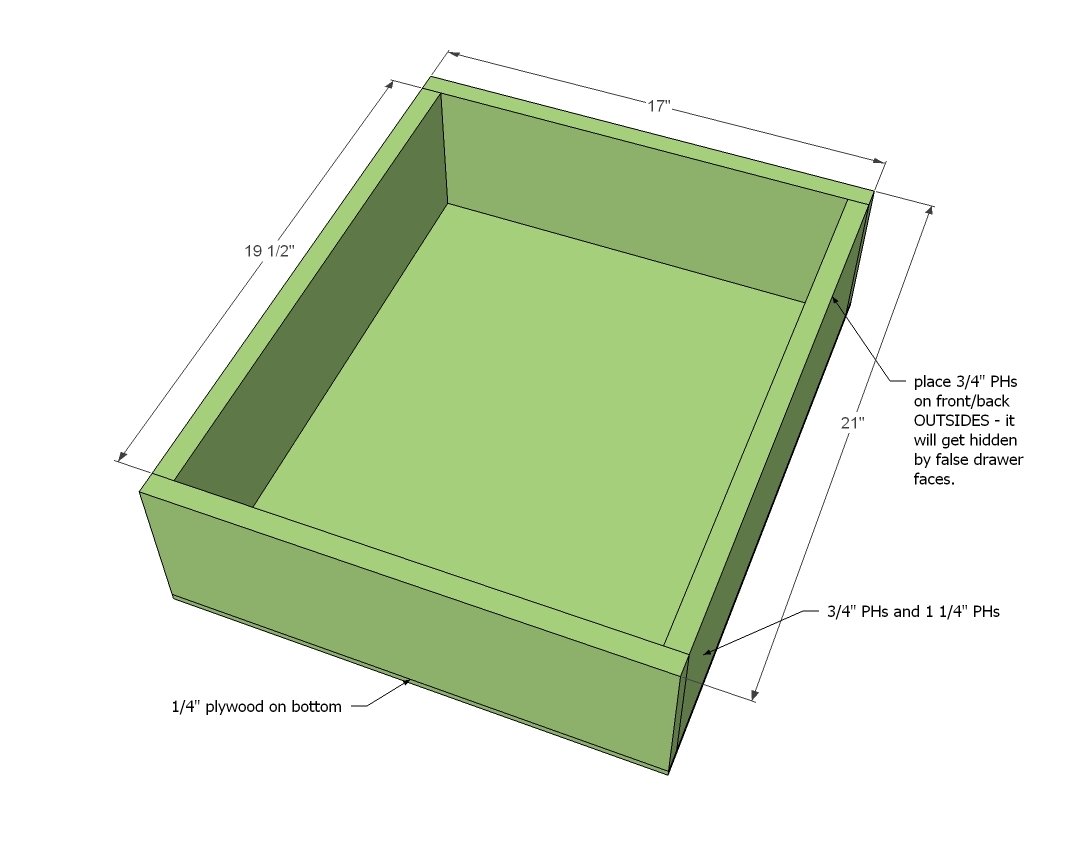
Step 9
You'll need to build three drawers. A note on drawers - build to suit the finished opening of your cabinet and your drawer slides. The measurements I give are for a perfect build with perfect boards for drawer slides that use 1/2" space. Build to suit your cabinet for best fit.
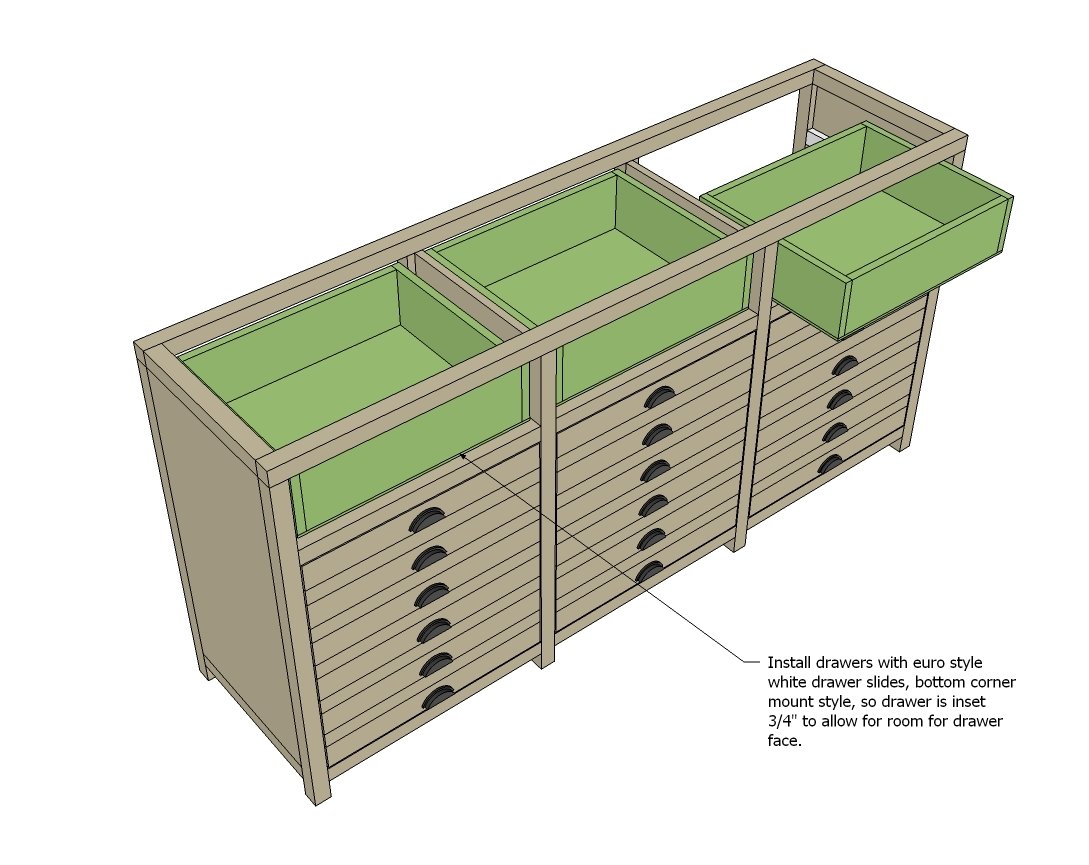
Step 10
Install the drawers so they are inset 3/4" on the front to allow for the drawer faces. They are nice deep drawers!
Step 11
And then attach the drawer faces to front. Keep an even 1/8" gap around all sides of drawer faces.
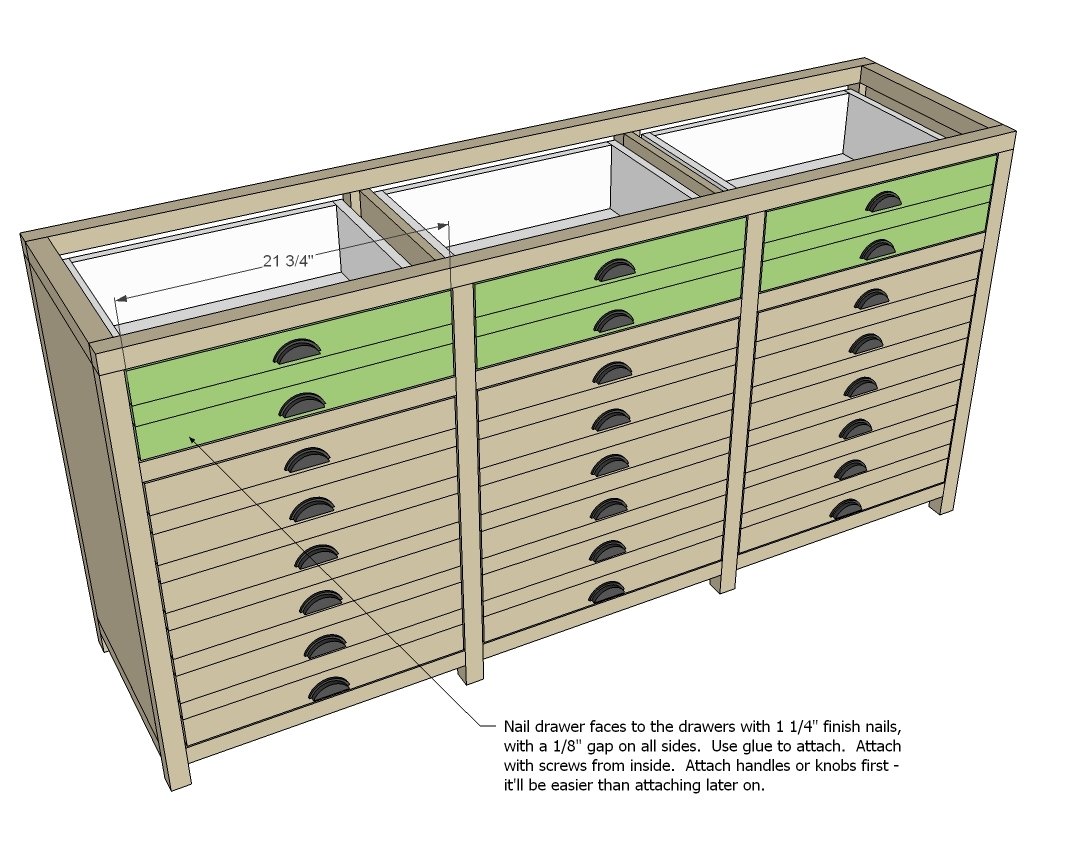
Step 12
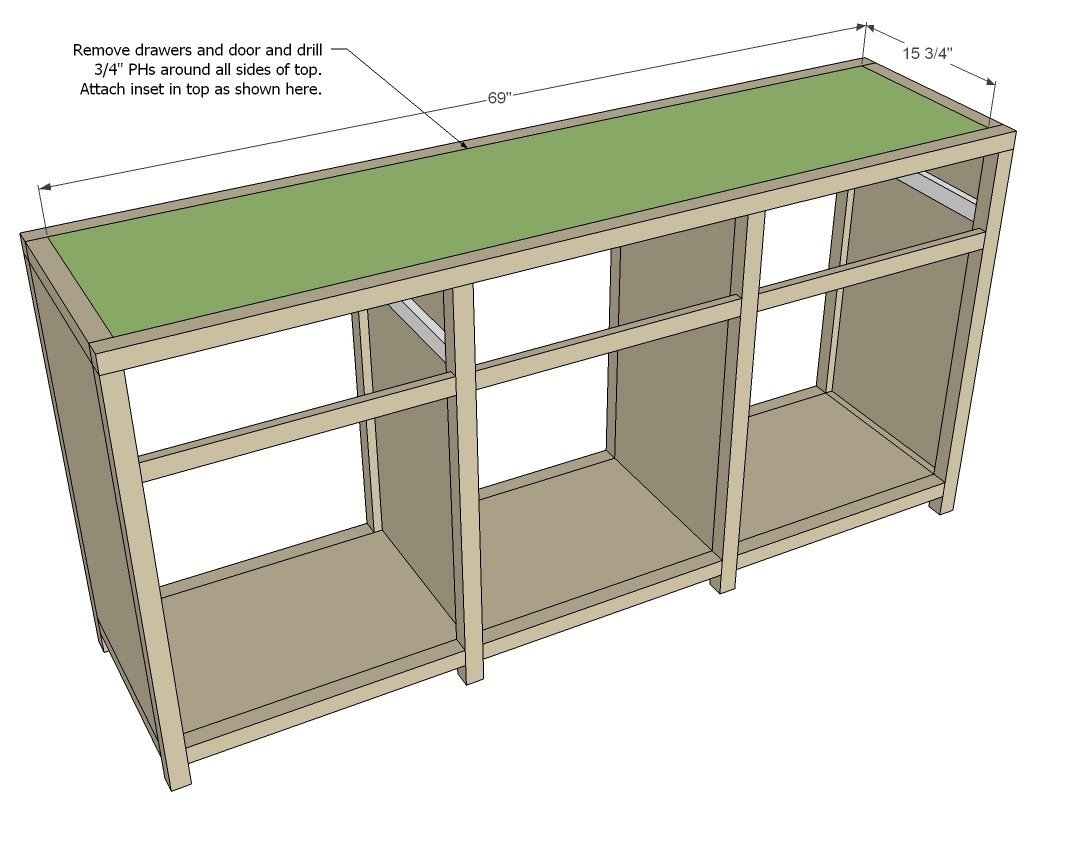
And finally add the top!
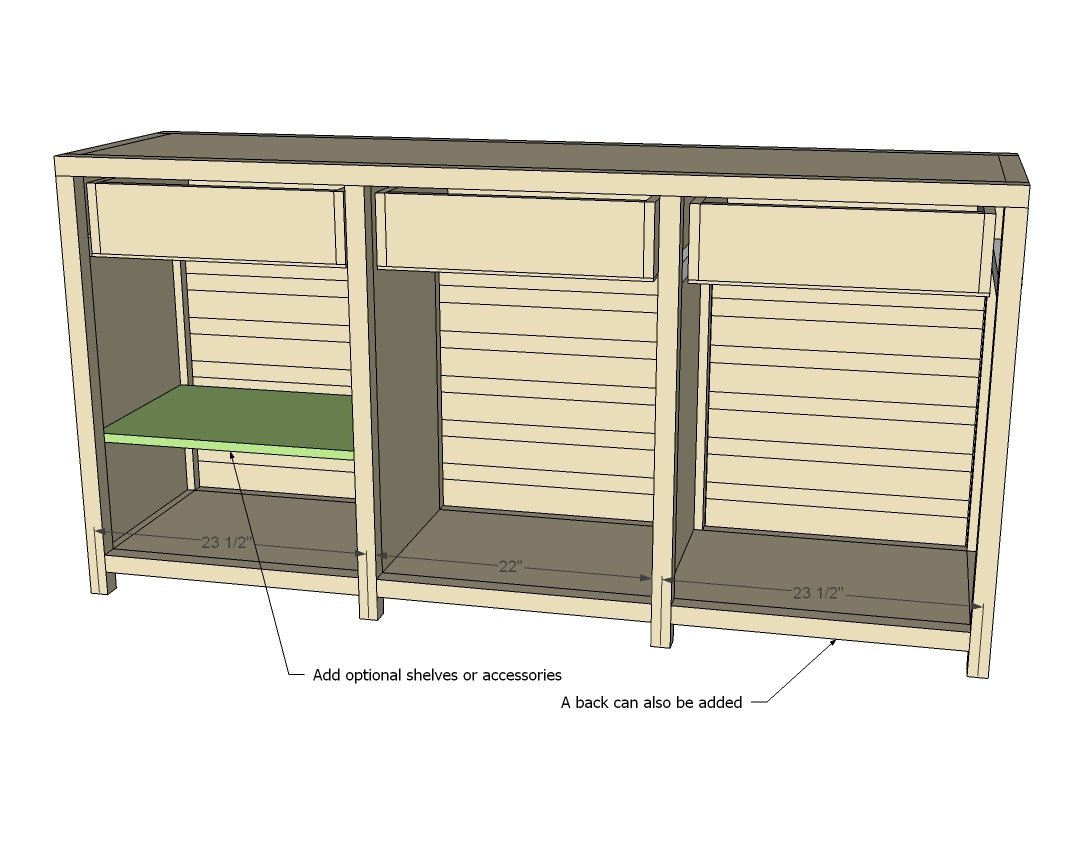
You can also add shelves, either fixed or with shelf pins.
And then if you want to put a back on, simply cut a piece of 1/4" plywood to the overall back size minus 1/2" and nail and glue on.
Finishing
Sand all surfaces, starting with a medium grit and finishing with fine. Wipe off the dust, fill any holes or gaps with wood filler, and sand smooth once dry. Apply primer if you're painting, then finish with your choice of paint or stain and seal with a durable clear topcoat. For outdoor projects, use exterior-rated primer, paint or stain, and sealer so the piece stands up to the weather.
Source (temporary): https://www.ana-white.com/woodworking-projects/printers-triple-console-cabinet