Puzzle Bookcase
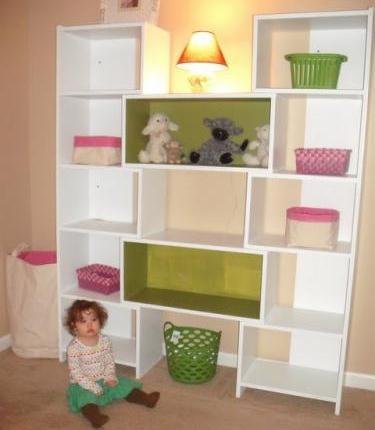
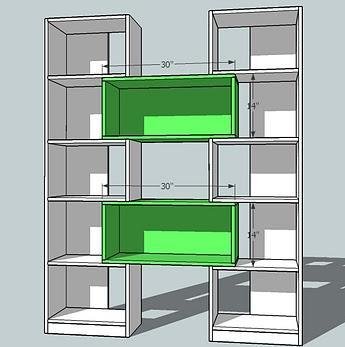
Fits in corners, expands to a wider or narrower width, and stores all in modern style. This clever bookcase is both functional and stylish. Special thanks to Abby for sharing her photo.
Specifications
| Project type | Bookshelf and Bookcase Plans |
|---|---|
| Room | Storage Solutions |
| Style | Modern Style Furniture Plans |
| Difficulty | Intermediate |
| Estimated cost | $100-$150 |
Dimensions
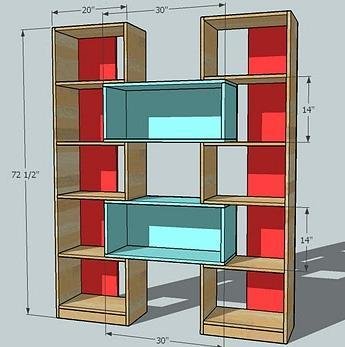
Use the size-specific shopping and cut lists below.
Shopping List
For 1 Side Bookcase, you will need 4 – 1×12 boards, 8′ long
1 – 1×3 scrap
For 1 Cubby, you will need
1 – 1×12 board, 8′ long
1 – 3/4″ MDF or Hardwood Plywood at least 30″ x 14″
Cut List
Cut List for 1 Side Bookcase for the Puzzle Bookcase 6 – 1×12 @ 18 1/2″ (Shelves)
2 – 1×12 @ 72 1/2″ (Side and Back)
1 – 1×12 @ 16 1/2″ (Bottom Cubby Side)
2 – 1×12 @ 14″ (Upper Cubby Sides)
1 – 1×3 @ 18 1/2″ (Footer)
Cut List for 1 Cubby for the Puzzle Bookcase
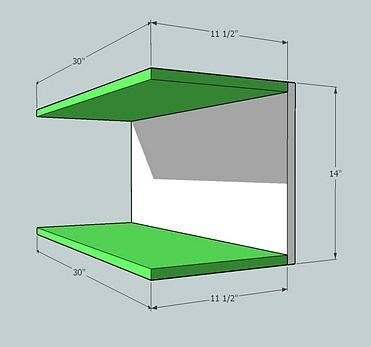
1 - 3/4″ MDF or Hardwood Plywood @ 30″ x 14″ (Backs of Cubbies)
2 – 1×12 @ 30″ (Tops and Bottoms of Cubbies)
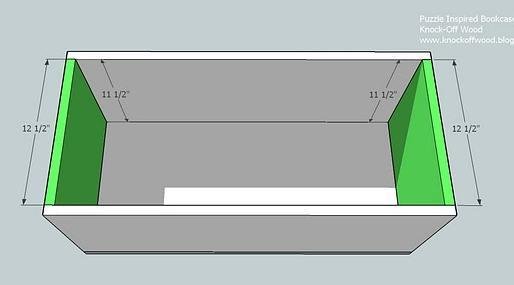
2 – 1×12 @ 12 1/2″ (Sides of Cubbies)
Tools
- measuring tape
- square
- pencil
- safety glasses
- hearing protection
- kreg-jig
- drill
- circular saw
- sander
Step-by-step Instructions
Step 1
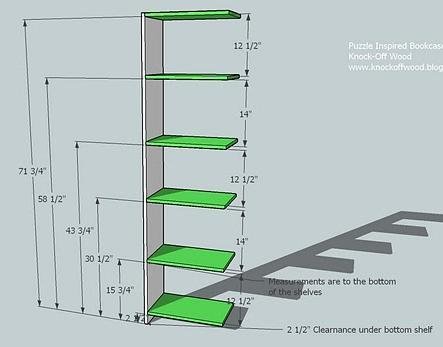
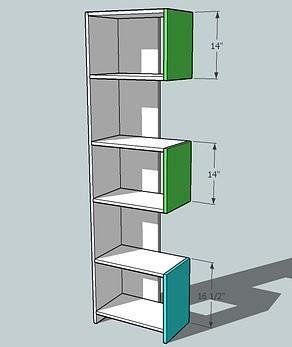
Shelves and Side of Bookshelf. Fasten the shelves to the sides of the bookcase as shown above. The measurements shown are from the bottom of the bookcase to the bottom of the shelves. There is a 2 1/2″ clearance under the bottom shelf.
Step 2
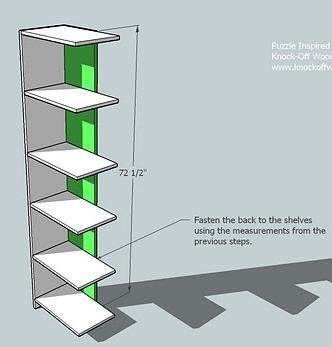
Back. Fasten the back to the back of the shelves and sides, keeping the back outside corner flush with the back edge of the sides. You will nail through the back into the back edge of the sides and shelves. Make sure your shelves are properly lined up using the meausrements from step 1.
Step 3
Cubby Sides. Attach the cubby sides as shown above. Keep outside edges flush. The bottom cubby side will reach the bottom of the bookcase.
Step 4
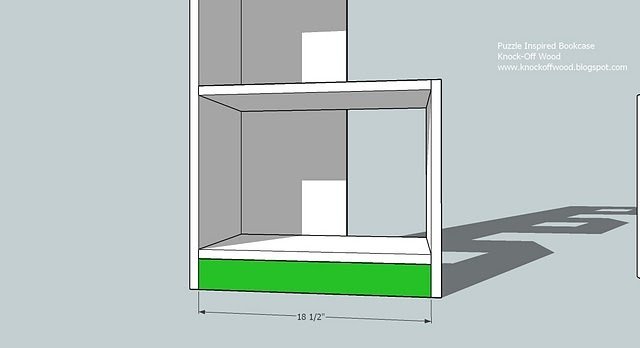
Footer. Fasten the footer in place, as shown above.
Step 5
Step 6
Sides of Cubby. Fasten the sides of the cubby in place, as shown above. Keep outside edges flush.
Step 7
Assmebly. If you are adding the cubbies, make sure you use 1 1/4″ screws to fasten the cubbies to the side bookcases. Also, you may wish to fasten the bookcase to the wall to prevent tipping.
Finishing
Sand all surfaces, starting with a medium grit and finishing with fine. Wipe off the dust, fill any holes or gaps with wood filler, and sand smooth once dry. Apply primer if you're painting, then finish with your choice of paint or stain and seal with a durable clear topcoat. For outdoor projects, use exterior-rated primer, paint or stain, and sealer so the piece stands up to the weather.
Source (temporary): https://www.ana-white.com/woodworking-projects/puzzle-bookcase