Raised Farmhouse Toy & Blanket Bin
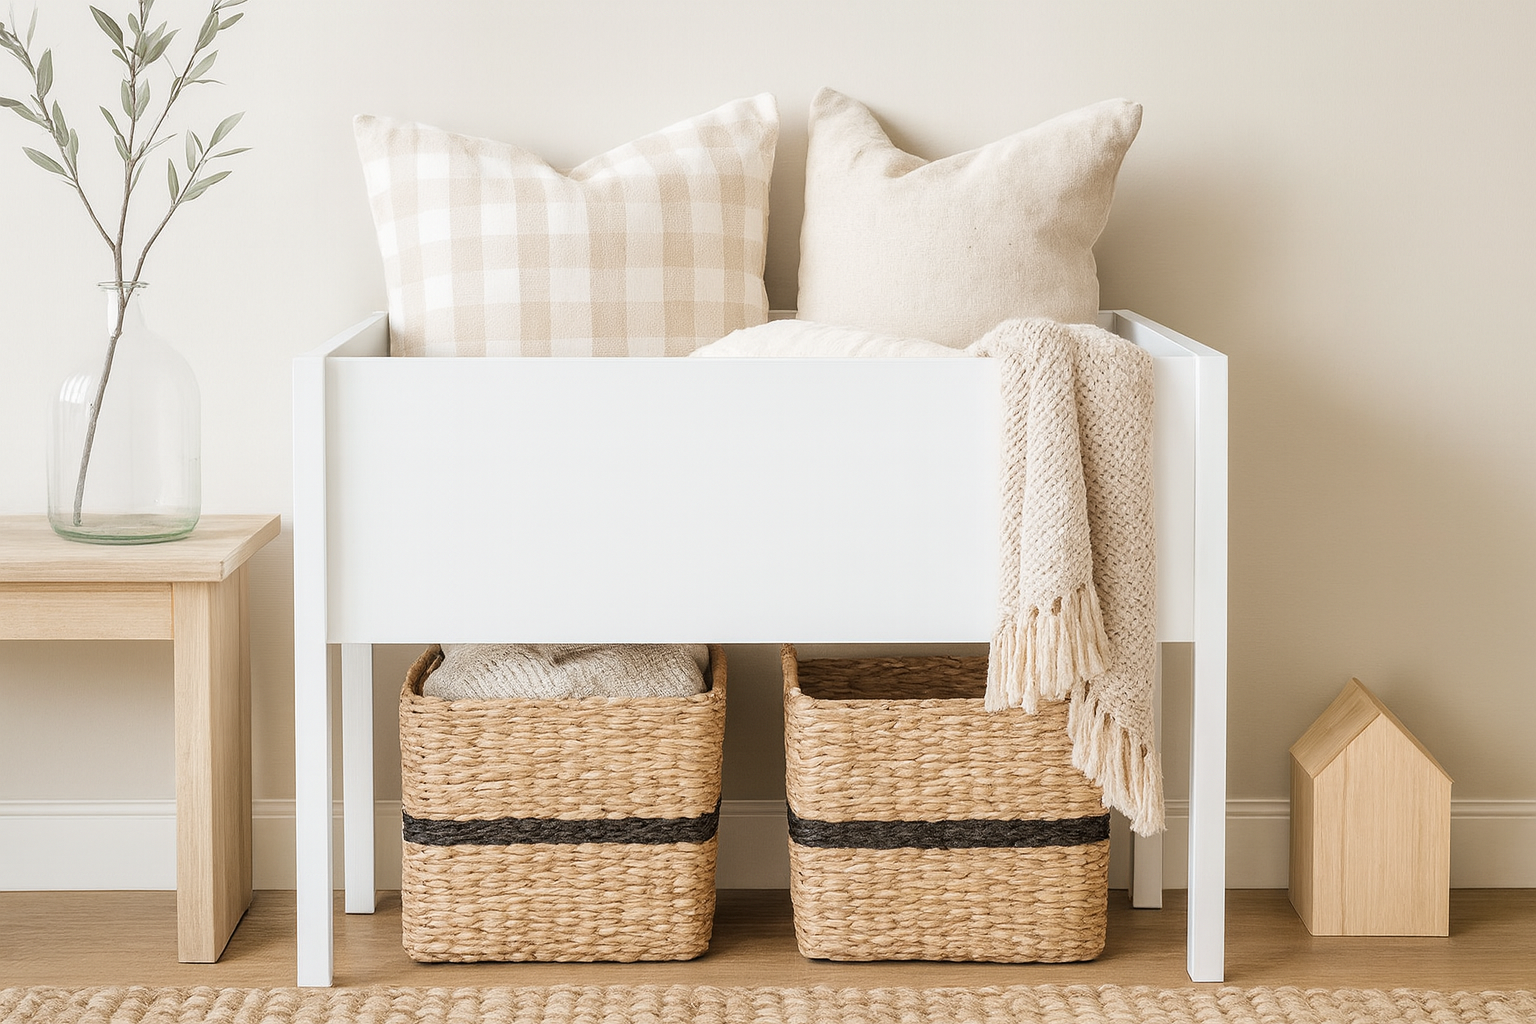
This charming raised storage bin combines style and functionality in a compact, kid-friendly design. Built from solid wood and finished in crisp white, it features clean lines, squared legs, and an open base that perfectly fits two or three standard baskets. The spacious top bin is ideal for storing blankets, pillows, or toys, making it a versatile piece for playrooms, entryways, or bedrooms. Designed with a modern farmhouse aesthetic, this piece brings warmth and organization to any space with its neutral palette and natural textures. Included Downloadable, beginner-friendly plans are available and include full cut lists, simple joinery steps, and a visual build diagram. Whether you're a first-time builder or a seasoned woodworker, these easy-to-follow instructions make it simple to recreate this beautiful and functional piece at home. Product Highlights: – Raised wood frame with open base for baskets – Spacious top compartment for soft storage – Finished in white for a clean farmhouse look – with step-by-step instructions Perfect for family spaces that need both beauty and utility.
Specifications
| Project type | Toys |
|---|---|
| Room | Kids and Toys |
| Style | Children's and Kid's Room Furniture and Toy Plans |
| Difficulty | Beginner Projects |
| Estimated cost | $20 - $50 |
Dimensions
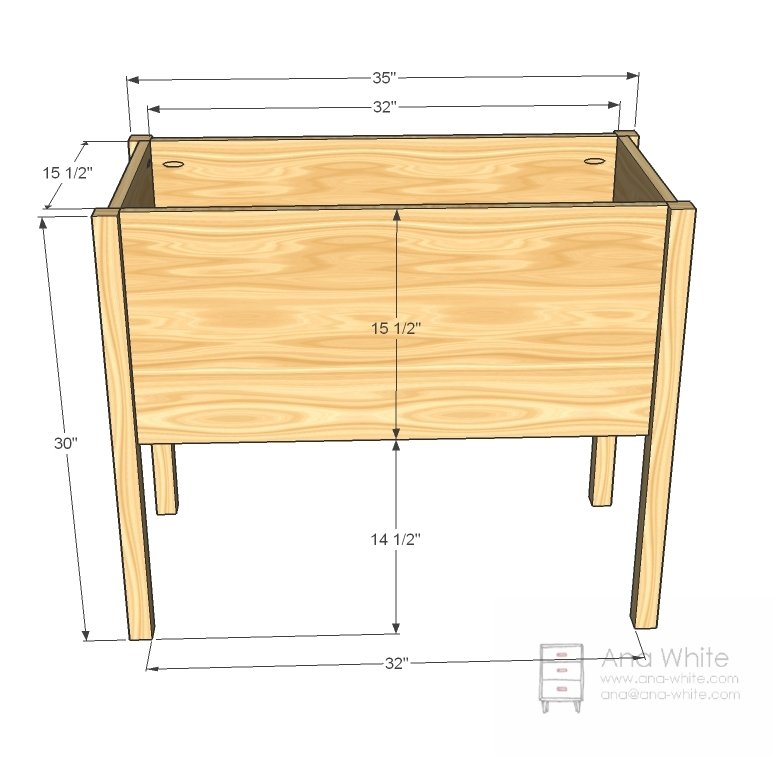
Use the size-specific shopping and cut lists below.
Shopping List
- 1/2 sheet of 3/4″ Plywood or MDF (I used MDF) cut into 15 1/2″ wide strips, 4 feet long (referred to as 1x16s) see diagram.
- 2 – 2x2s, 8 feet long
- 30 – 1 1/4″ pocket hole screws ) OR 2-1/2″ self tapping wood screws
- wood glue
Cut List
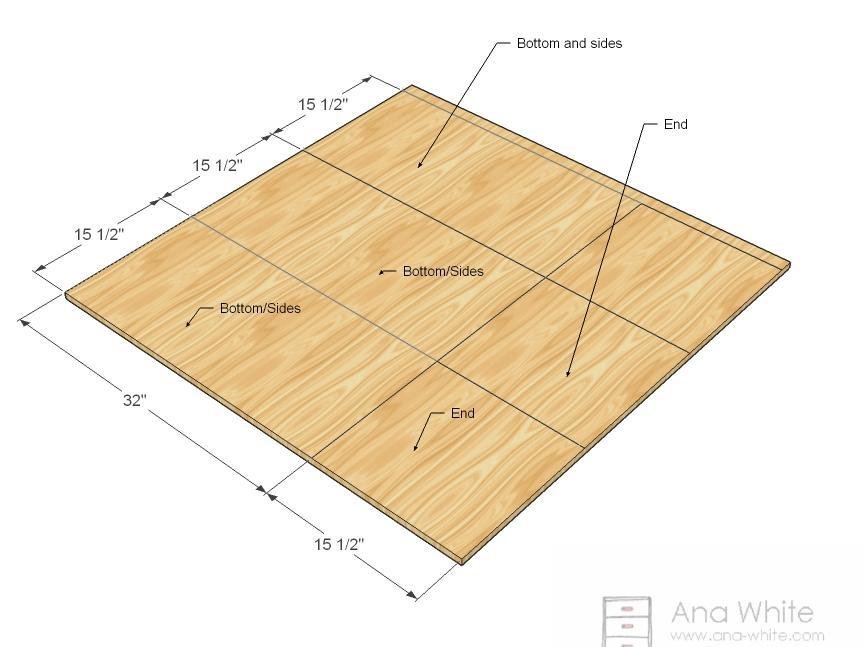
- 3 – 3/4" plywood @ 15-1/2" x 32″ (Sides and Bottom) - cut first from the 15-1/2" wide plywood strips
- 2 – 1×16 @ 15 1/2″ x 15-1/2" (Sides) - cut from leftovers
- 4 – 2×2 @ 32″ (Legs)
Tools
- measuring tape
- square
- pencil
- safety glasses
- hearing protection
- kreg-jig
- drill
- circular saw
- jigsaw
- sander
- countersink drill bit
Step-by-step Instructions
Step 1
Cutting If you plan carefully, as shown above, it will all fit on one sheet of plywood. Remember, you cannot mark all the cuts then cut as the saw blade takes up space too. Mark, cut, mark and so on. I highly recommend having your home improvement store at least ripping the plywood into easy to manage (and haul in your car) 15 1/2″ wide strips, 4 feet long. Then when you get home, all you have to do is make a few easy straight cuts.
Step 2
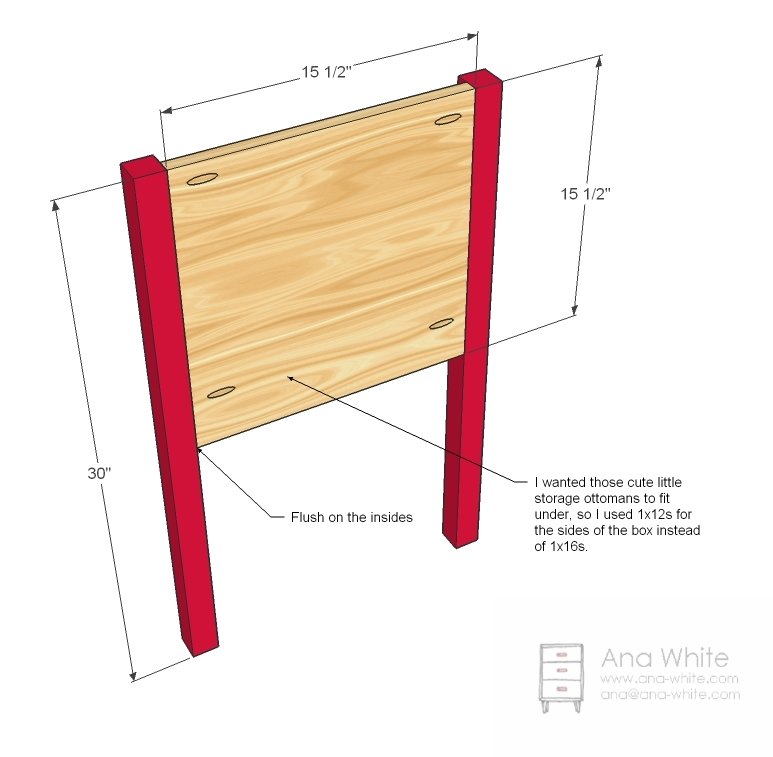
Ends Drill all pocket hole sin all of the boards, as pictured in all of the diagrams. Then attach the legs to the ends as shown above. Use glue. You can alternately use 2″ wood screws and glue, just make sure you predrill all holes first with a countersink bit.
Step 3
Box Now attach the sides to the bottom as shown above. Use glue. Again, you can use 2″ screws and glue to joint the sides to the bottom, just make sure you also use a countersink bit. Also, if you are working with MDF and are screwing into the edges, make sure you predrill the entire distance of the screw shaft and use DRYWALL screws, as regular wood screws have a tapered shaft and in my experience, cause the MDF to basically blow apart. Drywall screws have a straight shaft.
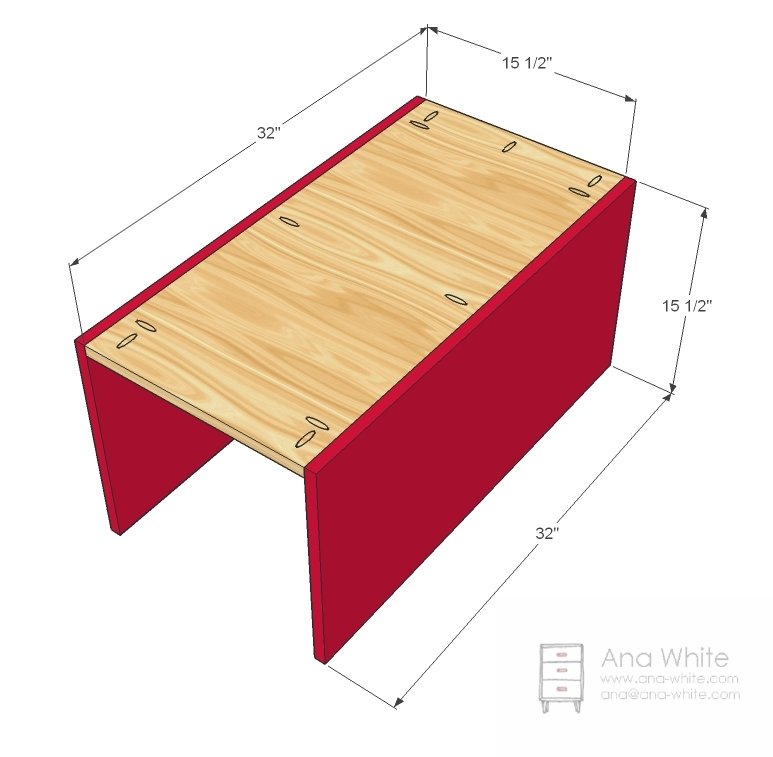
Step 4
Ends Now attach the box to the ends as shown above through the pocket holes in the bottom. Use glue. You can also attach with 2″ screws and glue, remember about the drywall screws and countersinking.
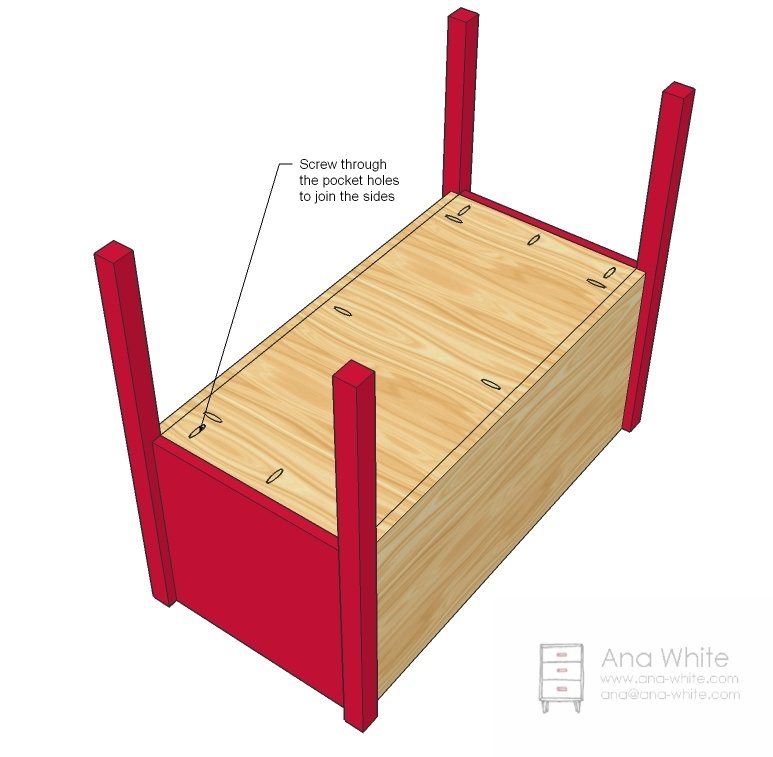
Step 5
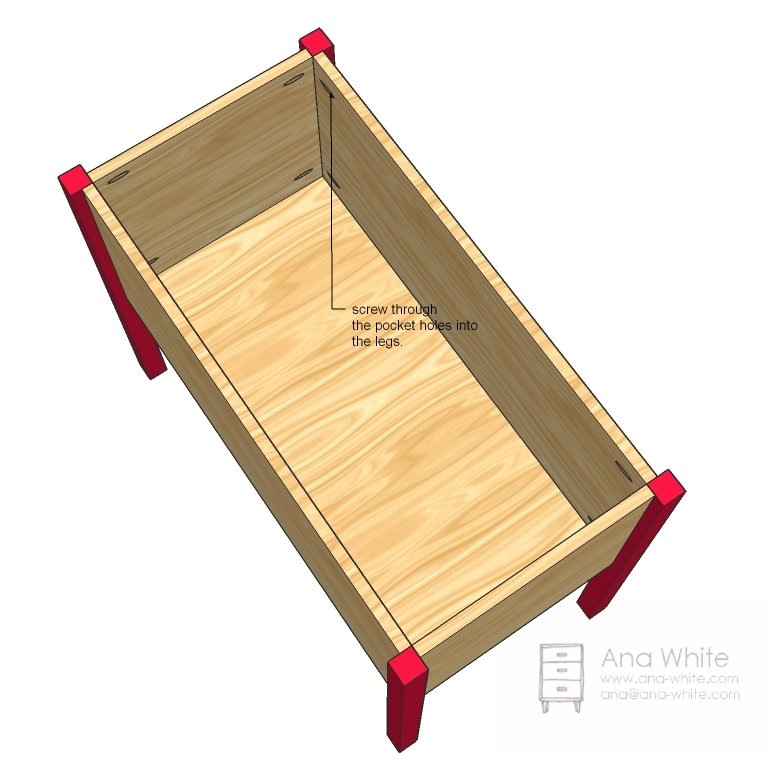
Finishing
Sand all surfaces, starting with a medium grit and finishing with fine. Wipe off the dust, fill any holes or gaps with wood filler, and sand smooth once dry. Apply primer if you're painting, then finish with your choice of paint or stain and seal with a durable clear topcoat. For outdoor projects, use exterior-rated primer, paint or stain, and sealer so the piece stands up to the weather.
Source (temporary): https://www.ana-white.com/woodworking-projects/raised-farmhouse-toy-blanket-bin-free-plans