Rustic X Farmhouse Dining Table
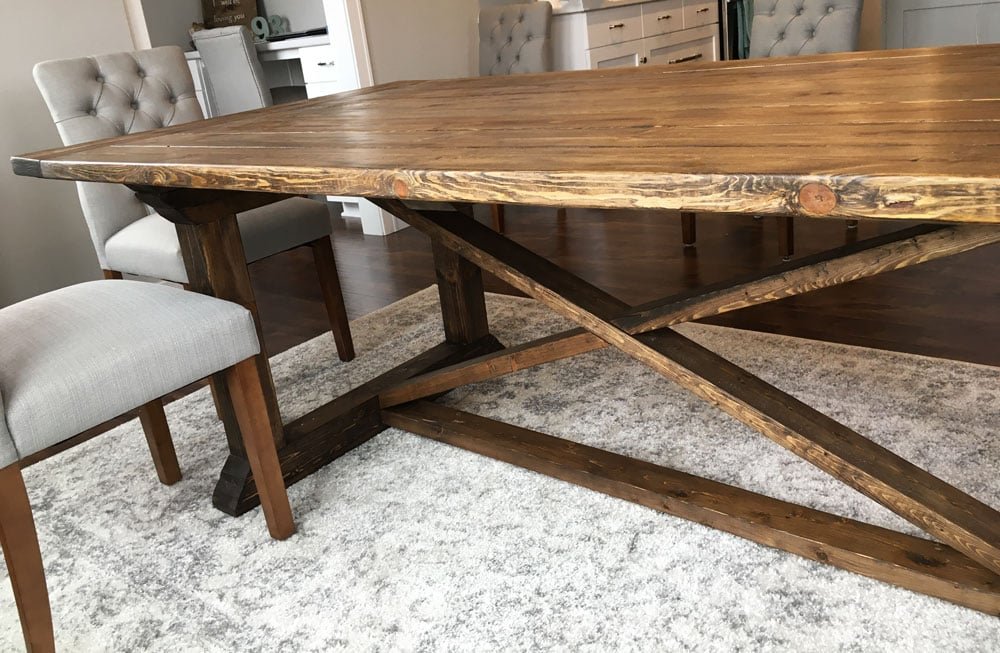
Build your own farmhouse table! We love this slightly more formal version with the curved leg pedestals, and the X base. include step by step diagrams, shopping list and cut list. We recommend this bench plan (adjust length to suit) with this table.
Specifications
| Project type | Dining Table Plans |
|---|---|
| Room | dining room |
| Style | Farmhouse Furniture |
| Difficulty | Intermediate |
Dimensions
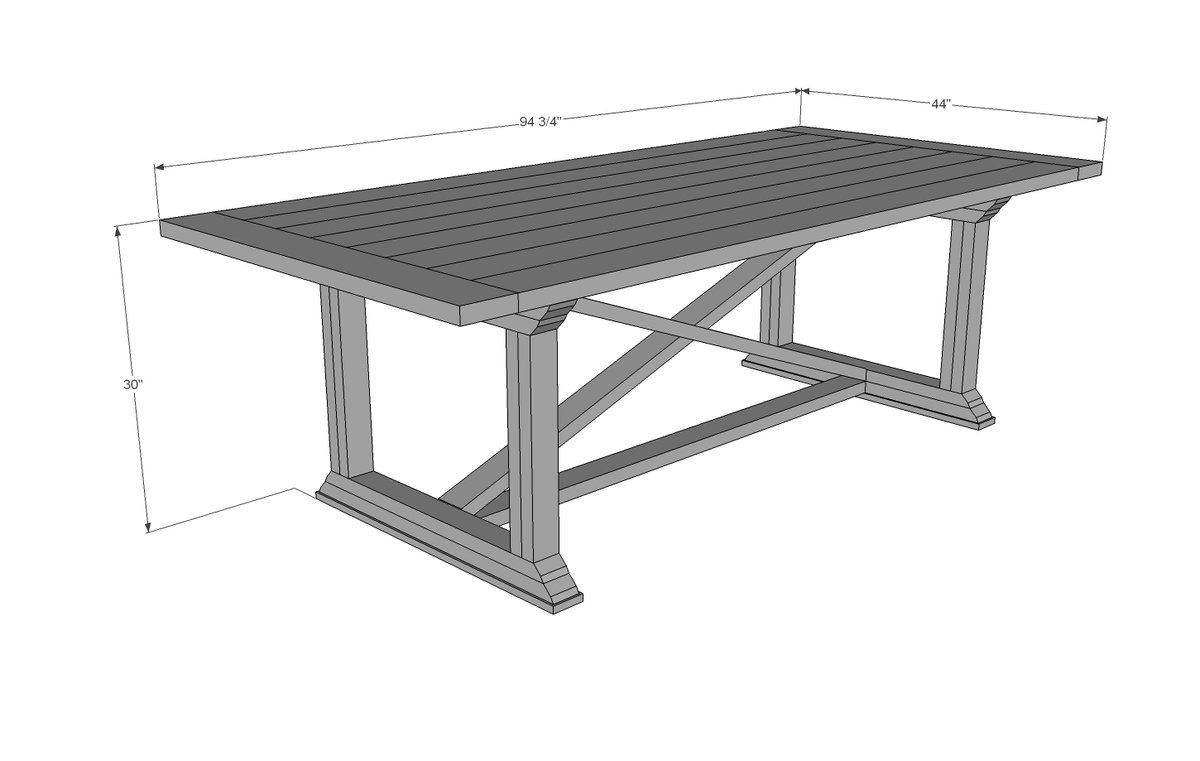
Use the size-specific shopping and cut lists below.
Shopping List
9 - 2 x 6 x 8'
9 - 2 x 4 x 8'
1 - 1 x 4 x 8'
Cut List
- 8 - 2x6 @ 83 1/2" (tabletop boards) - use this measurement, not the measurement in the diagram
- 2 - 2x6 @ 44" (breadboard ends) - CUT TO FIT!!!
- 3 - 2x4 @ 38" (long point to long point, ends cut at 30 degrees off square, ends are NOT parallel)
- 4 - 2x4 @ 35 1/2" (long point to long point, ends cut at 30 degrees off square, ends are NOT parallel)
- 4 - 2x4 @ 33" (long point to long point, ends cut at 30 degrees off square, ends are NOT parallel)
- 8 - 2x4 @ 20 1/4"
- 2 - 1x4 @ 36"
- 1 - 2x4 @ 64"
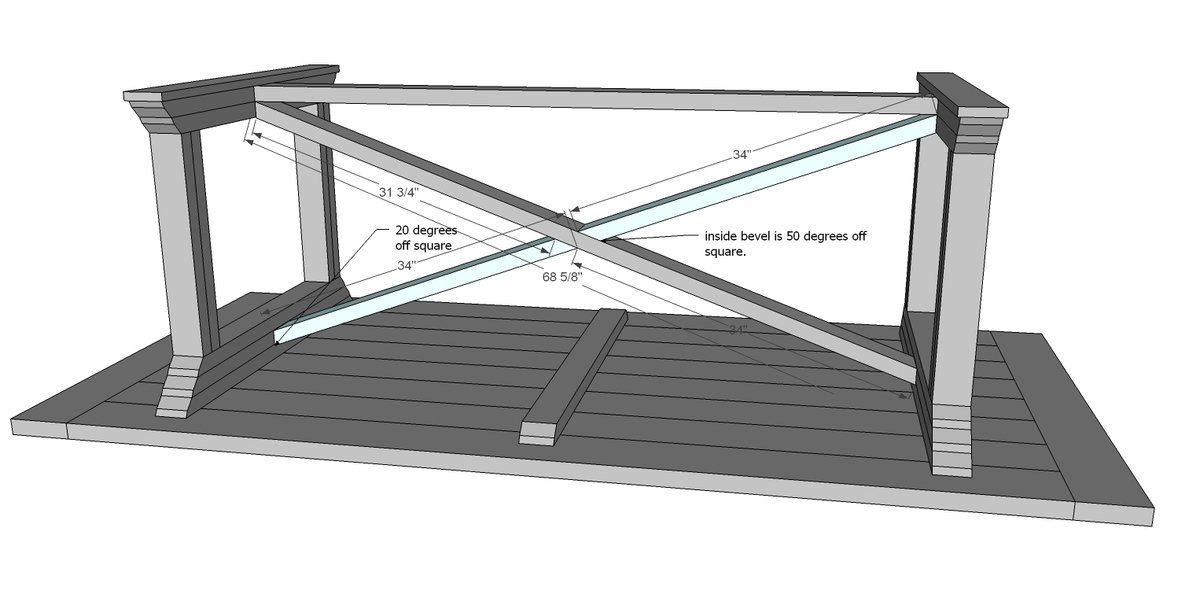
- 1 - 2x4 or 2x2 @ 68 5/8" (long point to short point, both ends cut PARALLEL at 20 degrees off square)
- 2 - 2x4 or 2x2 @ 34" (longest point measurement, both ends cut INWARD from measurement, one at 50 degrees off square and one at 20 degrees off square)
Tools
- measuring tape
- square
- pencil
- safety glasses
- hearing protection
- kreg-jig
- drill
- compound miter saw
- table saw
- nailer
- sander
- countersink drill bit
Step-by-step Instructions
Step 1
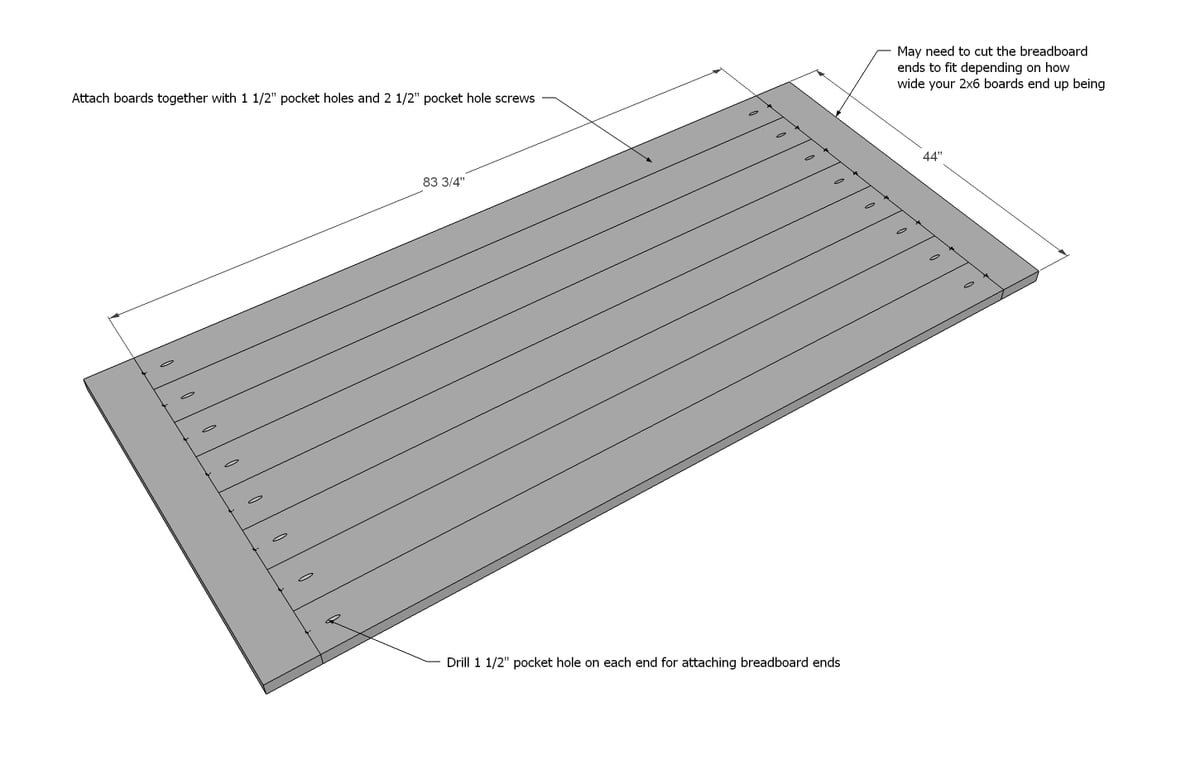
Build your tabletop first with 1 1/2" pocket holes and 2 1/2" pocket hole screws. A trick I do is build the tabletop without breadboard ends first. Then I take a circular saw (using a clamped board as a guide) and run it down the end edges to make sure all my boards are exactly the same length. Then I measure and cut the breadboard end to fit and attach it. For a smoother tabletop, try using tongue and groove for the tabletop boards.
Step 2
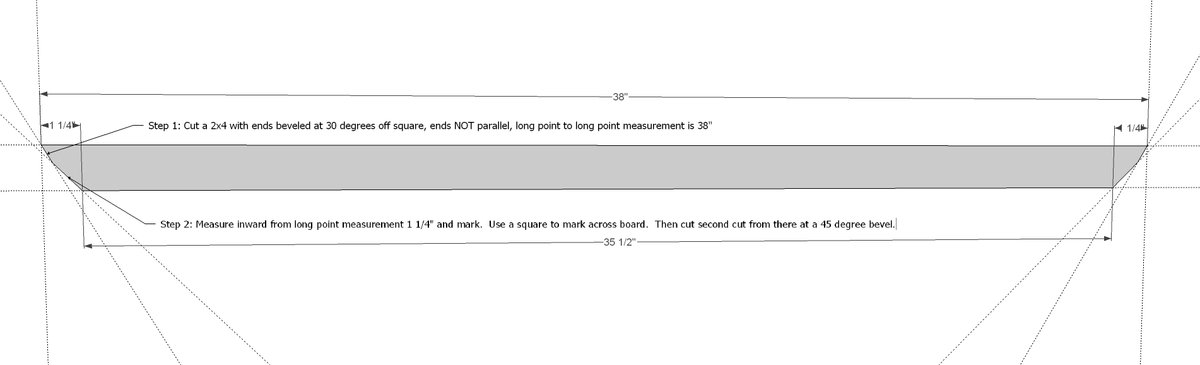
This is the pattern for cutting the curved edge boards. Once you get one end cut right, use it as a pattern for cutting the rest.
Step 3
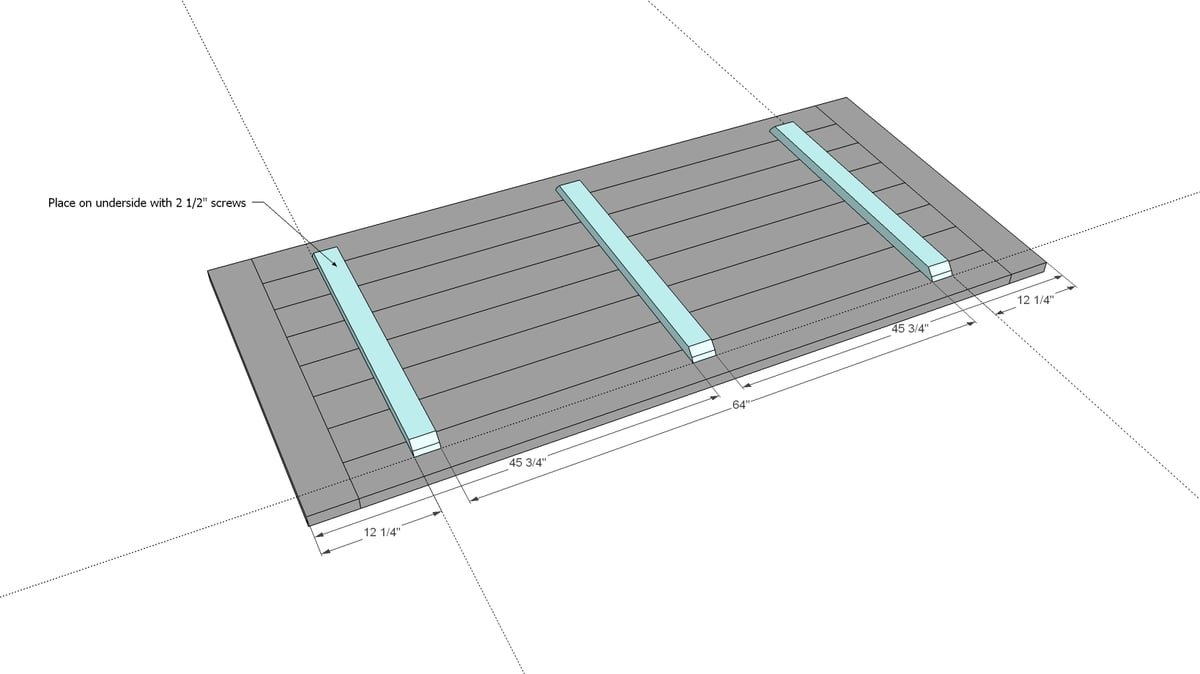
Attach the three longest curved end boards to underside of tabletop.
Step 4
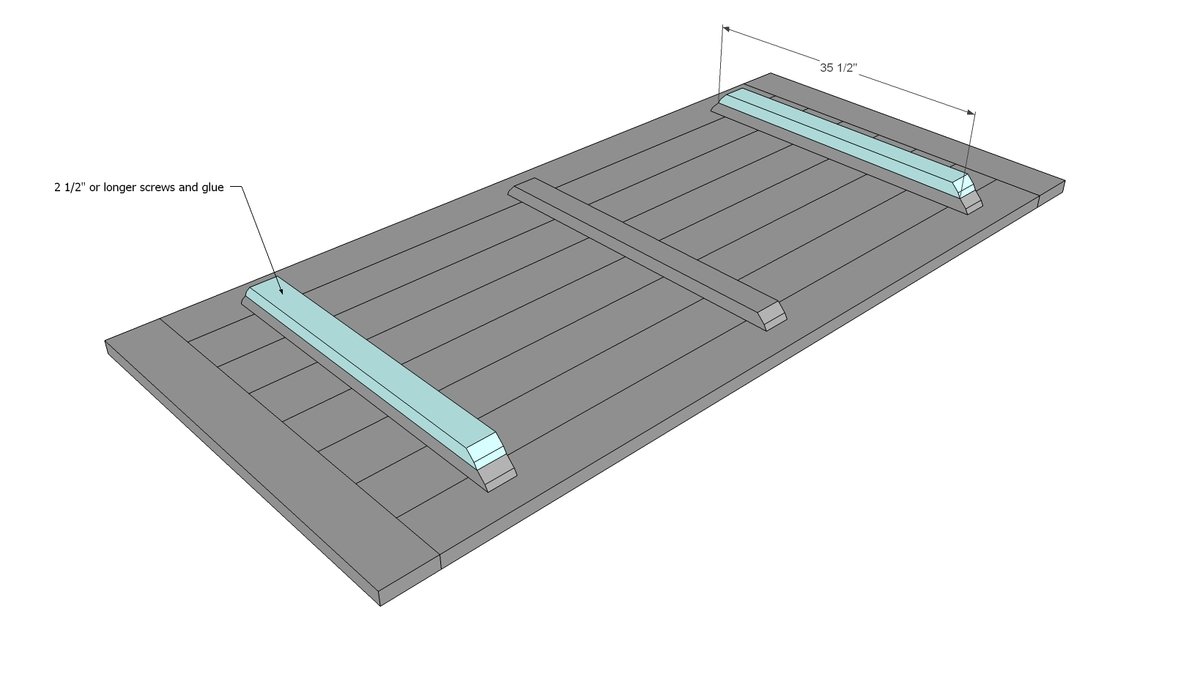
Then stack the next row on top. You can hide screws here if you are using screws, just make sure they are countersunk.
Step 5
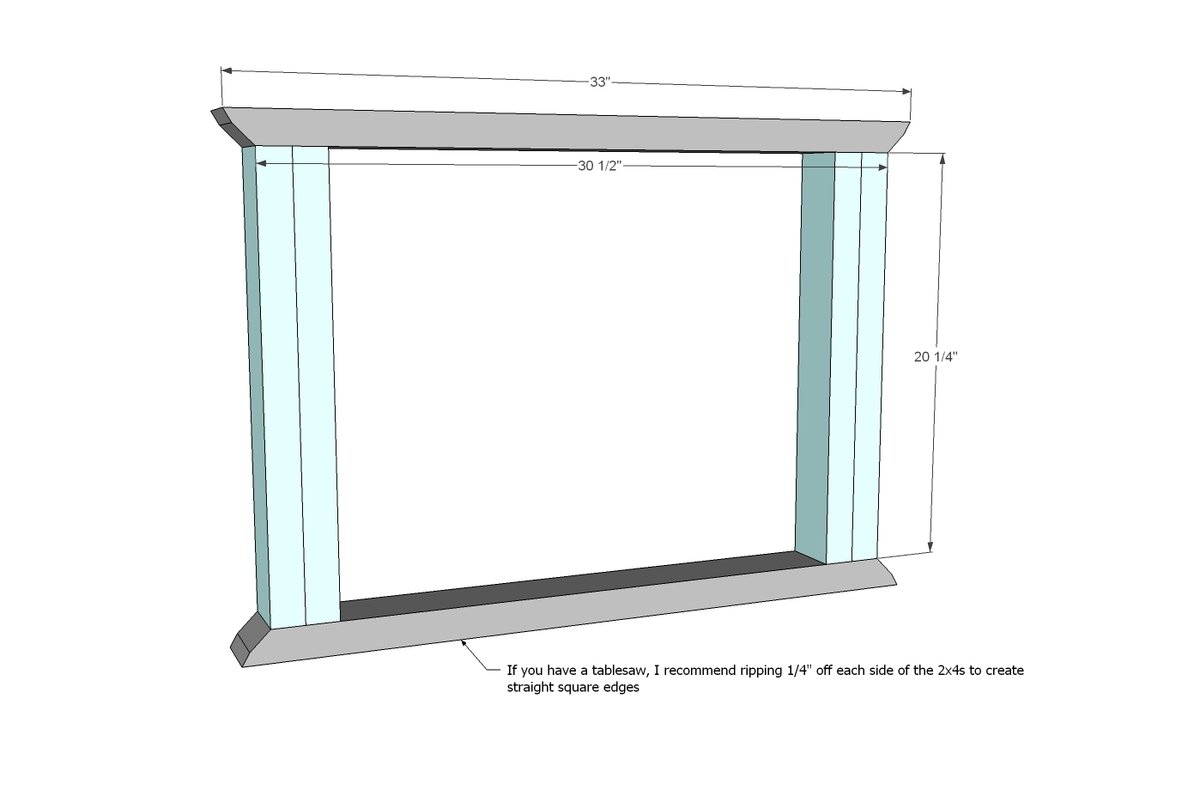
Step 6
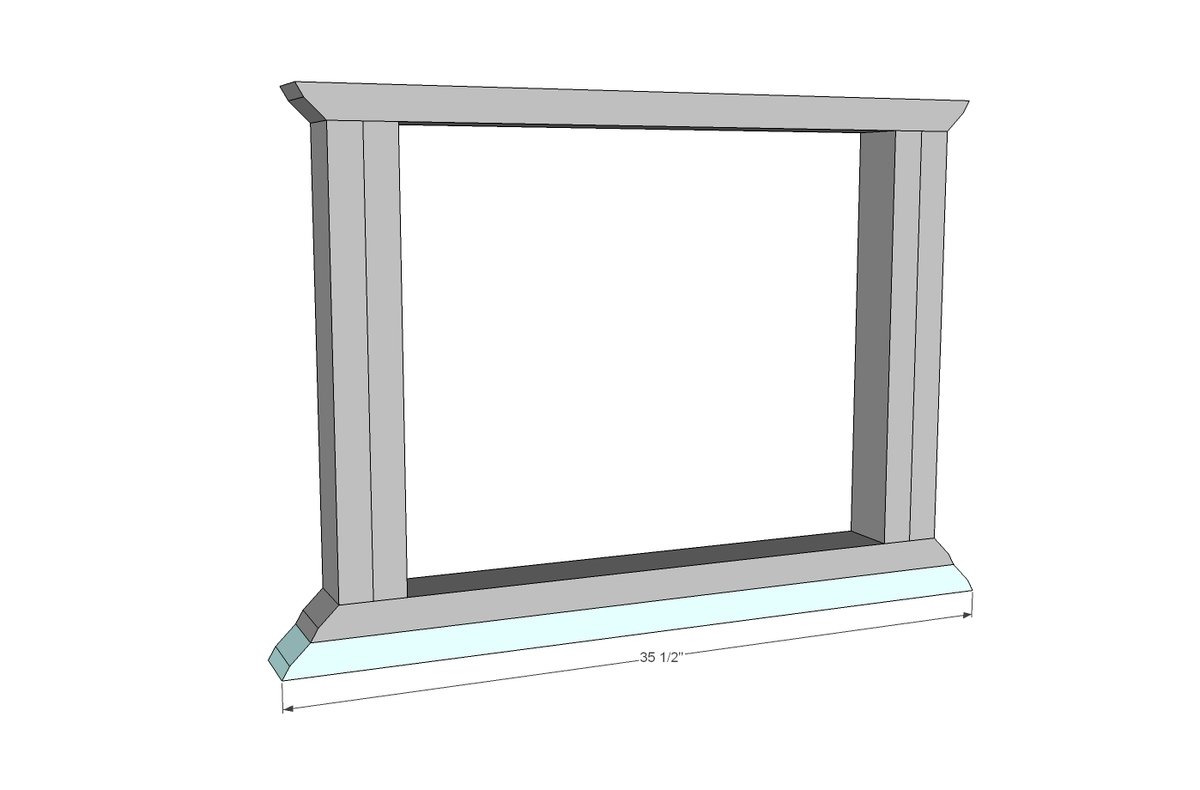
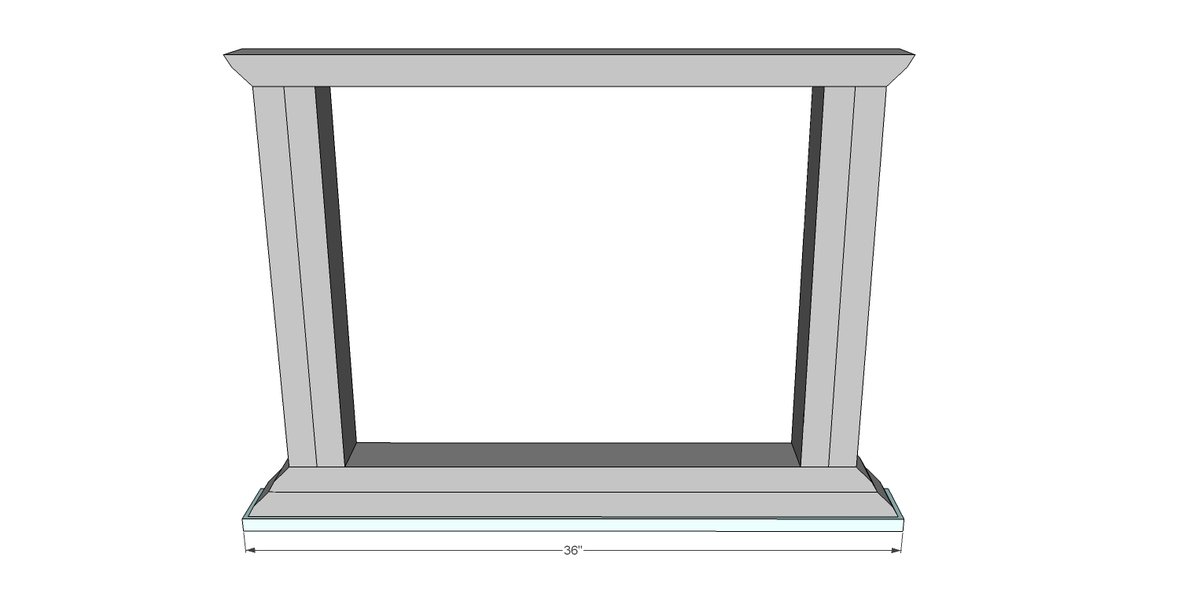
Add the second base to the leg set.
Step 7
And then the foot.
Step 8
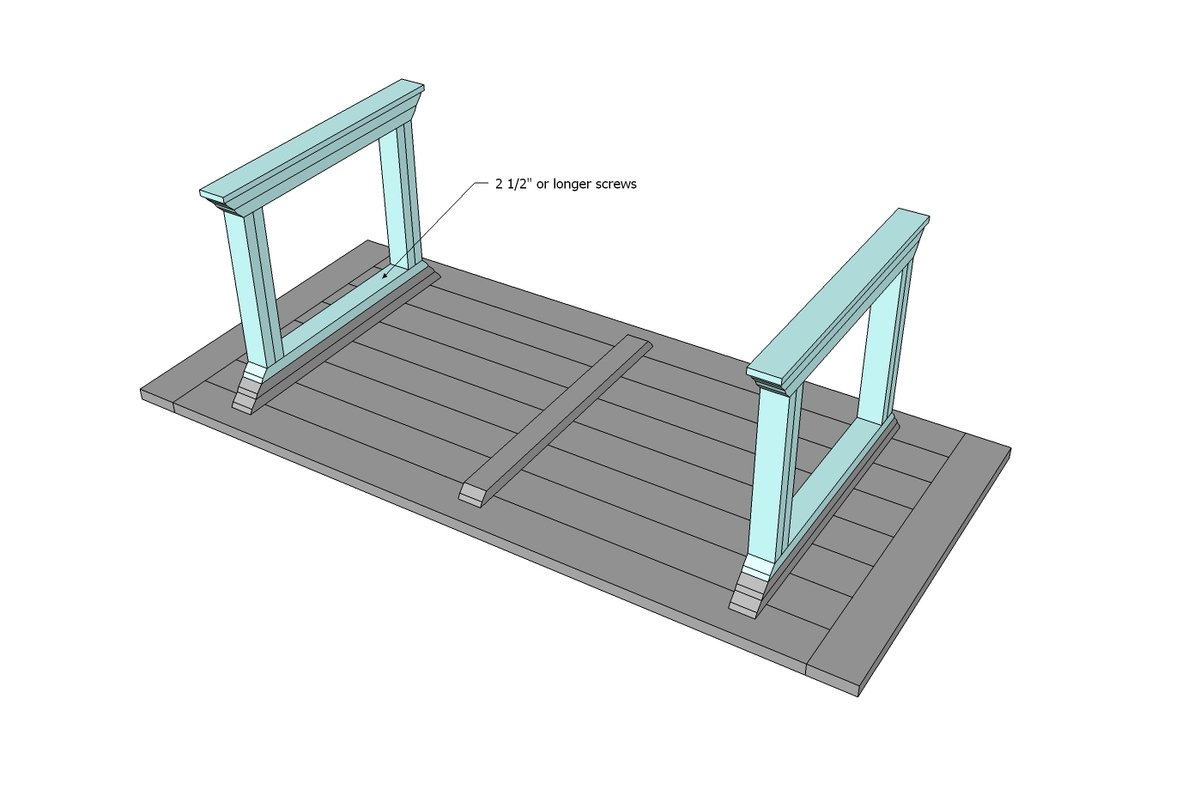
And then attach the leg sets to the underside of the table.
Step 9
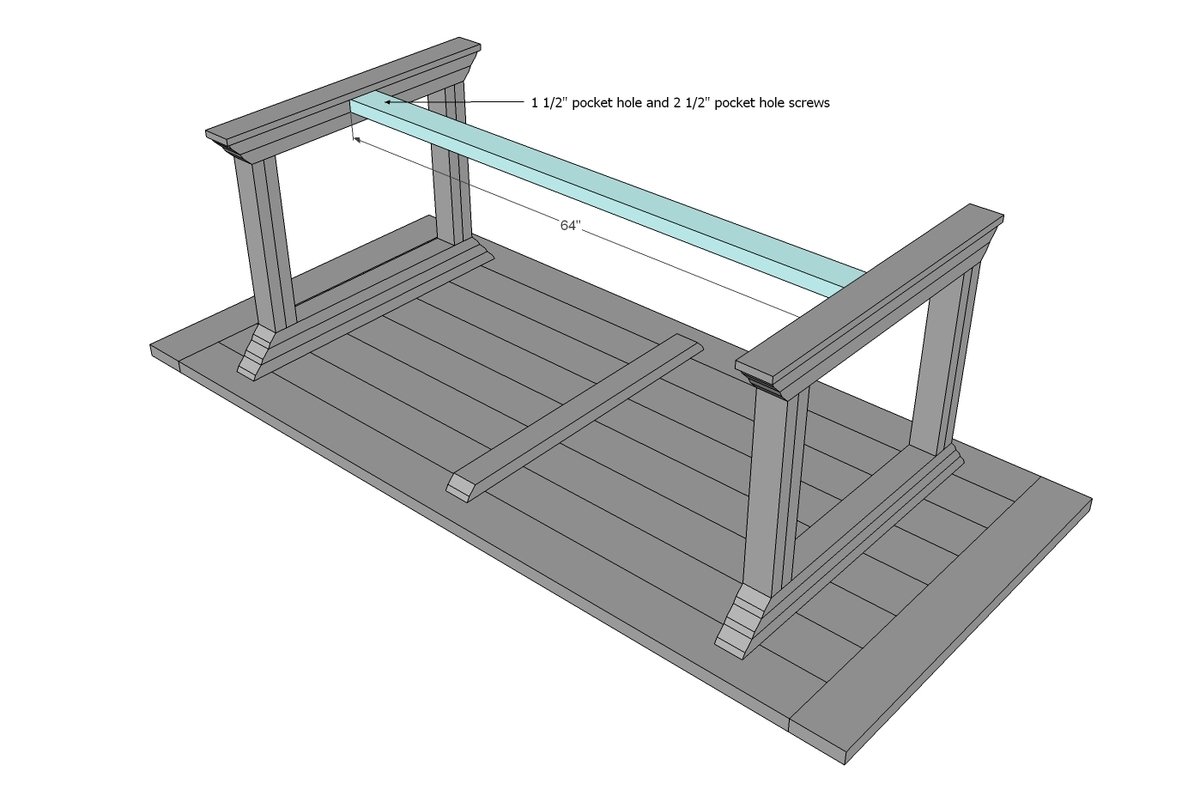
Add the stretcher with pocket holes to the underside. You'll probably want to measure and cut this guy to fit depending on your 2x4 widths - just make sure it's the same distance apart as the legs sets are at the tops.
Step 10
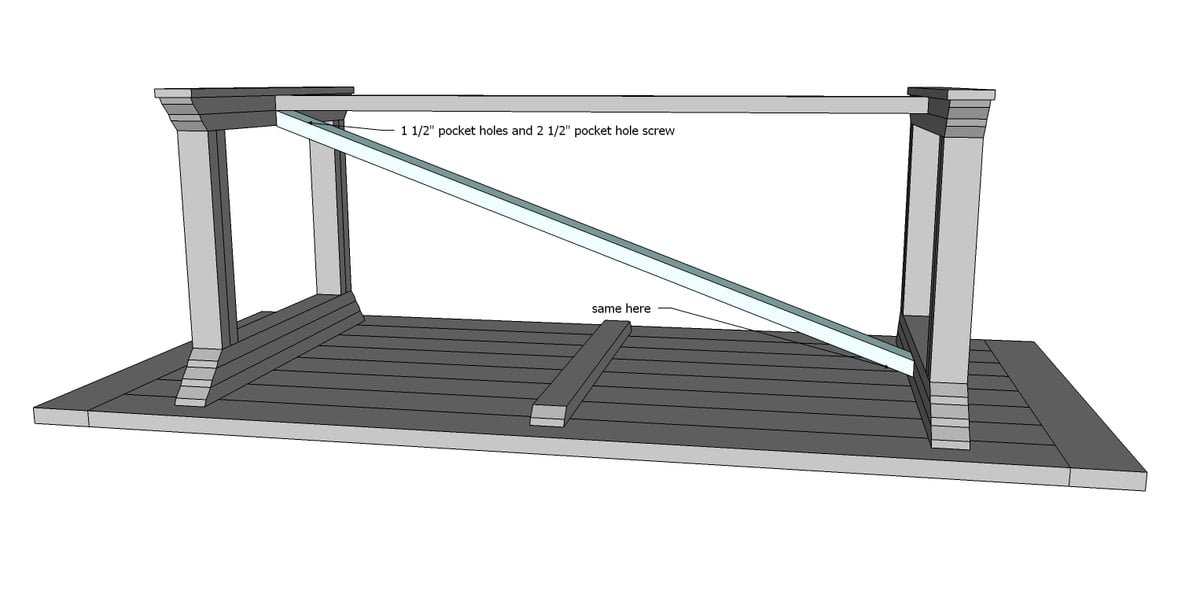
If your saw doesn't do 50 degree miters, what you can do is just use 2x2s at an angle cut (you can make angle cuts with a circular saw to just about any degree), cutting two 2x2s the full length and overlappping them, crossing in the middle. Then you can go back and fill in the spaces with 2x2s if you want.
Step 11
For the 2x4s, add the second part to the center X.
Step 12
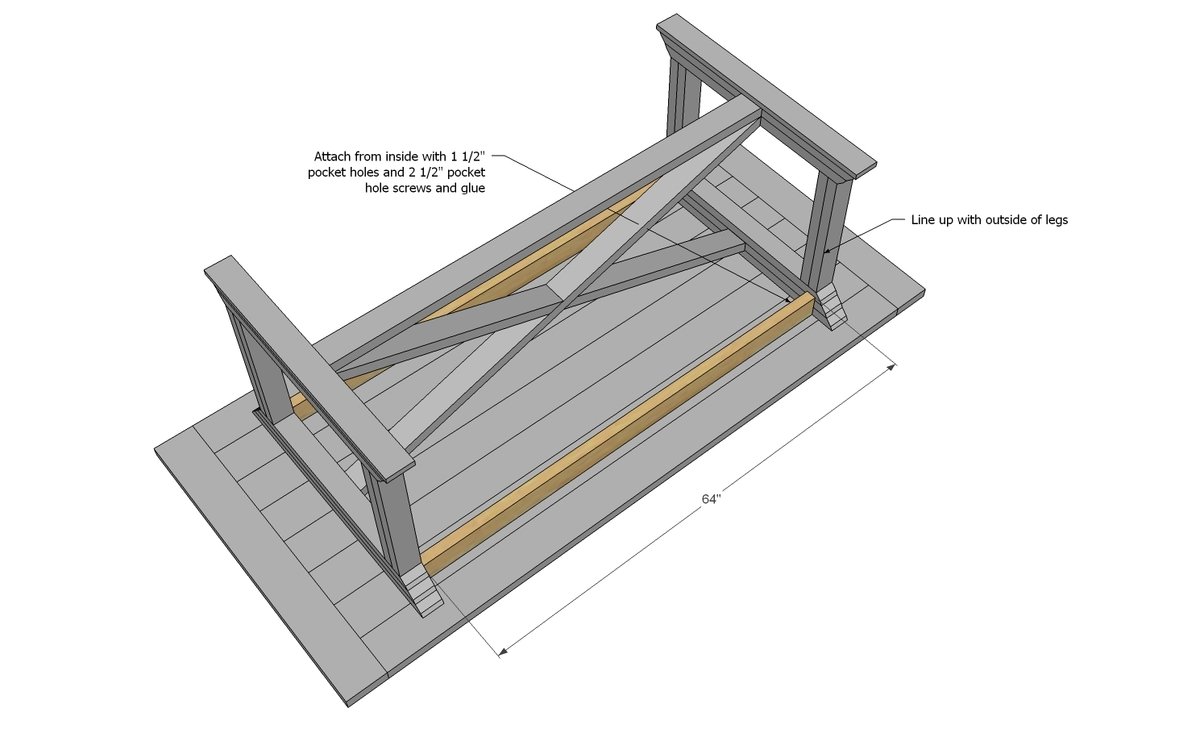
We also came up with a second variation with aprons just in case you planned to use the table for extra heavy loads -the aprons will add a TON of support but Jen felt that she didn't need them. If you do the aprons, you'll omit the center 2x4.
Finishing
Sand all surfaces, starting with a medium grit and finishing with fine. Wipe off the dust, fill any holes or gaps with wood filler, and sand smooth once dry. Apply primer if you're painting, then finish with your choice of paint or stain and seal with a durable clear topcoat. For outdoor projects, use exterior-rated primer, paint or stain, and sealer so the piece stands up to the weather.
Source (temporary): https://www.ana-white.com/woodworking-projects/rustic-x-farmhouse-dining-table