Shaker Peg Board with No Saw Cuts Required
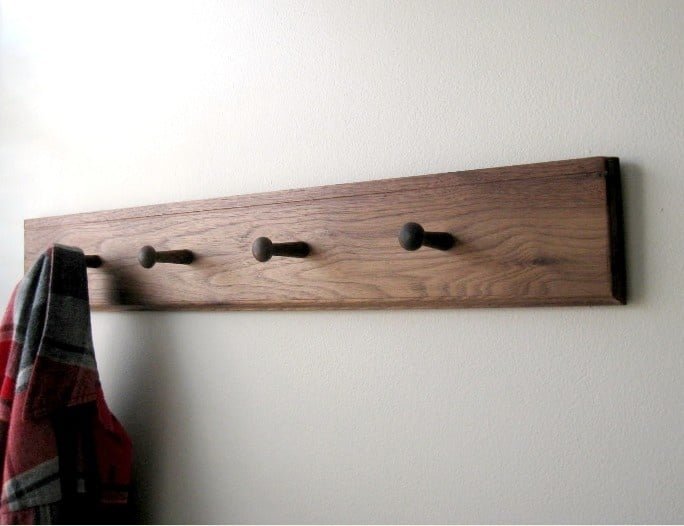
It's possible build a pretty attractive and useful piece that really only requires a drill, hammer, sandpaper and some finish. No saw cuts at all. You need a single board. You can go to Rockler (a woodworking company that has stores nationwide and is on the web at and purchase a 24 inch by 3 3/4 inch by 1/2 inch piece of walnut at a cost around 10 or 12 bucks. The Local Home Depot carries the 1/2" thick 2 foot boards in Red Oak for 5 or 6 bucks too. Either way you go, make sure it's straight and flat. Next you need shaker pegs. Rockler has these. The local Home Depot did not. The Local Ace Hardware did. The ones from Ace were made of Birch which is fine.
Specifications
| Project type | Wall Projects |
|---|---|
| Room | Bedroom |
| Style | Primitive or Early American Style Furniture Plans |
| Difficulty | Starter Projects |
| Estimated cost | Under $20 |
Shopping List
1 24 X 3 1/2 X 1/2 Board
3 or 4 shaker pegs
Cut List
None
Tools
- measuring tape
- drill
Step-by-step Instructions
Step 1
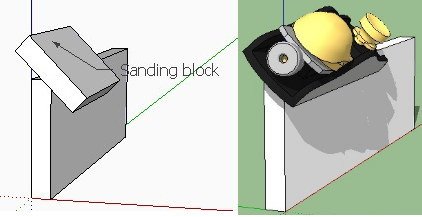
Decide if you want a special edge. The item pictured has a sort of fancy edge created with a router but a simple chamfer is all it takes to give it a more well crafted appearance. To create the chamfer place board in a vice and use a block plane or a sanding block held at a 45 degree angle to your board. See Image. The block plane will leave a crisper edge, but not everybody has a plane handy. The trick is to keep it held at 45 degrees. Practice on a piece of scrap if possible.
Step 2
Sand the faces of the board. Stepping up through the grits 150, 180, and 220 is best. At a minimum, sand it well with 150 grit sandpaper, using a sanding block. There is no need to sand higher than 220 grit.
Step 3
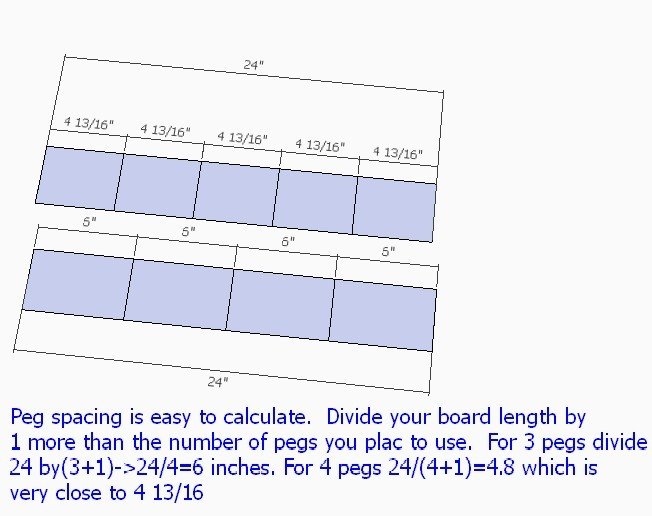
You need to make a decision here. You can finish, then drill or drill then finish. It's easier to finish then drill but the drilling process can craze or crack the finish near the hole. If you finish after drilling make sure to keep the finish out of the hole as it will reduce the glue strength. A piece of properly sized sponge should work. Either way you'll find it easier to finish before gluing in the pegs. Measure and drill the holes. See image for measuring. The size will depend on the shaker pegs. Make sure to measure them as close to the step as possible as they are usually tapered. The simplest approach to drilling is to drill the holes all the way through. Truth be told, nobody will know since the back will be against the wall. A more complicated but 'cleaner' approach is to drill them to the 3/8" depth of the plug at the bottom of the pegs. Knowing when to stop is the trick. You can measure 3/8 up the drill bit and place a piece of blue painters tape there. Stop drilling when you get to the tape.
Step 4
The finish shown here was satin General Finishes Arm-R-Seal. MinWax Wipe-on Poly would be another option for a similar finish. This was used without staining on the walnut. You could stain it though if its walnut it seems pointless to hide the natural beauty of the wood with stain. The pegs are stained (prior to gluing) to match the Walnut. The ones shown here were actually colored with a Dark Walnut Dye, but a dark stain would work too.
Finishing
Sand all surfaces, starting with a medium grit and finishing with fine. Wipe off the dust, fill any holes or gaps with wood filler, and sand smooth once dry. Apply primer if you're painting, then finish with your choice of paint or stain and seal with a durable clear topcoat. For outdoor projects, use exterior-rated primer, paint or stain, and sealer so the piece stands up to the weather.
Source (temporary): https://www.ana-white.com/woodworking-projects/shaker-peg-board-no-saw-cuts-required