Shaker style dresser
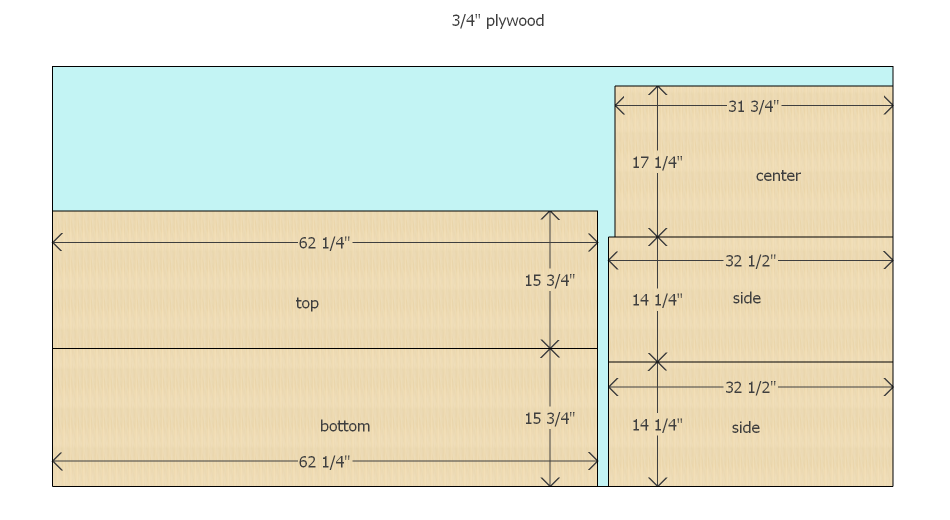
If you are getting this cut at a store, have them make the 32 1/2 rip cut to make the sides. Having the sides exactly the same measurement is very important to getting the dresser square.
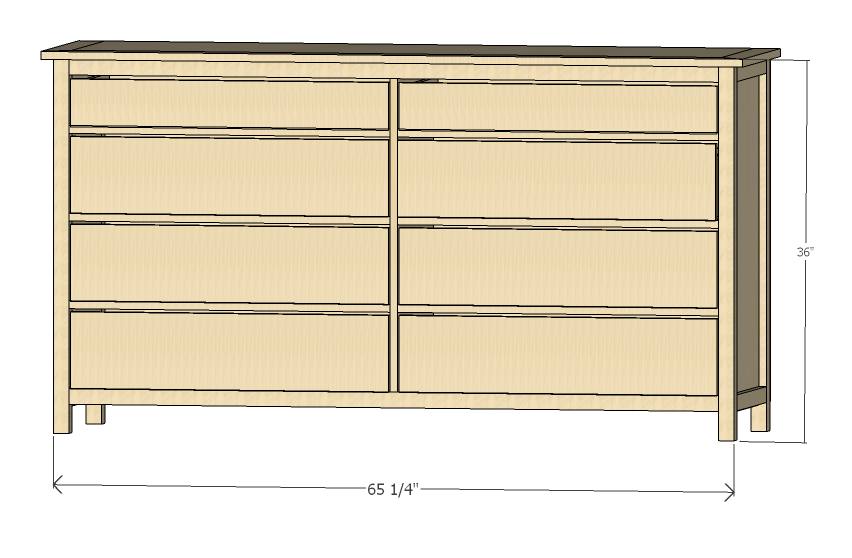
Specifications
| Project type | Dresser Plans |
|---|---|
| Room | Bedroom |
| Style | Farmhouse Furniture |
| Difficulty | Advanced |
Shopping List
4 - 1x2x8
1 - 1x2x6
2 - 1x3x6
1 - 1x5x6
3 - 1x8x8
1 sheet 3/4" birch plywood
1 sheet 1/2" birch plywood
2 sheets 1/4" birch plywood (review cut list below before purchasing)
8 pair 14" euro drawer slides
16 knobs
2" finish nails
1 1/4" finish nails
5/8" finish nails
1 1/4" pocket hole screws
wood glue
wood filler
Cut List
Side trim:
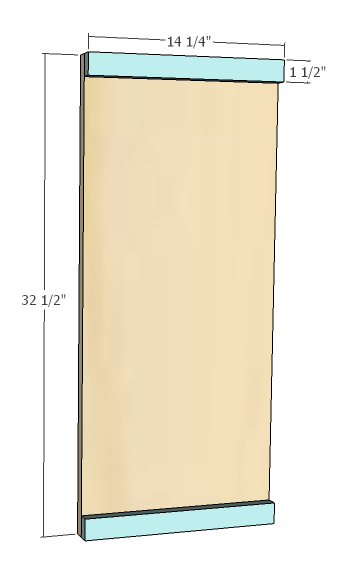
4 - 1x2 @14 1/4"
Legs:
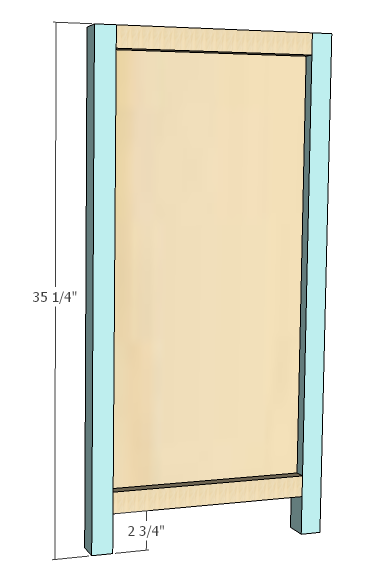
4 - 2x2 @35 1/4"
Front trim:
2 - 2x2 @ 62 1/4"
Back brace:
1 - 1x2 @ 62 1/4"
Drawer dividers:
6 - 1x2 @ 30 3/4"
Small drawer fronts:
2 - 1x5 @ 30 1/2"
Large drawer fronts:
6 - 1x8 @ 30 1/2"
Top trim:
1 - 1x2 @ 67 1/4"
2 - 1x2 @ 18 1/4"
CUT LIST - Plywood
3/4 Plywood:
Sides:
2 - 14 1/4" x 32 1/2"
Center:
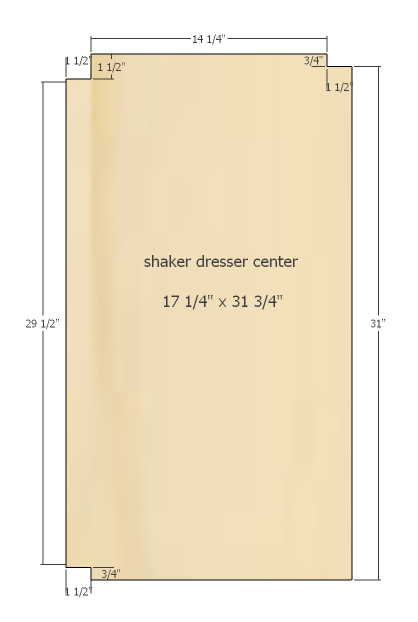
1 - 17 1/4" x 31 3/4"
Top and bottom:
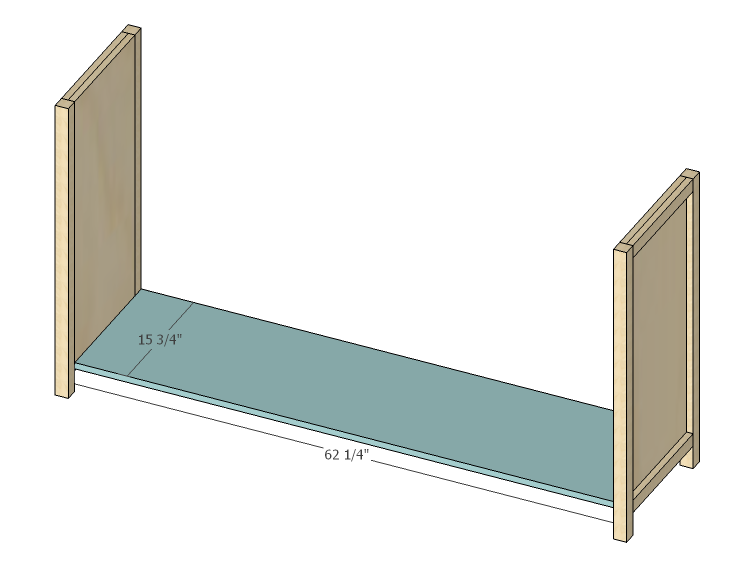
2 - 15 3/4" x 62 1/4"
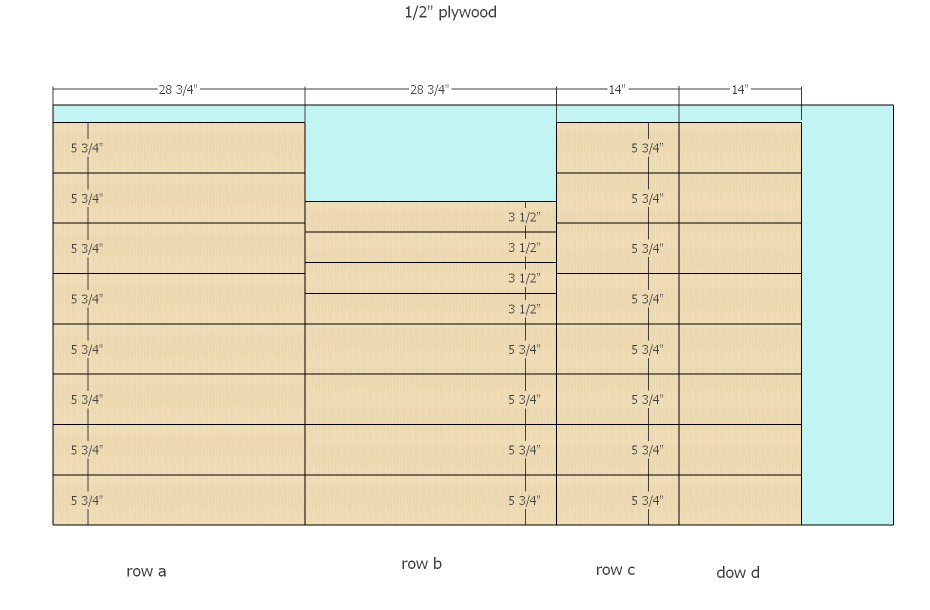
1/2" Plywood
Large drawer front/backs:
12 - 5 3/4" x 28 3/4"
Small drawer front/backs:
4 - 3 1/2" x 28 3/4"
Large drawer sides:
12 - 5 3/4" x 14"
Small drawer sides:
4 - 3 1/2" x 14"
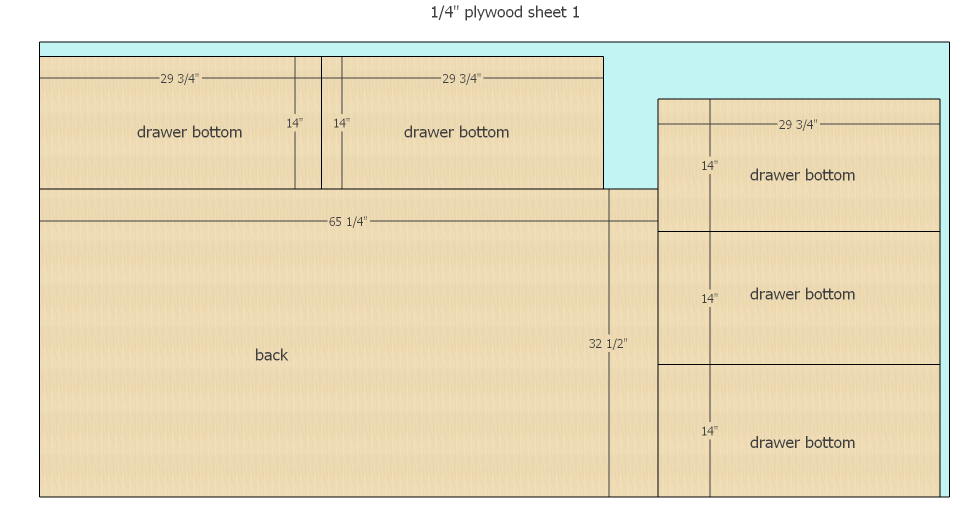
1/4" Plywood
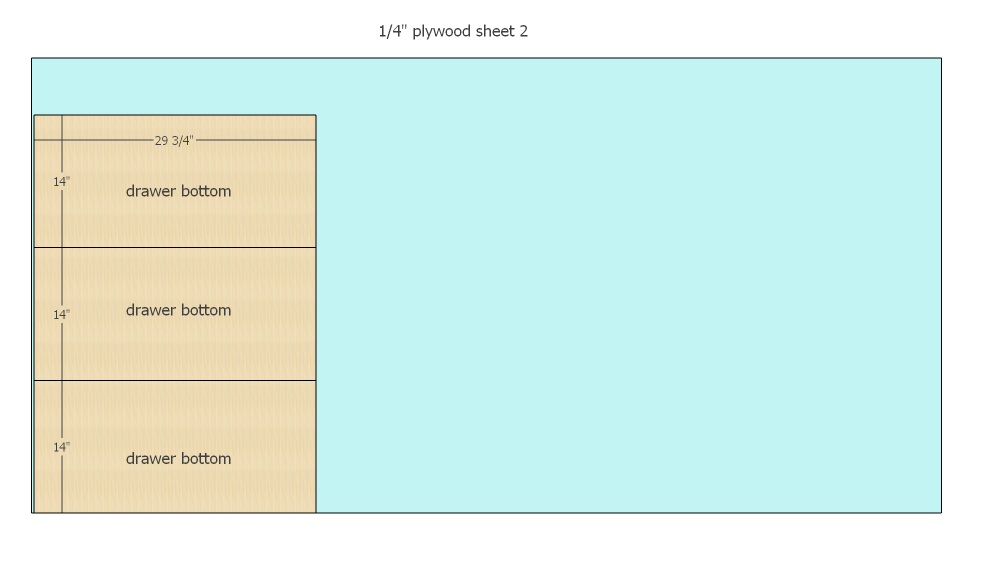
Drawer bottoms:
8 - 14" x 29 3/4"
Back:
1 - 32 1/2" x 65 1/4"
Tools
- measuring tape
- square
- pencil
- hammer
- safety glasses
- hearing protection
- kreg-jig
- drill
- circular saw
- jigsaw
- compound miter saw
- nailer
- sander
Step-by-step Instructions
Step 1
If you are getting this cut at a store, have them make the 32 1/2 rip cut to make the sides. Having the sides exactly the same measurement is very important to getting the dresser square.
Step 2
These are the drawer sides and front/backs. I like to lightly label each crosscut by its row number. For example, each drawer front/back from the first rip cut would be labeled 'row a.' This way, I know to pair two 'row a' pieces for one drawer which ensures the pieces will be exactly the same length helping to make the drawer box square. If I matched a front/back from row a with one from row b, they might be slightly off in measurement. Likewise, I match sides from the same rows.
Step 3
You may not need the second sheet if you have some scrap 1/4" already.
Step 4
Step 5
Step 6
Attach the posts to each side with pocket holes and 1 1/4" screws keeping the tops flush.
Step 7
Attach the dresser bottom to the sides keeping the back of the dresser bottom flush with the back legs. There should be a 1 1/2" space at the front. Lay the pieces on the ground like the dresser is on its back. Making sure each corner is square, attach using pocket holes and 1 1/4" screws from underneath.
Step 8
Using a jigsaw, cut inserts in center section as shown below. In addition to drawing the lines, you may want to use a straight edge to keep these corners square.
***no jigsaw***
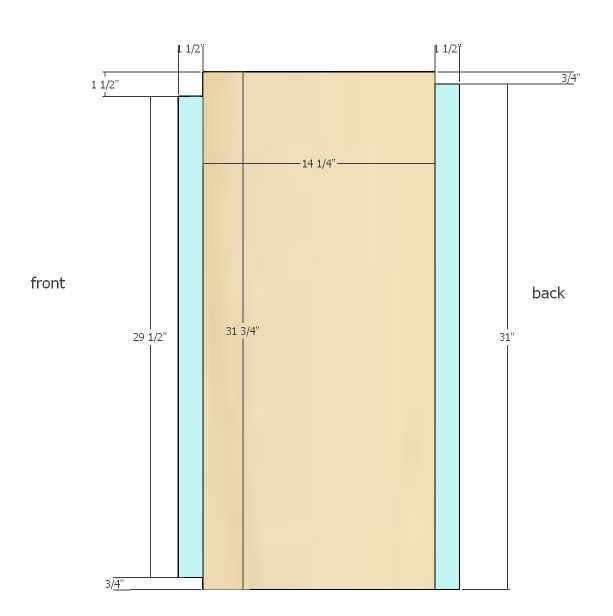
If you don't have a jigsaw, make the center dimenstions as shown below and attach 1x2s as shown. The extra 1x2 cut will be 1@ 29 1/2" and 1 @ 31". Use pocket hole screws to screw from the center section into the 1x2s. Try to place these where the center of the drawers will be to avoid interfering with the drawer divider or drawer slide placement.
***staining the dresser***
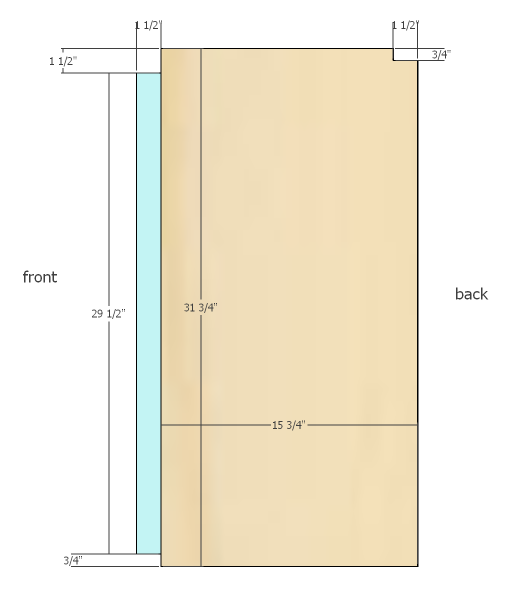
If you want to stain the dresser, this option will let you avoid sanding the plywood edge to accommodate edge banding and will also keep all the front trim the same type of wood taking the stain more evenly. The extra 1x2 cut will be 1@ 29 1/2". Use pocket hole screws to screw from the center section into the 1x2. Try to place these where the center of the drawers will be to avoid interfering with the drawer divider or drawer slide placement.
Step 11
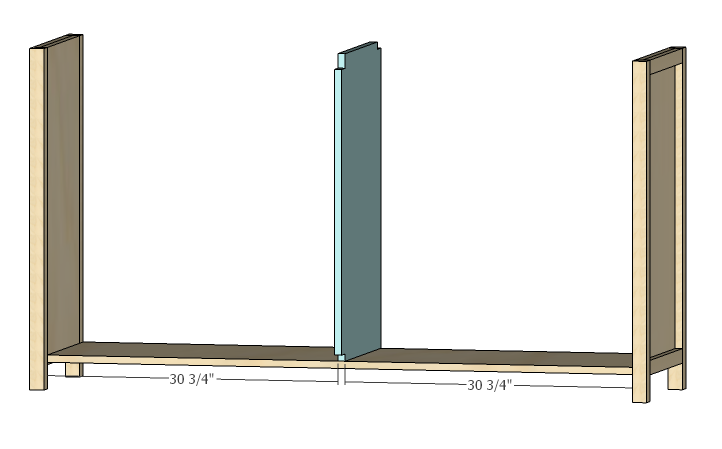
With the dresser still on its back, attach the center section using plenty of glue and screw from underneath. Use 5 1 1/4" screws.
Step 12
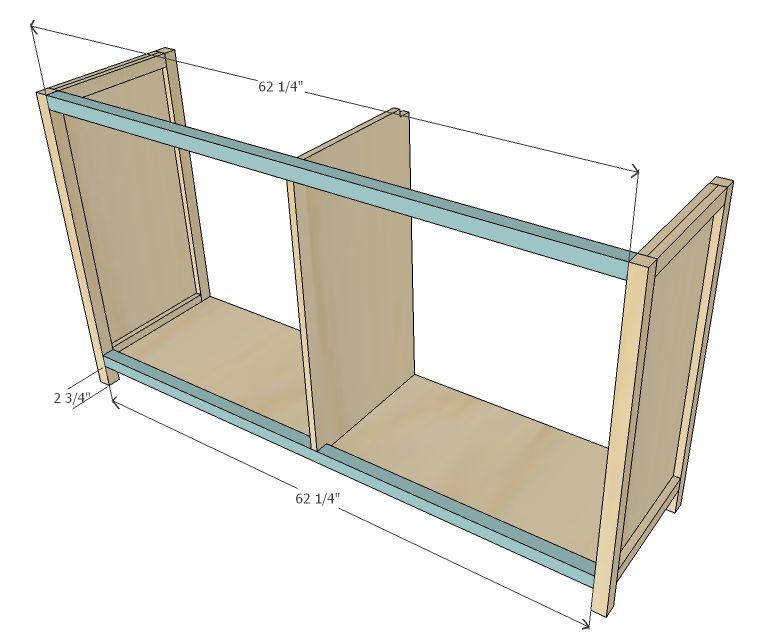
Attach front trim pieces (2x2s) using the cutouts as guides. For the bottom trim, glue and use 2" finish nails or pocket holes from underneath. Screw directly from underneath into the cutout using 2 1/4" screws. For the top trim, attach with 2 pocket holes on each side underneath and screw directly from the top into the center cutout using 2 1/4" screws. (I also used glue on each cutout.)
Step 13
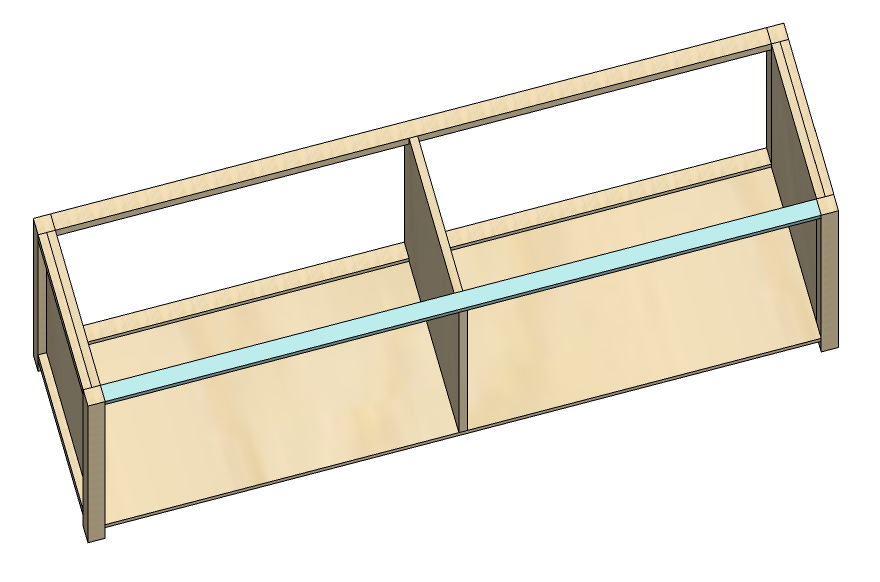
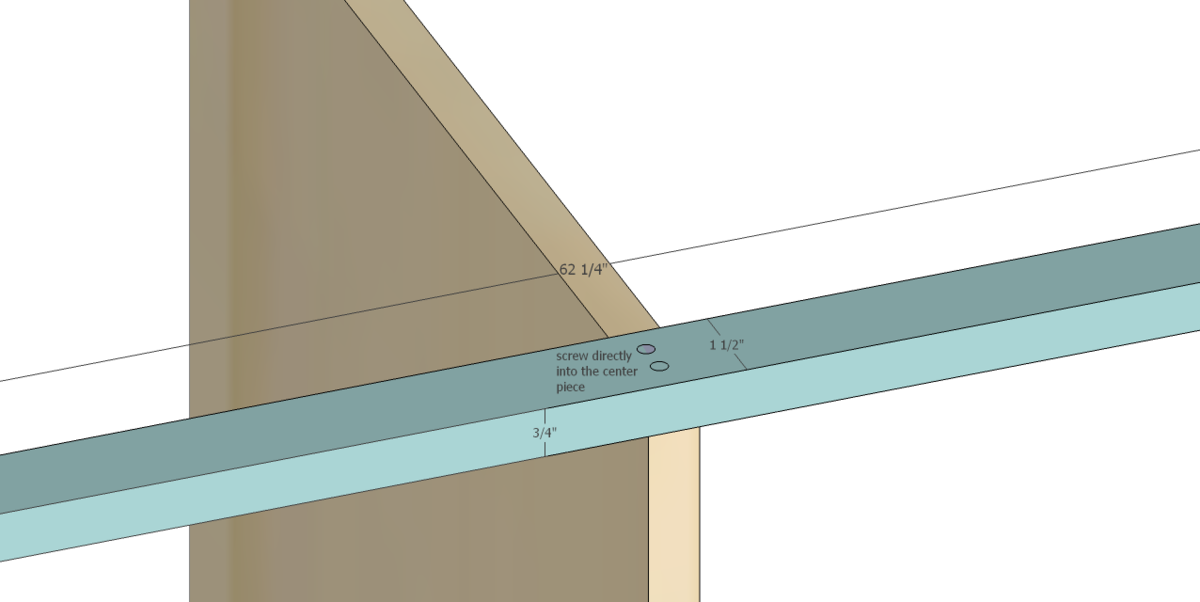
Attach the 1x2 brace to the back with pocket holes under each side and screwing directly into the cutout using 1 1/4" screws.
Step 14
Close up view
Step 15
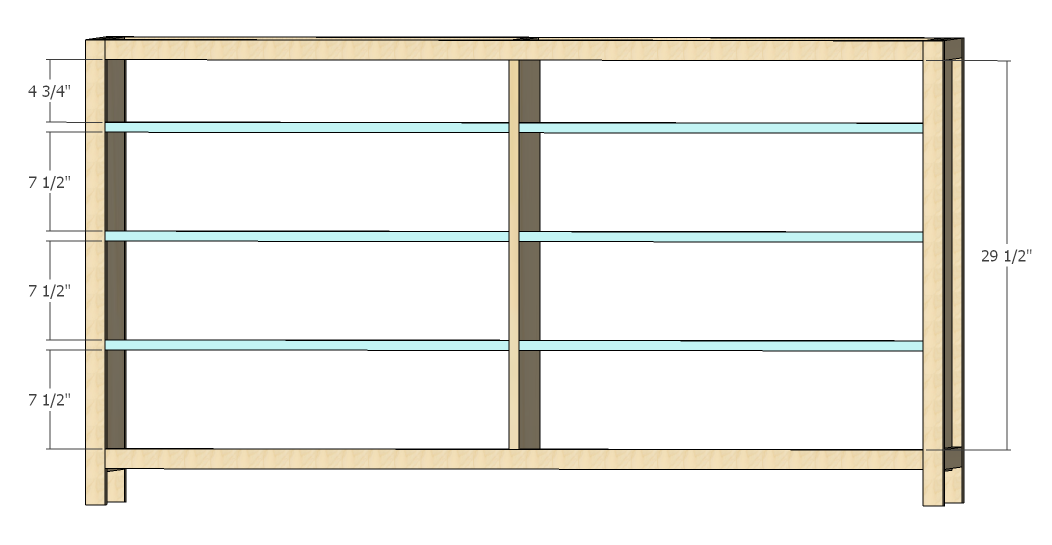
Drill 2 pocket holes into each end of the drawer dividers. With the holes facing downward, attach to the center and sides. Cut a piece of wood 7 1/2" and one 4 3/4" to use as a guide/jig for each opening. It is very important that each opening is square.
Step 16
Build large drawer boxes as shown. There should be 6 larger and 2 smaller. Check for square. Put your pocket holes in the front and the very back. The drawer fronts will cover the front pocket holes, and you won't ever see the back holes.
Step 17
Build small drawer boxes.
Step 18
Add drawer bottoms using glue and 5/8" finish nails. Both the small and large boxes are handled the same way.
Step 19
Install drawer glides according to package directions allowing for a 3/4" inset to accommodate the drawer front. Working one drawer at a time, put the large drawer box in the dresser. Using 1/8" craft wood strips as spacers on all four sides, position drawer front and clamp. Attach using a few 1 1/4" nails. Don't put nails where your knobs will be be. I like to write in pencil where the drawer was originally fit (e.g. L4 for left side, 4th drawer down.) I found that the 1x8s I used varied slightly in width. (It's probably overkill, but I wanted to be extra cautious!)
Step 20
Repeat with small drawers.
Step 21
Attach trim to top using glue and pocket holes from underneath or 2" finish nails. (If you don't want to miter the corners, cut the 2 side pieces to 15 3/4" and do a butt joint with the unmitered 67 1/4" front trim piece.
Step 22
Place dresser top upside down on the ground. Remove drawers, and place dress upside down so that the backs of the dresser and dresser top are flush and there is a 1" overhang on the front and sides. Attach using the pocket holes and 1 1/4" screws. Also, screw through the brace into the top using 1 1/4" screws.
Step 23
Using glue and 5/8" finish nails, attach back to dresser.
Finishing
Sand all surfaces, starting with a medium grit and finishing with fine. Wipe off the dust, fill any holes or gaps with wood filler, and sand smooth once dry. Apply primer if you're painting, then finish with your choice of paint or stain and seal with a durable clear topcoat. For outdoor projects, use exterior-rated primer, paint or stain, and sealer so the piece stands up to the weather.
Source (temporary): https://www.ana-white.com/woodworking-projects/shaker-style-dresser-plan