Shed Chicken Coop
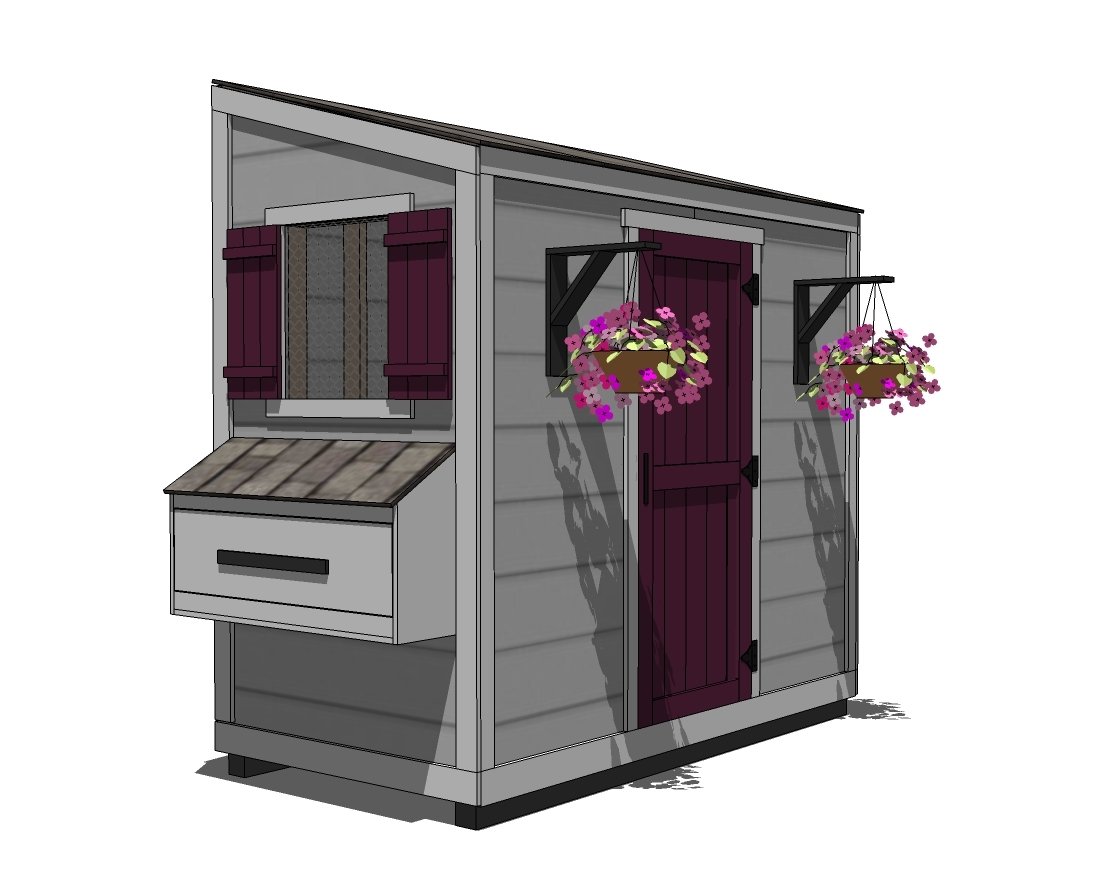
Build your own shed chicken coop with diagrams, shopping list and cut list. from
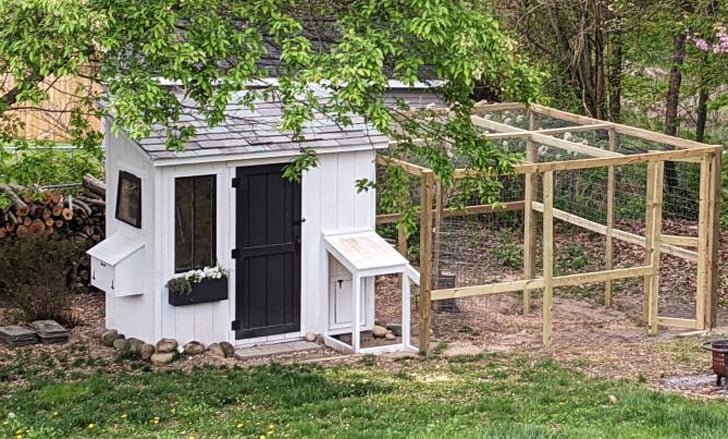
Specifications
| Project type | Chicken Coop Plans |
|---|---|
| Room | Outdoor |
| Style | Cottage Style Furniture Plans |
| Difficulty | Advanced |
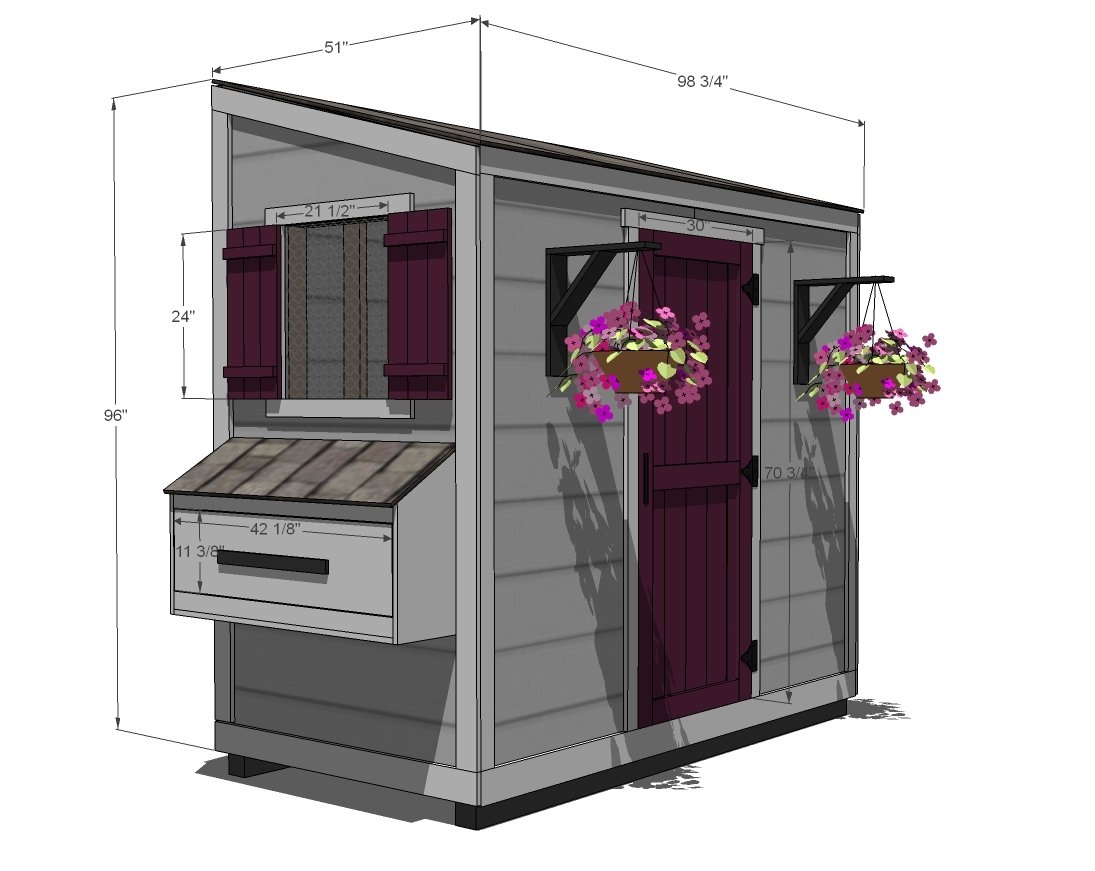
Dimensions
Use the size-specific shopping and cut lists below.
Shopping List
- 6 – Sheets T1-11 side or other sheathing
- 1 – Sheet 3/4" plywood suitable for flooring
- 40 – 2x4 x8 or stud length (only 5 must be full 8 feet length)
- 17 – 1x4 @ 8 feet long
- 8 – 1x3 @ 8 feet long
- 3 – Sheets 1/2" plywood suitable for roof
- 1 – 1x12 @ 10 feet long
- Hinges for doors and shutters and nesting box
- 16d nails for framing with 2x4s OR 3” torq head wood construction screws (for framing 2x4 walls)
- 2” galvanized or ring shank nails for attaching T1-11 and roofing plywood and trim boards or suitable screws
- 1 1/2” Pocket hole screws for attaching roof rafters
- 1 1/4" Pocket hole screws for building doors and nesting box
- Roofing to cover approximately 50 square feet
Cut List
Due to the size and complexity of this plan, it is recommended to cut as you go. Below is cut list for framing, but trim will need to be cut to fit.
FLOOR
- 5 - 2x4 @ 45"
- 2 - 2x4 @ 96"
- 1 - 3/4" plywood for flooring 96x48"
FRONT WALL
- 1 - 2x4 @ 96" (top plate)
- 6 - 2x4 @ 72 3/4" (studs)
- 2 - 2x4 @ 69 1/4" (jack studs for doorway)
- 4 - 2x4 @ 33" (door header and bottom plates)
SIDE WALLS - BUILD 2
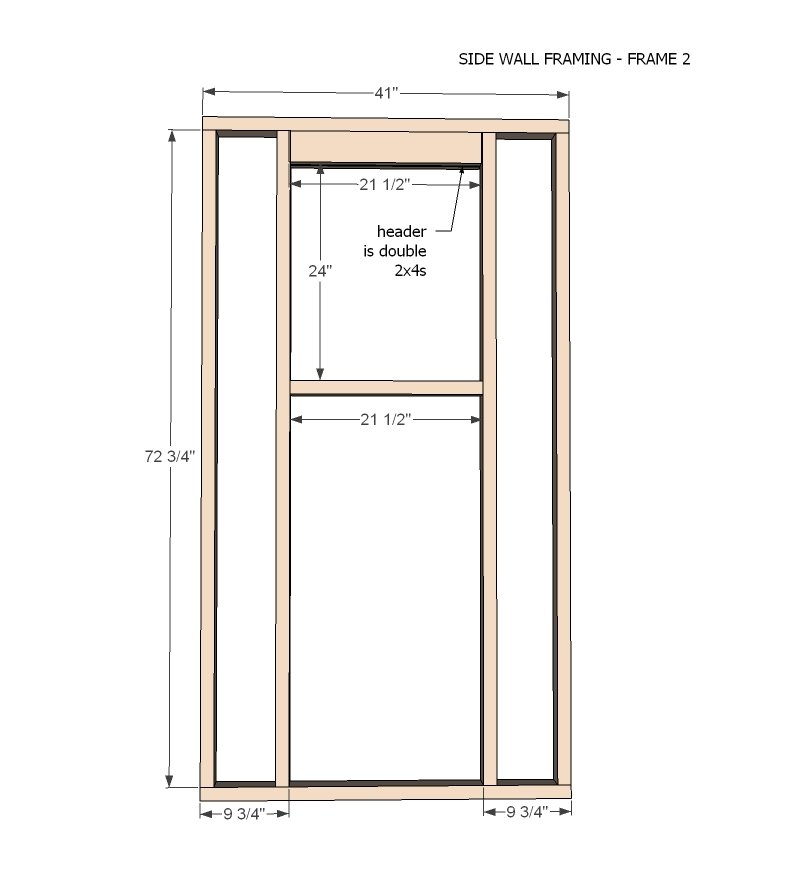
- 8 - 2x4 @ 72 3/4" (studs)
- 6 - 2x4 @ 21 1/2" (window header and sill)
- 4 - 2x4 @ 41" (top and bottom plates)
BACK WALL
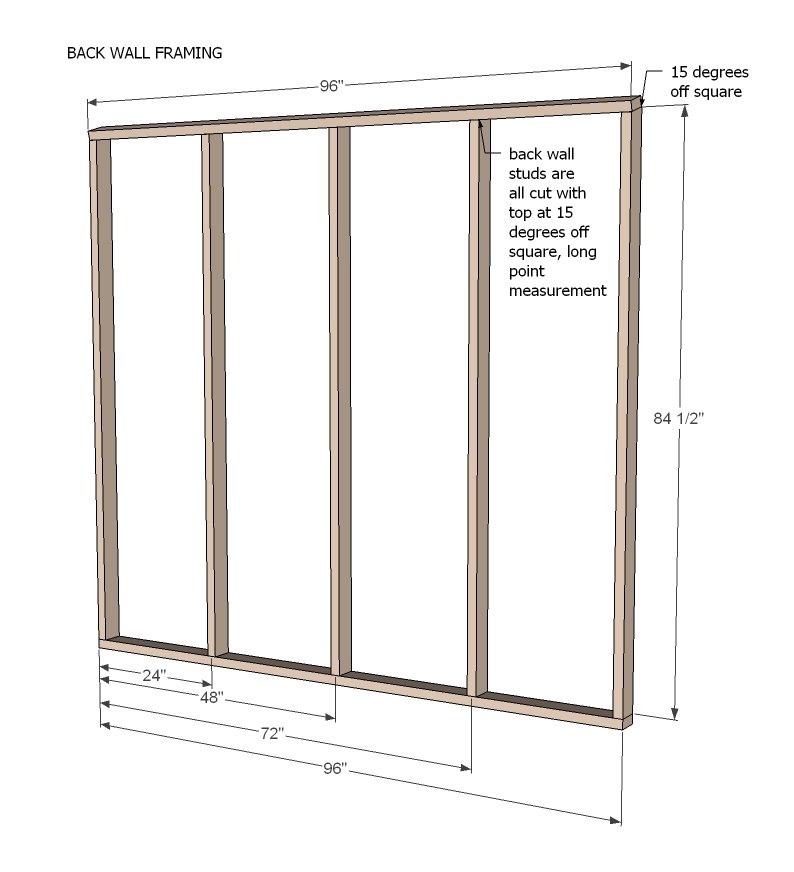
- 2 - 2x4 @ 96" (top and bottom plates)
- 5 - 2x4 @ 84 1/2" - top end cut at 15 degrees off square (studs)
ROOF FRAMING
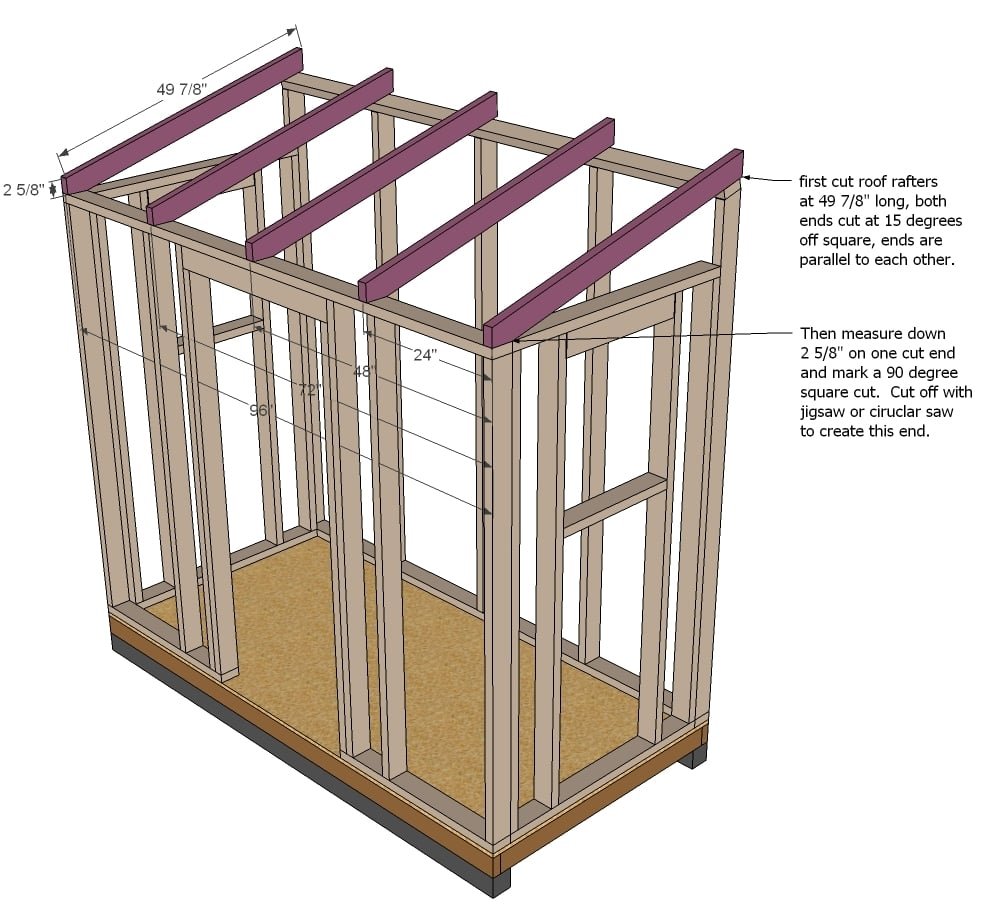
- 5 - 2x4 @ 49 7/8" - both ends cut at 15 degrees off square, ends parallel, with bottom point cut off at a 90 degree angle - see diagram (rafters)
- Cut roof plywood to length.
SIDING Use full sheets of siding, only trimming down the length to fit.
Nesting box, door and shutter cuts are in plan.
Tools
- measuring tape
- square
- pencil
- hammer
- safety glasses
- hearing protection
- kreg-jig
- drill
- circular saw
- nailer
- level
- countersink drill bit
Step-by-step Instructions
Step 1
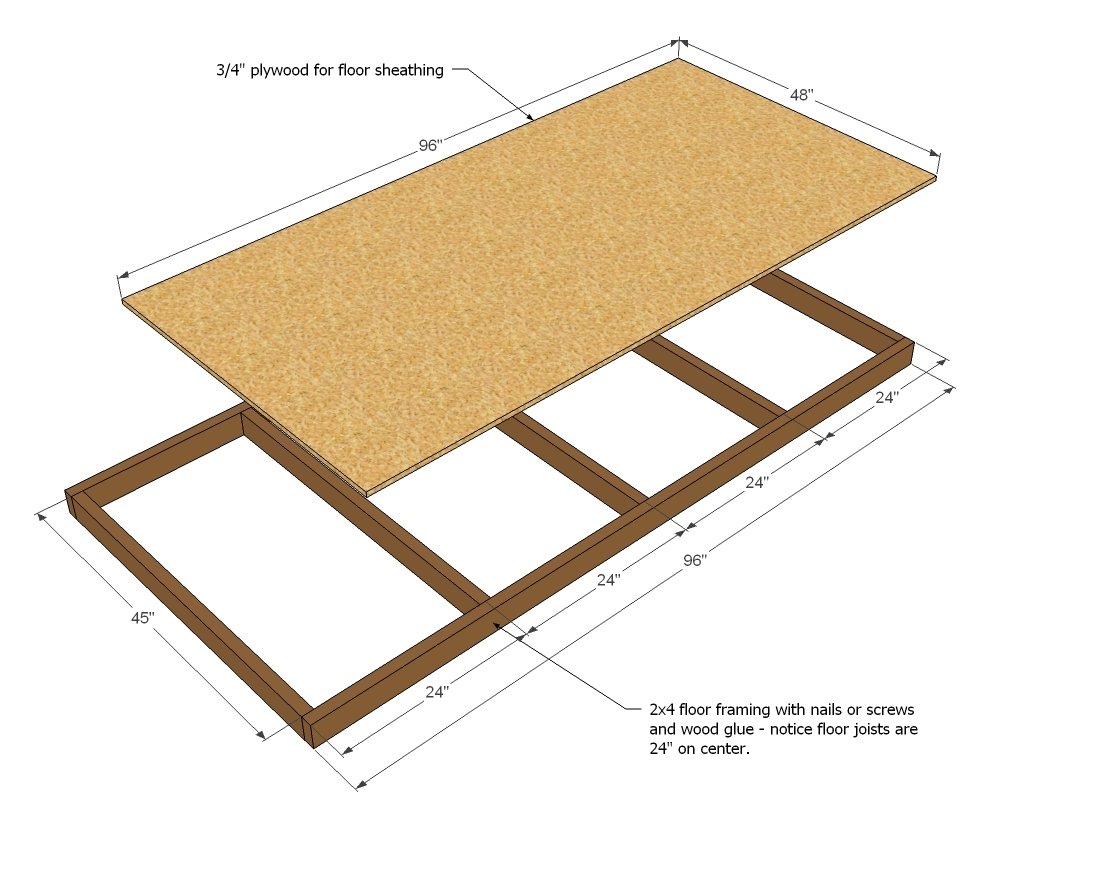
You will need to first determine the type of foundation you will put the coop on. Probably the easiest and simplest foundation is pier blocks with treated 4x4s on top. Then your flooring system can set on that. Because foundation requirements vary greatly by where you live, ask locally for the best way to create a foundation for the coop. To build the floor, simply frame up with 2x4s as shown above, 24” on center, using the 3” wood screws or 16d nails. Check the floor for square, and sheath with 3/4” plywood, glued on with subfloor glue and ring shank nails. At this point, you could also add insulation underneath if you live in a cold climate – for example blueboard. I recommend on the final finish linoleum to protect the plywood from pet damage. Attach the floor to your foundation and adjust for level.
Step 2
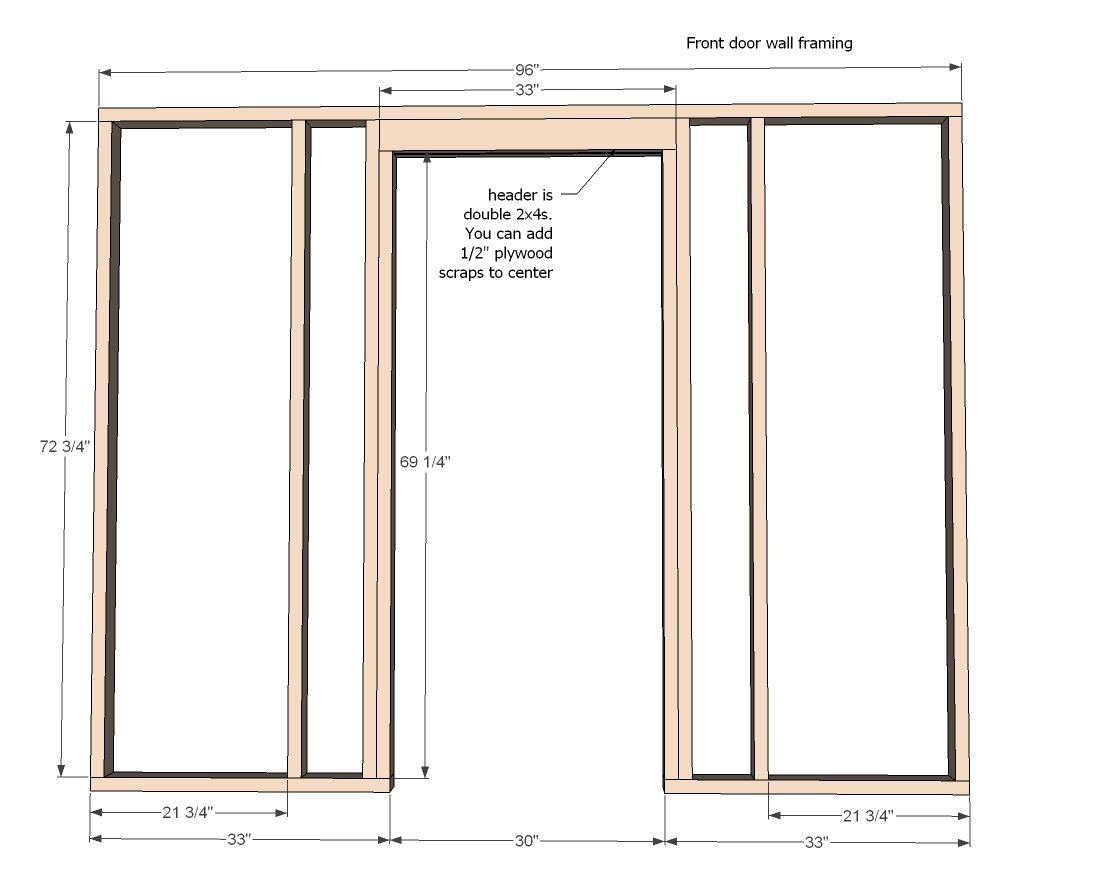
Once your floor is done, it’s time to build walls. You will need a large flat area to frame your walls. Use the 16d nails or 3” screws. Build one front wall.
Step 3
You will need to frame two side walls. The windows can be made smaller or larger or positioned differently. In this plan, both side walls have a window. Also, with scrap wood, you can frame out the nesting box opening, or a lip to help the hens get into the nesting box.
Step 4
The back wall is a little different, but no biggie. Simple cut the top ends at 15 degrees off square, with the longest point measurement 84 ½”. Then fasten top plate to wall. Do not allow the top plate to extend past the back wall studs, because t1-11 will sheath all the way up, and the back surface needs to be flush.
Step 5
Attach rafters to top of walls.
Step 6
With all the walls built, attach walls to the floor, attaching to the floor joists in the floor. Attach walls to each other as well. Now it’s time to build the roof! The rafters are simply 2x4s cut with both ends parallel at 15 degrees off square. Once the rafter is cut, on the bottom edge, mark 2 5/8” down, and use a carpenter’s square to draw a line perpendicular to the bottom cut at 2 5/8” down. Cut off the bottom of the rafter. This will give you something flush to attach to your front wall. The easiest way to attach rafters is with a Kreg Jig and 1 ½” pocket holes and 2 ½” pocket hole screws. But you can also toenail to the top plates, or use brackets.
Step 7
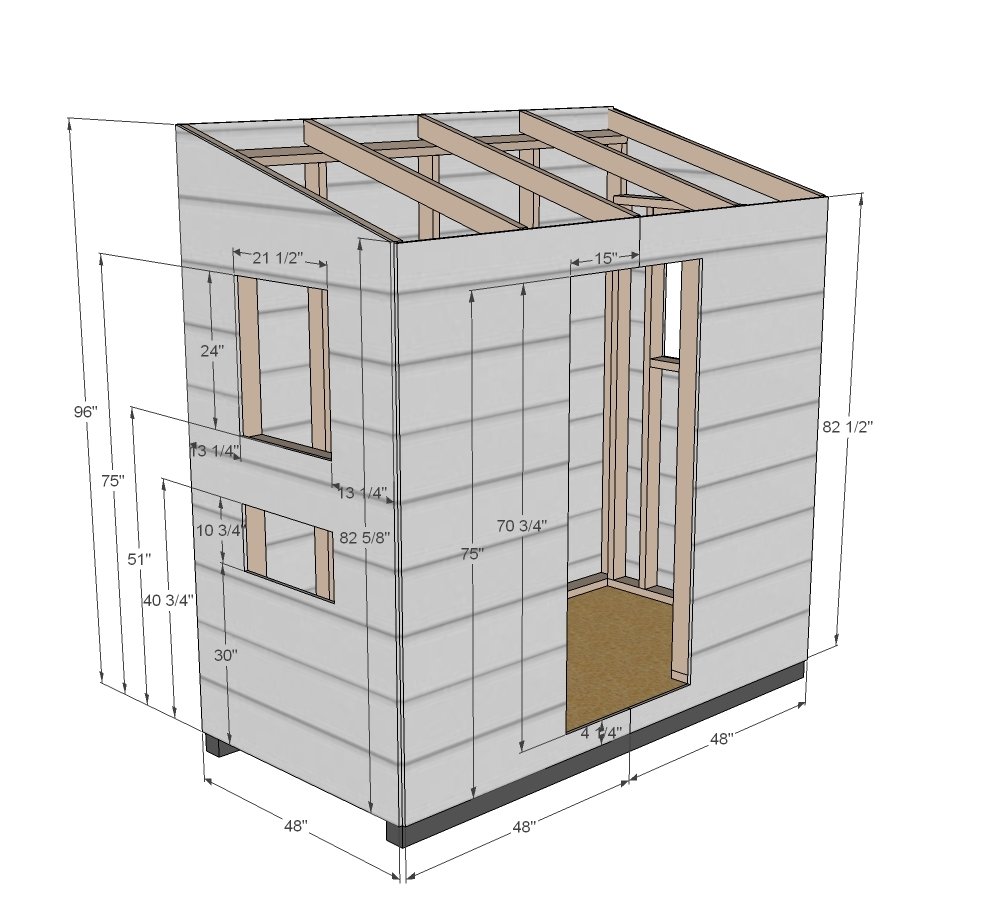
I do not give exact trim dimensions because depending on the thickness of your T1-11, your trim boards will vary. On the fronts and back, you will need to use full 8 foot sticks at the top and bottom. Trim out front and back first, followed by side walls. Use galvanized nails or screws.
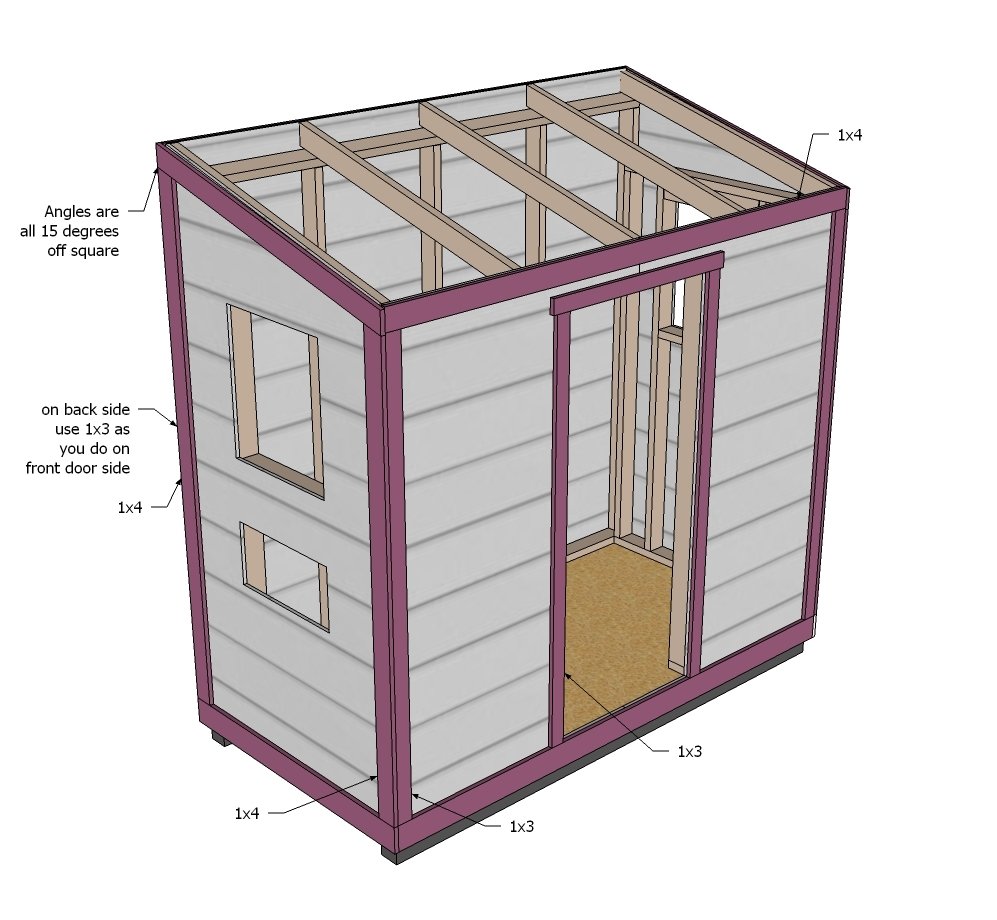
Step 8
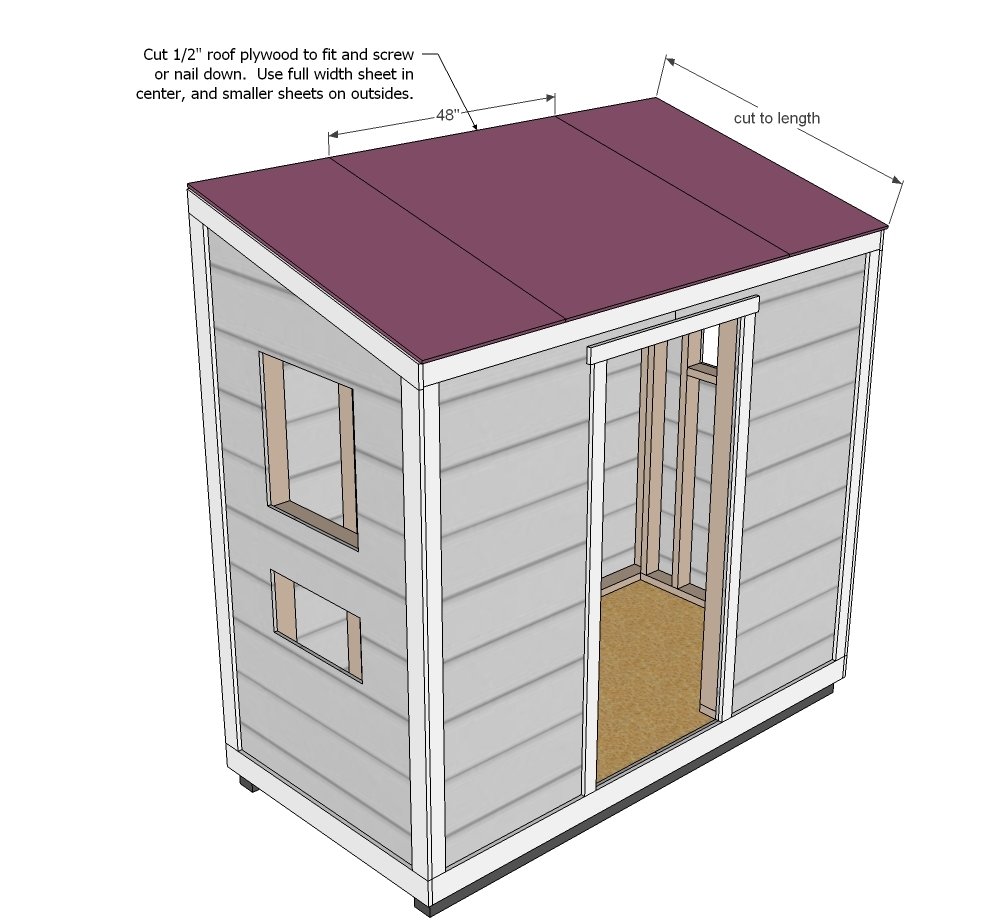
There’s no way around this to do it correctly than to use 3 sheets of 1/2” plywood. Cut the center piece to fit – it should just be a single lengthwise cut as the studs are spaced 24” on center. Nail down with galvanized nails or screws. Then add the remaining two pieces on the sides. Add roofing to top of plywood.
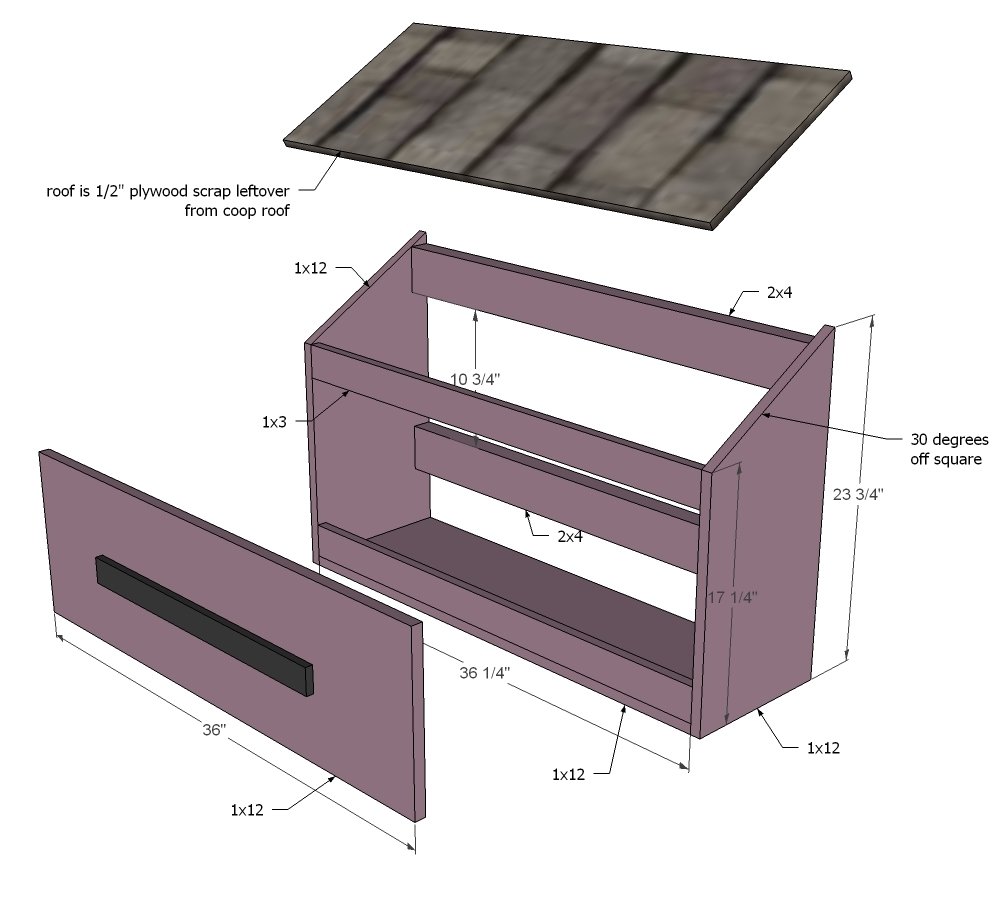
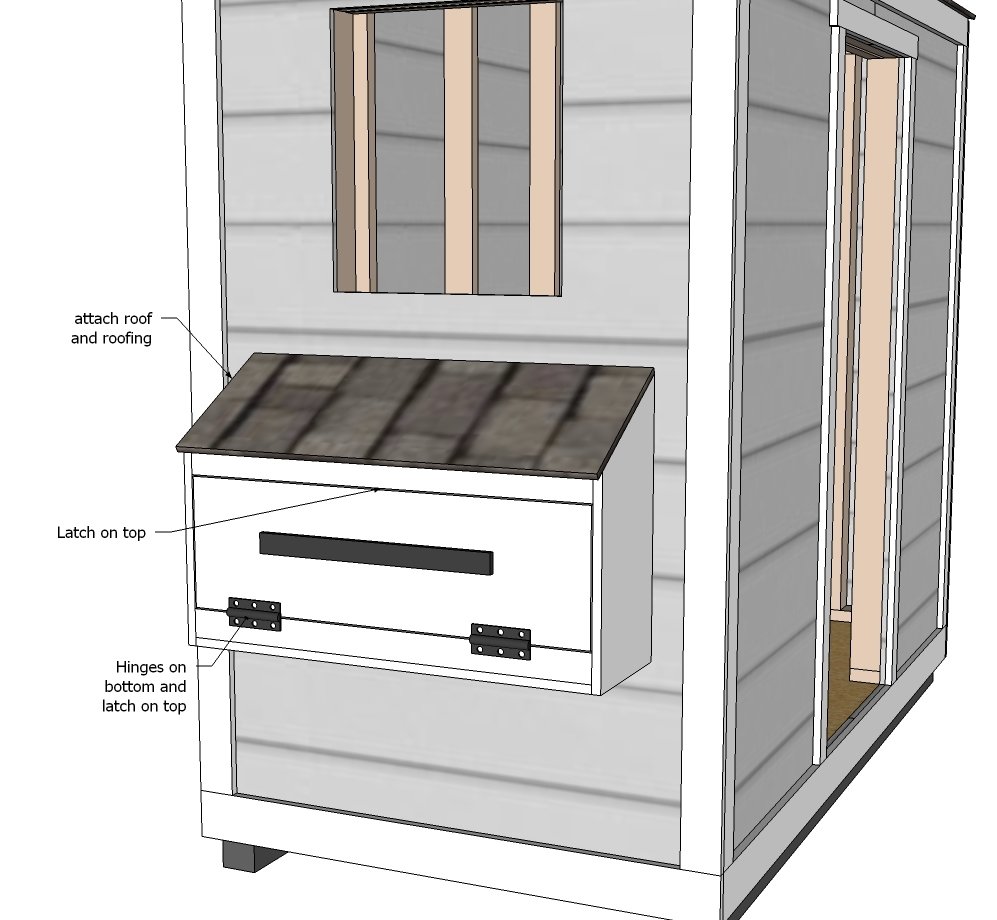
For the nesting box, I designed it with 1x12 boards.
• 2 – 1x12 @ 23 ¾” – one end at 30 degrees off square, longest point (sides) • 2 – 1x3 @ 36 ¼” (front trim) • 2 – 2x4 @ 36 ¼” (back supports) • 1 – 1x12 @ 36 ¼”(bottom) • 1 – 1x12 @ 36” (door) • ½” plywood for the roof
Step 10
Attach nesting box to side of coop, screwing into studs in wall.
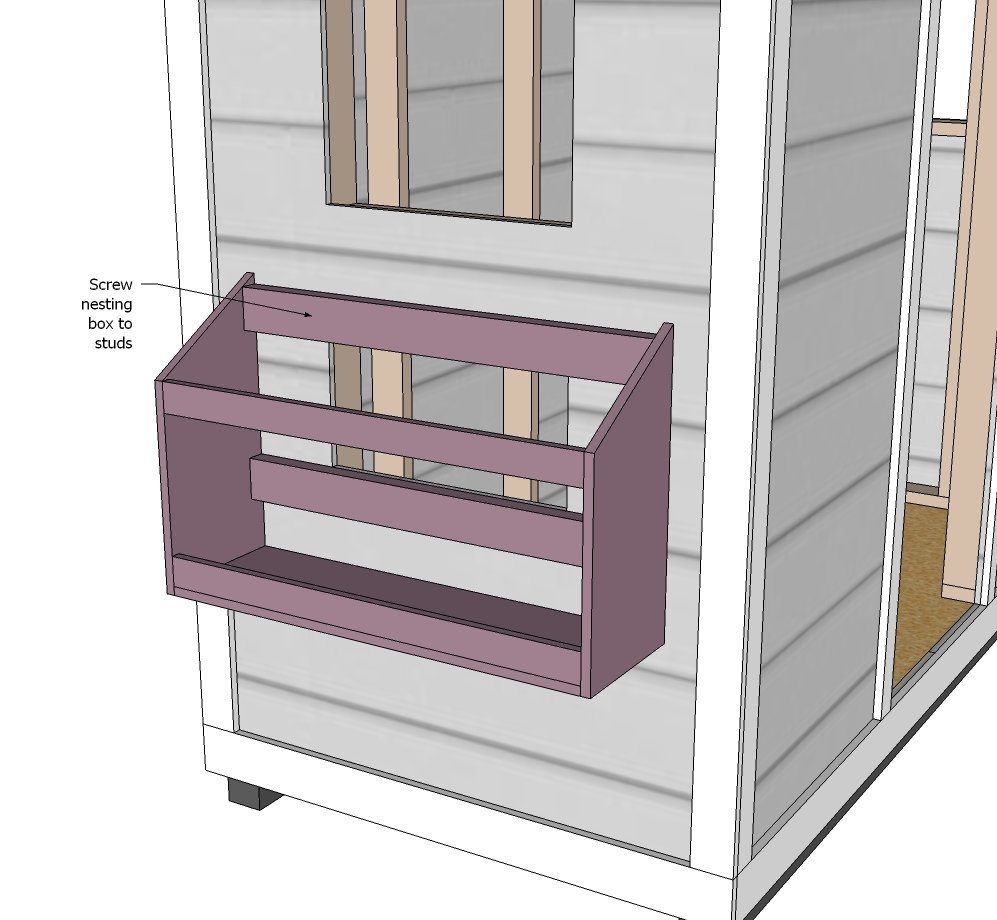
Step 11
Then add the roofing and door with hinges.
Step 12
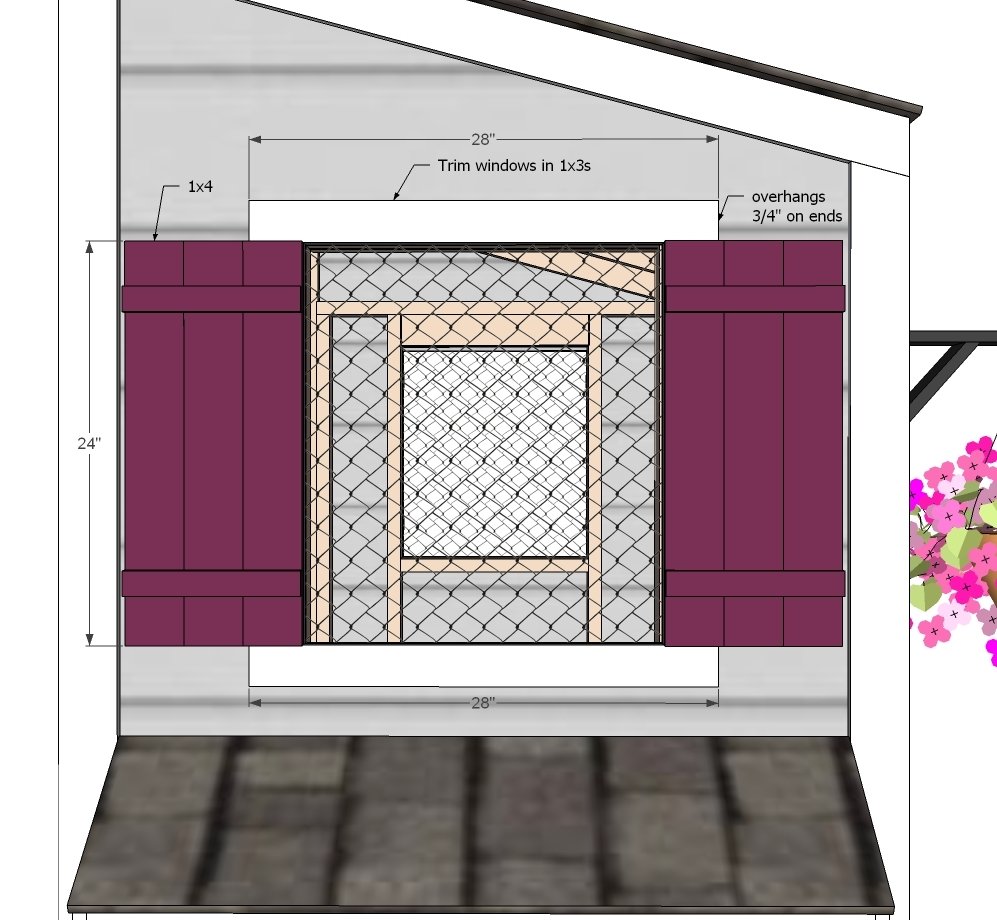
Windows are trimmed out in 1x3s followed by shutters made from 1x3s and 1x2 boards. Staple chicken wire or hardware cloth to inside of coop. Shutters are attached with hinges so they can close in rainy or cooler weather. SHUTTERS (for 4) 12 – 1x4 @ 24” 8 – 1x2 @ 10 ½”
Step 13
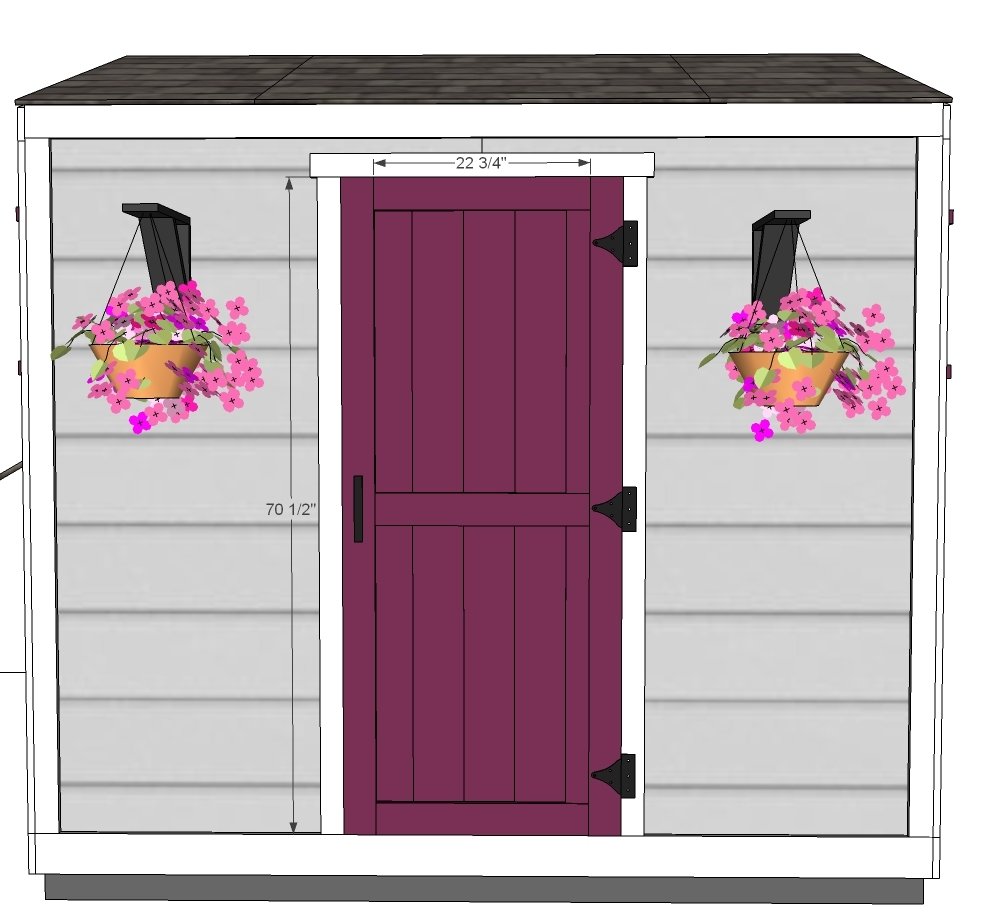
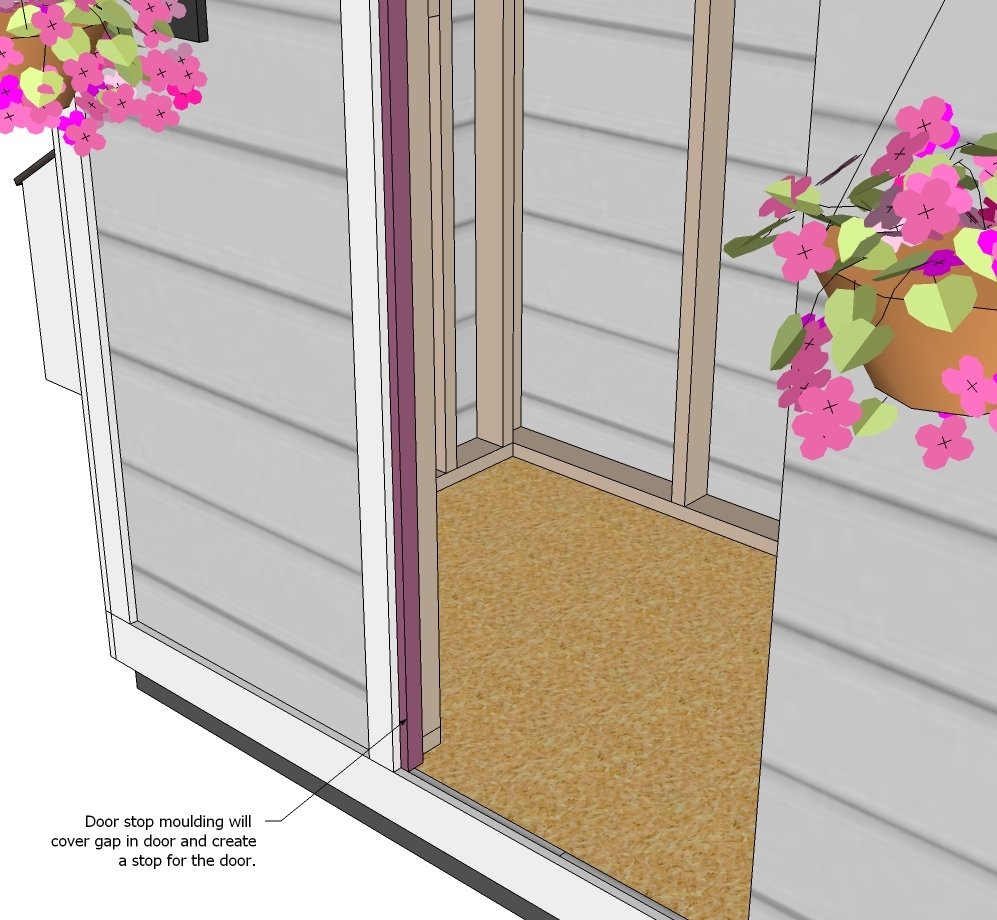
The door is framed in 1x4s with the Kreg Jig. Then you can back it with either scrap plywood leftover or as shown, 1x6 boards. The door should be built to fit your opening. I like to leave 1/8” gaps all the way around. You can add door stop moulding in 1x2s to the inside of the doorway to act as both a stop and a weather seal – see next diagram.
Step 14
Step 15
Step 16
For lots more tips and building photos, please stop over and check out Whitney's post.
Finishing
Sand all surfaces, starting with a medium grit and finishing with fine. Wipe off the dust, fill any holes or gaps with wood filler, and sand smooth once dry. Apply primer if you're painting, then finish with your choice of paint or stain and seal with a durable clear topcoat. For outdoor projects, use exterior-rated primer, paint or stain, and sealer so the piece stands up to the weather.
Source (temporary): https://www.ana-white.com/woodworking-projects/shed-chicken-coop