A Simple Modern Desk
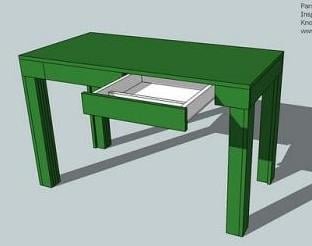
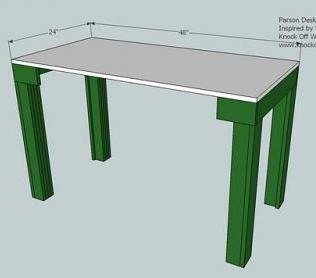
Featuring double doors and built from a standard 1/4 sheet of MDF as a desktop, this simple plan will give you a sturdy modern parson style desk.
Specifications
| Project type | Desk, Desk Systems and Project Table Plans |
|---|---|
| Room | Craftroom |
| Style | Modern Style Furniture Plans |
| Difficulty | Intermediate |
| Estimated cost | $20 - $50 |
Dimensions
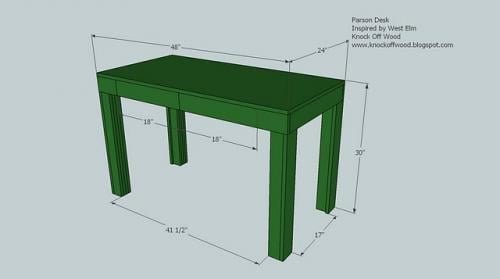
Use the size-specific shopping and cut lists below.
Shopping List
2 sets of 15″ drawer slides (as low as $3 each, depending on the quality, strength and features) 24″ x 48″ Project Panel (available at Lowes or Home Depot) OR 1 piece of 3/4″ MDF cut at 24″ x 48″ (about $30 for an entire sheet, you only need 1/4 of a sheet) 6 – 1×3 Boards (about $1.50 each) 4 - 1×4 Boards (about $3 each) Sanded plywood 1/4″ plywood - about 1/4 of a sheet (about $15 per sheet) 1 1/4″ Nails 2″ Nails
Cut List
A) 12 – 1×3 @ 29 1/4″ (Center of the Legs)
B) 4 - 1×3 @ 25 1/2″ (Front and Back Trim for Legs, Outside Only)
C) 4 – 1×4 @ 25 1/2″ (Side Trim for Legs, Outside Only)
D) 2 - 1×4 @ 22 1/2″ (Side Aprons)
E) 1 - 1×4 @ 48″ (Back Apron)
F) 2 – 1×4 @ 6″ (Front Aprons)
G) Project board 24″ x 48″ OR 3/4″ MDF cut at 24″ x 48″ (this would be 1/4 of a sheet)
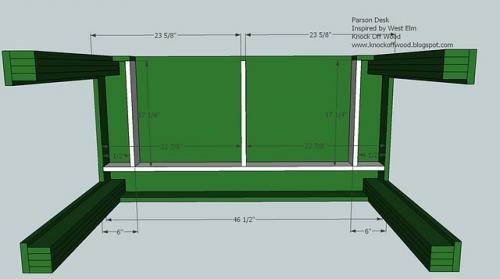
H) 1 – 1×4 @ 46 1/2″ (Back of Drawer Framing)
I) 3 – 1×4 @ 17 1/4″ (Sides and Middle of Drawer Framing) Drawers
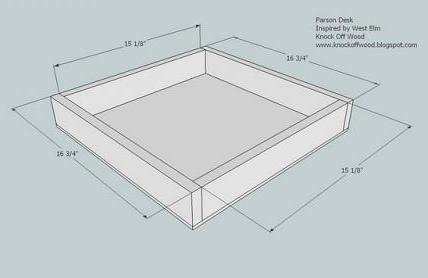
J) 4 – 1×3 @ 16 3/4″ (Drawer sides)
K) 4 – 1×3 @ 15 1/8″ (Drawer front and back)
L) 2 – 1/4″ Plywood cut at 16 3/4″ X 16 5/8″ (bottom of drawers)
M) 2 – 1×4 @ 18″ (Drawer Faces)
Tools
- measuring tape
- square
- hearing protection
- kreg-jig
- drill
- circular saw
- table saw
- nailer
- sander
Step-by-step Instructions
Step 1
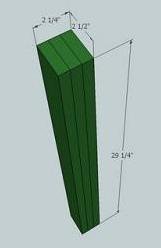
Inner Legs. Build all four legs be first using the 1 1/4″ nails to nail two of boards A together, flat edges facing, keeping all outside edges flush. Then use the 2″ nails to nail another board A to the first 2 boards A, as shown in the diagram above. Use glue and keep outside edges flush on all sides.
Step 2
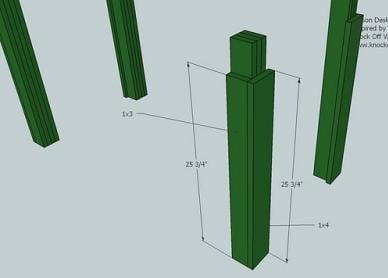
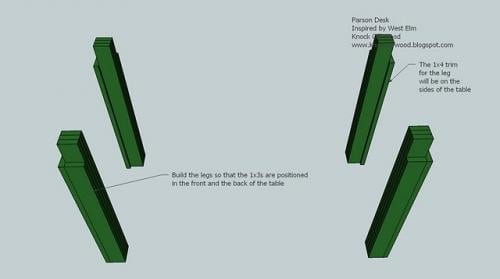
Leg Trim. Begin by adding board B to the leg from A, as shown above. Keep outside and bottom edges flush. Use glue and nail. Then, nail in place board C, fastening to all four of the sandwiched 1×3 from steps 1 and 2. Your completed leg should look like the above diagram. As you are building all four legs, make note taht the legs are not build the same for each corner. This is shown below.
Step 3
Building all 4 Desk Legs. Keep in mind that the 1×3 trim, or board B, will trim out the front and back of the desk, and the 1×4 trim, boards C, will trim out the sides. The diagram above illustrates this.
Step 4
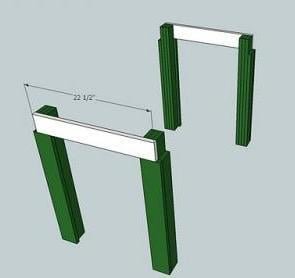
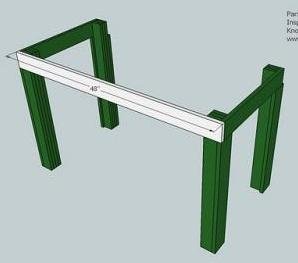
Apron Sides. Add the side aprons, D, to the top, nailing into boards A as shown above. The overall width of the table is 24″. Keep board D flush with the outside edge of the center of the legs (boards A).
Step 5
Step 6
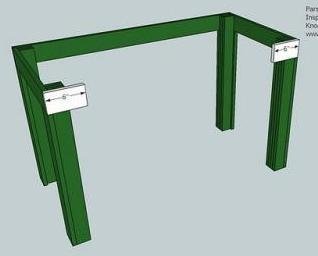
Front Apron. As shown above, nail F in place. Make sure you nail into both the side apron and the center of the legs, boards A. This is shown above.
Step 7
Tabletop. Add the project board or 3/4″ MDF tabletop, G, to the top, keeping outside edges flush. Make sure you nail into all the side aprons, back apron, and leg pieces.
Step 8
Drawer Housing. Add H and I as shown above. Make sure you add a screw at the front of the middle board I, screwing through the tabletop into the top edge of I. Cross nail and use lots of glue – these boards are going to be supporting the drawers. This is very important – make sure you add H and I exactly square. If the drawer frame is not square the drawer will not slide.
Step 9
Drawers. Nail through the drawer sides, J, into the drawer fronts and backs, K. This is shown above. Make sure you take a square of the drawer. See the HOW-TO section on how to check for square. Also make sure you cut your plywood perfectly square. This is very important. Your drawers will not slide if they are not square. Add the plywood, L, to the bottom of the drawers. Use the 1 1/4″ nails and glue to nail the plywood to the bottom of the drawers.
Step 10
Drawer Faces. Add the faces of the drawer as shown above. Notice how on the inside of the drawers the overhang of the face is 7/8″ and on the outsides only 1/2″. The best way to accurately attach the face is to attach the drawers to the slides and insert the drawers into the drawer frame. Then position the face on the drawer so that it fits the opening on the aprong. Then add a couple of 1 1/4″ nails to the face. Then take the drawer out and nail through the inside of the drawer into the face.
Step 11
Optional Drawer Dividers. You can also add 1x2s as dividers built into the drawers. I suggest using a 1×2 to create a space for pens and pencils, and perhaps a second divider for small items like tacks and paper clips.
Finishing
Sand all surfaces, starting with a medium grit and finishing with fine. Wipe off the dust, fill any holes or gaps with wood filler, and sand smooth once dry. Apply primer if you're painting, then finish with your choice of paint or stain and seal with a durable clear topcoat. For outdoor projects, use exterior-rated primer, paint or stain, and sealer so the piece stands up to the weather.
Source (temporary): https://www.ana-white.com/woodworking-projects/simple-modern-desk