Small Kitchen Island with Slide Out Double Trash Cans
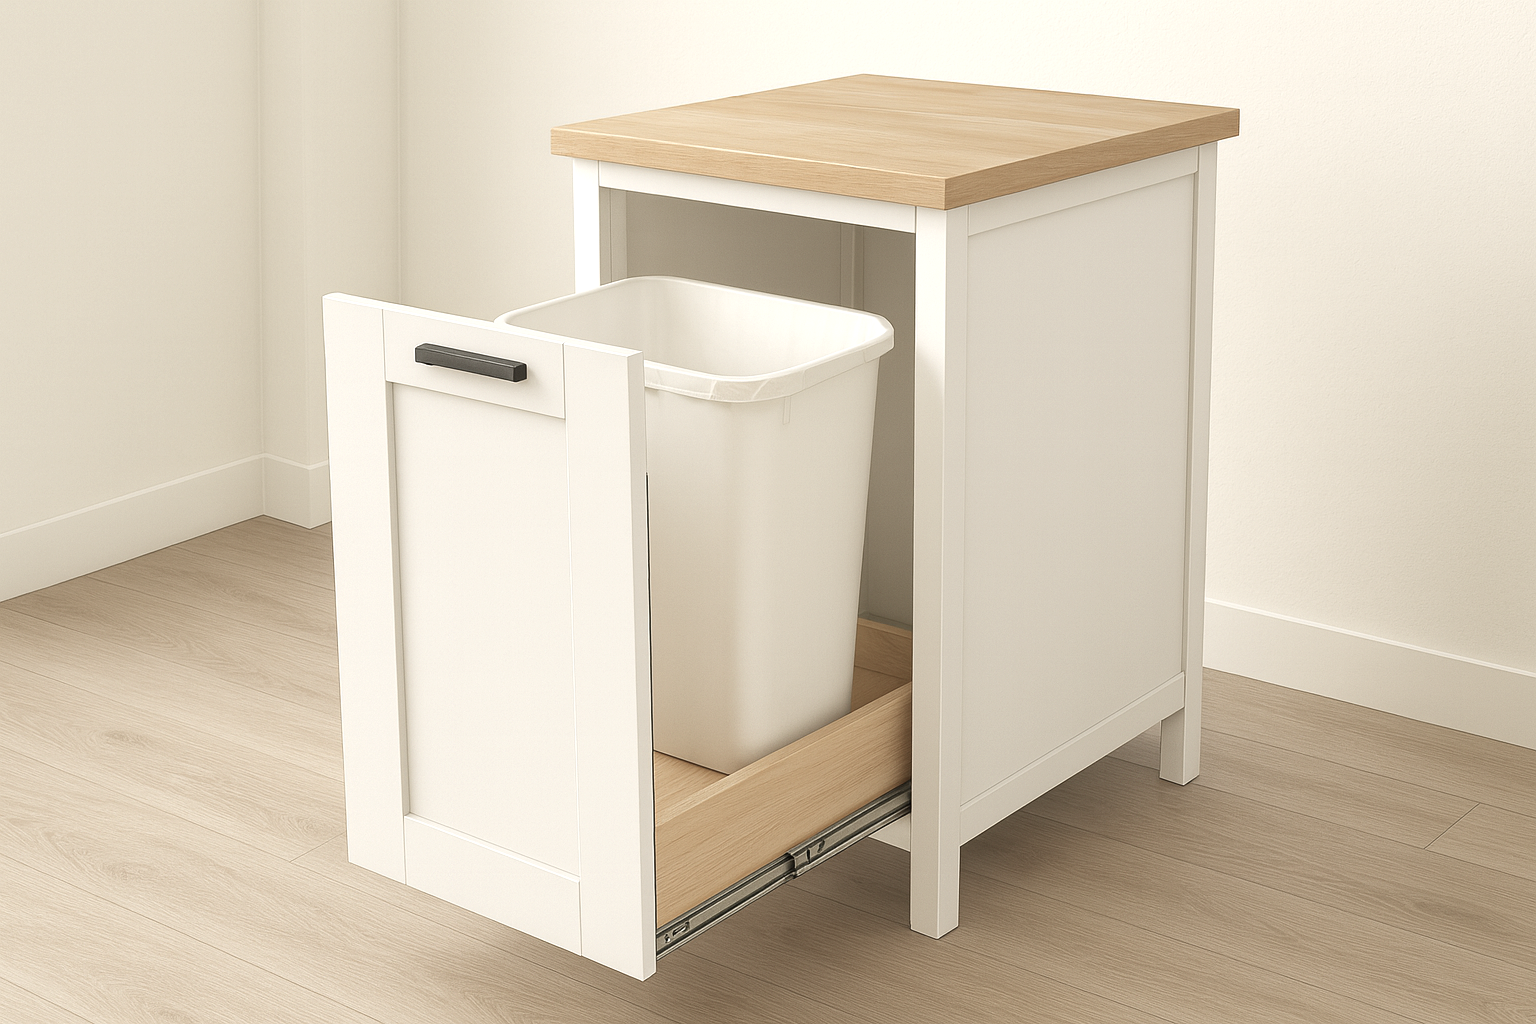
Build a space-saving kitchen island with hidden double trash cans! This compact kitchen island is perfect for small kitchens, offering extra counter space, storage, and a pull-out trash/recycle center. Designed to fit two standard 13-gallon bins, the hidden slide-out makes waste sorting easy and discreet. Great for food prep - chop on top, no cutting board required, then just slide waste into waste, or compost into compost, you have both options with this double pull out trash center! The simple frame is beginner-friendly and budget-conscious, built from off-the-shelf lumber and minimal tools. Add a custom top and optional back panel for a polished look that works in any kitchen. ✅ Fits two standard kitchen trash cans ✅ Slide-out for easy access and odor control ✅ Doubles as a prep space or extra storage ✅ Compact footprint – great for small kitchens
Specifications
| Project type | Kitchen Island Plans |
|---|---|
| Room | kitchen |
| Difficulty | Advanced |
| Estimated cost | $100-$150 |
Dimensions
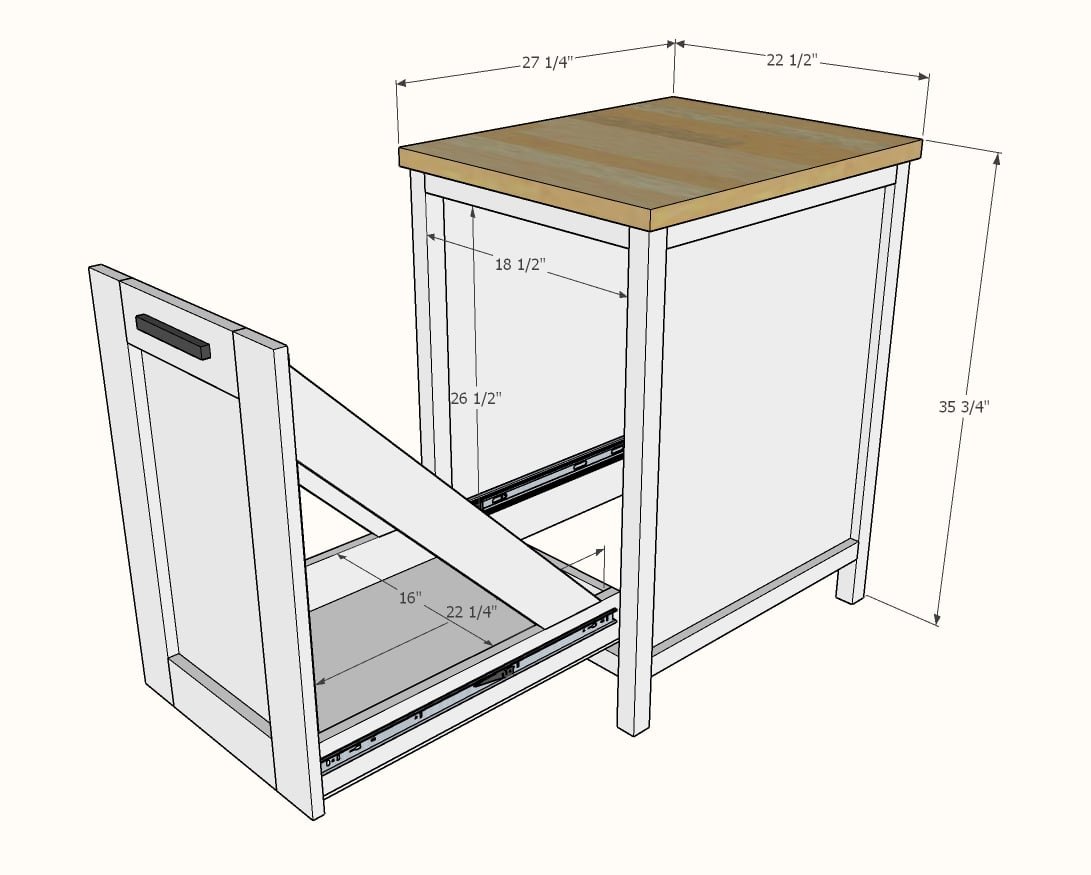
Use the size-specific shopping and cut lists below.
Shopping List
- 2 - 2x2 @ 8 feet long
- 1 - 1x2 @ 8' long
- 1 - 1x2 @ 4' long
- 2 - 1x4 @ 10 feet long (can also use 3 - 1x4 @ 8 feet long)
- 1 sheet of 3/4" cabinet grade plywood
- 1 set of 24" full extension drawer slides
- 2" cabinet screws (about 8 for attaching the countertop)
- Countertop or butcher block top 27-1/4" x 22-1/2"
- 1 pull or handle
- 2 standard 10 gallon plastic waste bins less than 16" wide x 24" tall x 11" deep
Cut List
Carcass
- 4 - 2x2 @ 34-1/2" - legs
- 4 - 1x2 @ 23-1/4" - side trim
- 2 - 3/4" plywood @ 23-1/4" x 30-1/2" - side panels
- 2 - 2x2 @ 18-1/2" - front trim
- 2 - 1x2 @ 18-1/2" -back trim
- 1 - 3/4" plywood @ 18-1/2" x 30-1/2" - back panel
- 1 - butcher block top or similar @ 27-1/4" x 22-1/2"
Drawer
- 2 - 1x4 @ 23-3/4" - drawer sides
- 1 - 1x4 @ ~16" - drawer back - should be measured and cut to fit while building
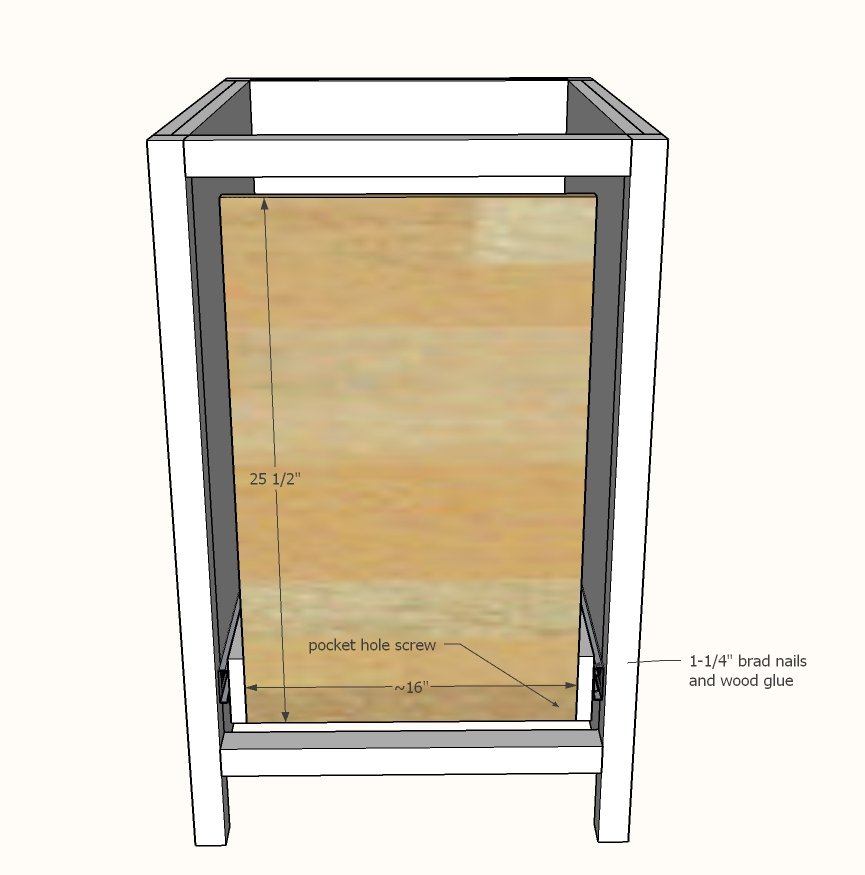
- 1 - 3/4" plywood @ 25-1/2" x ~16" - should be measured and cut to fit while building
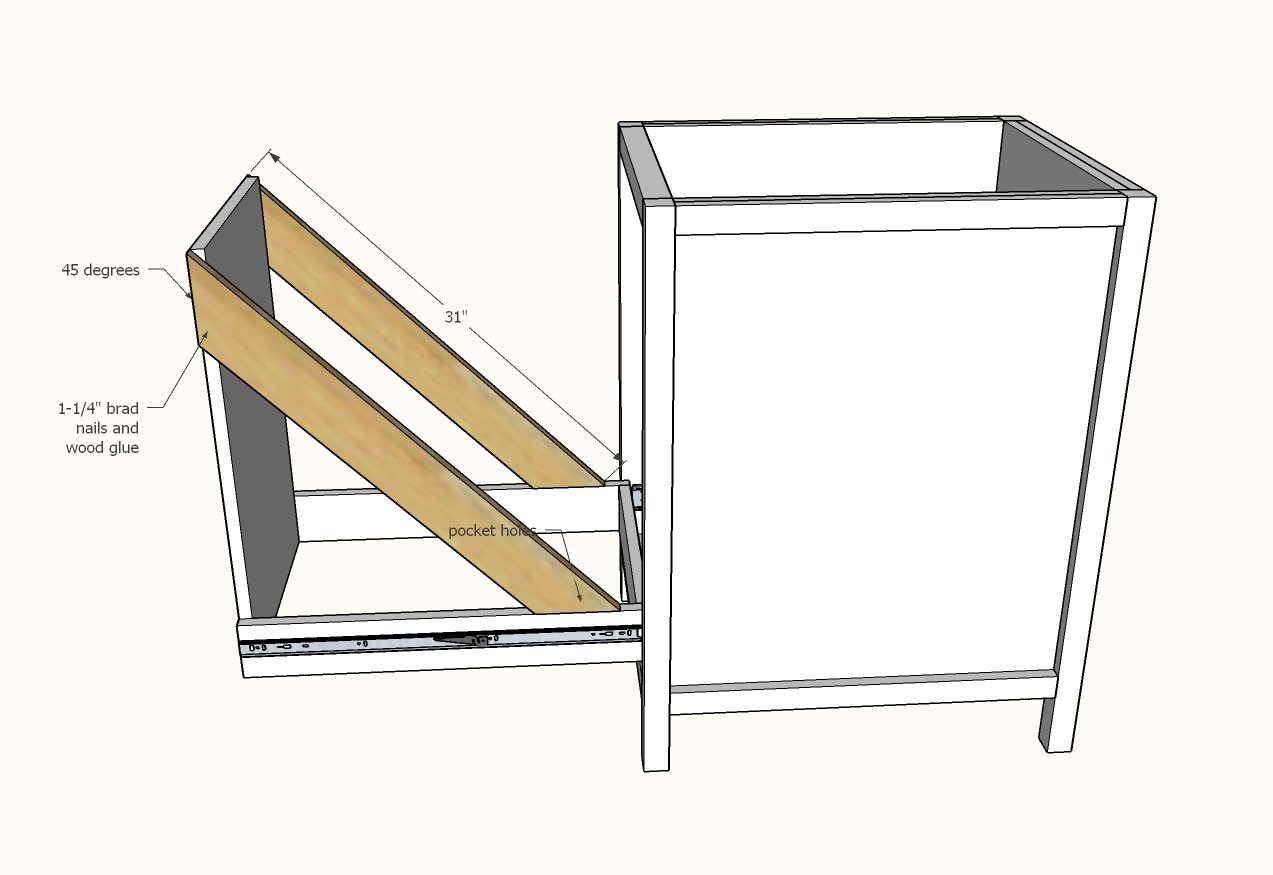
- 2 - 1x4 @ 31" - long point to long point measurement, both ends cut at 45 degrees, ends are NOT parallel
- 1 - 3/4" plywood @ ~16" x 22-1/4" - drawer bottom
- 2 - 1x4 @ 27-1/4" - drawer face stiles
- 2 - 1x4 @ 11-1/4" - drawer face rails
Tools
- measuring tape
- square
- pencil
- safety glasses
- hearing protection
- kreg-jig
- drill
- compound miter saw
- table saw
- nailer
- sander
Step-by-step Instructions
Step 1
Drill two 3/4" pocket holes on each end of the 1x2 side trim pieces. Attach to the 2x2 legs, flush on back side, with 1-1/4" pocket hole screws.
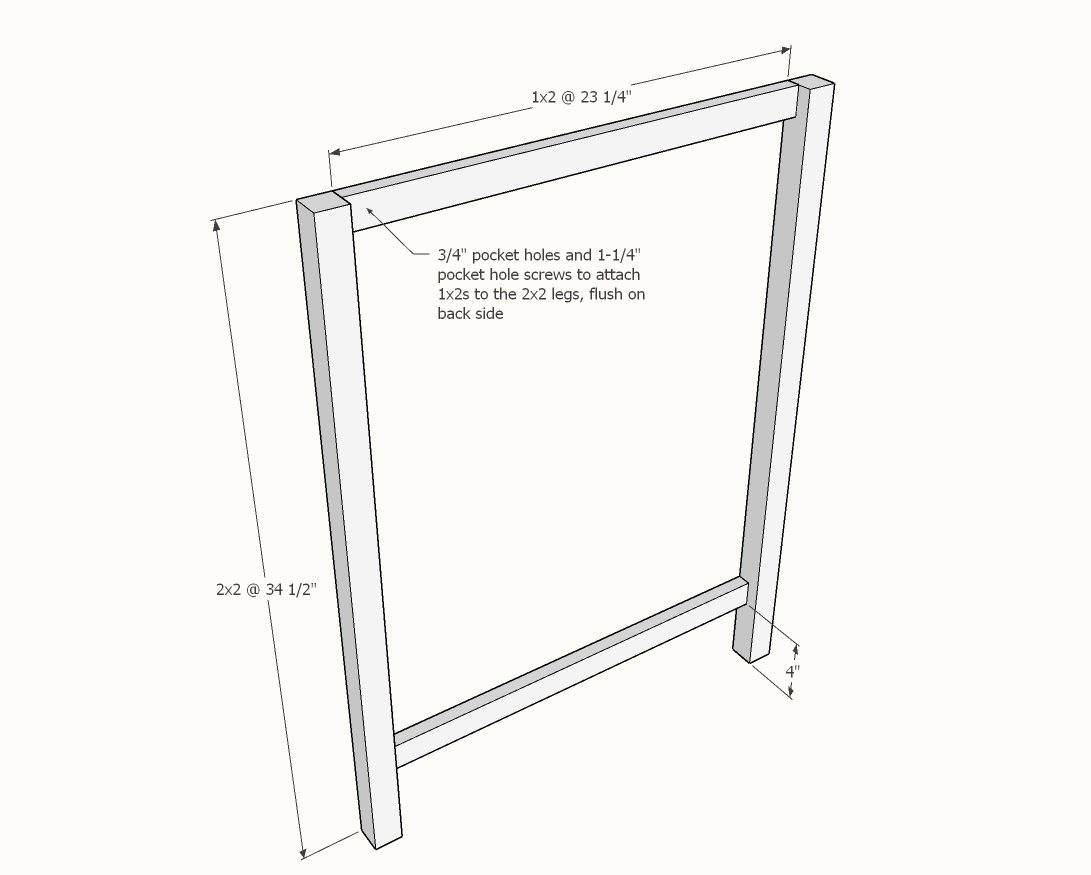
Make sure your plywood panel fits inside the 2x2s as shown.
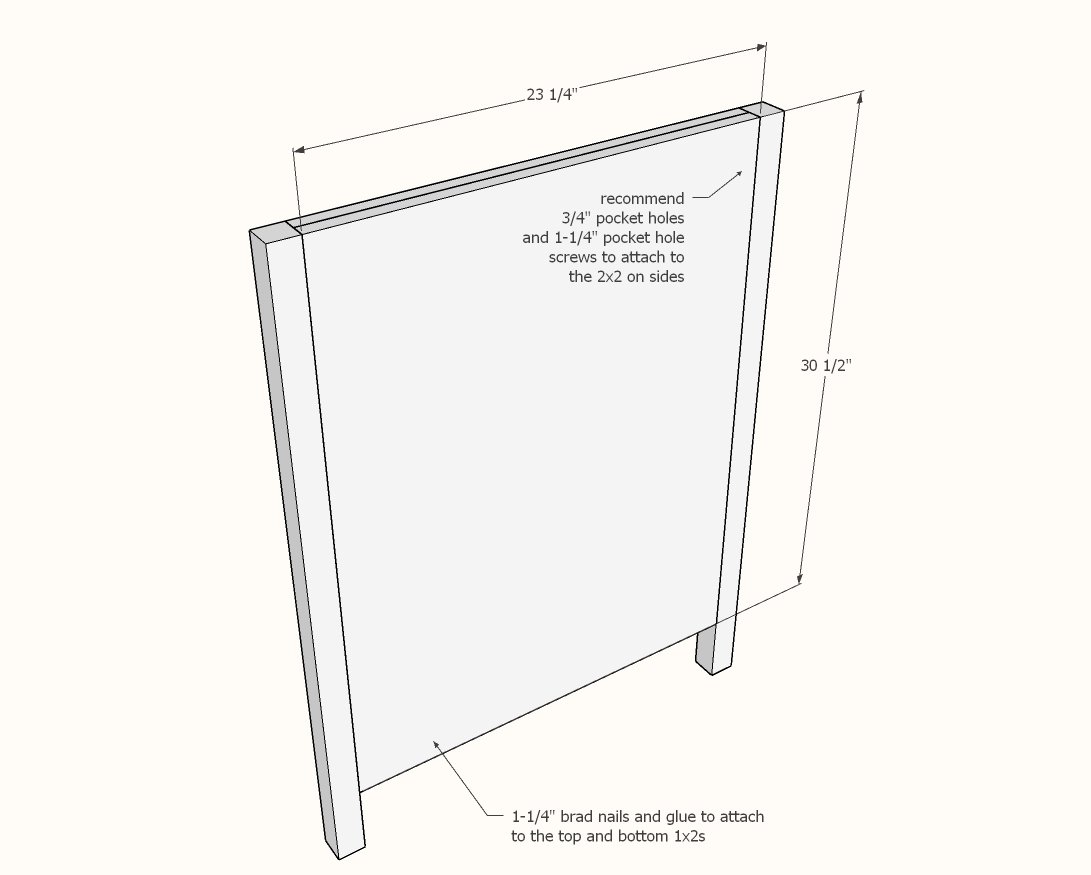
Drill 3/4" pocket holes along long edges of side plywood panels, about every 8". Apply glue to back side of 1x2s. Place panel on top of 1x2s and nail down with 1-1/4" brad nails. Then attach plywood panel to the legs with 1-1/4" pocket hole screws. Repeat steps 1 and 2 to make a second side panel.
Step 3
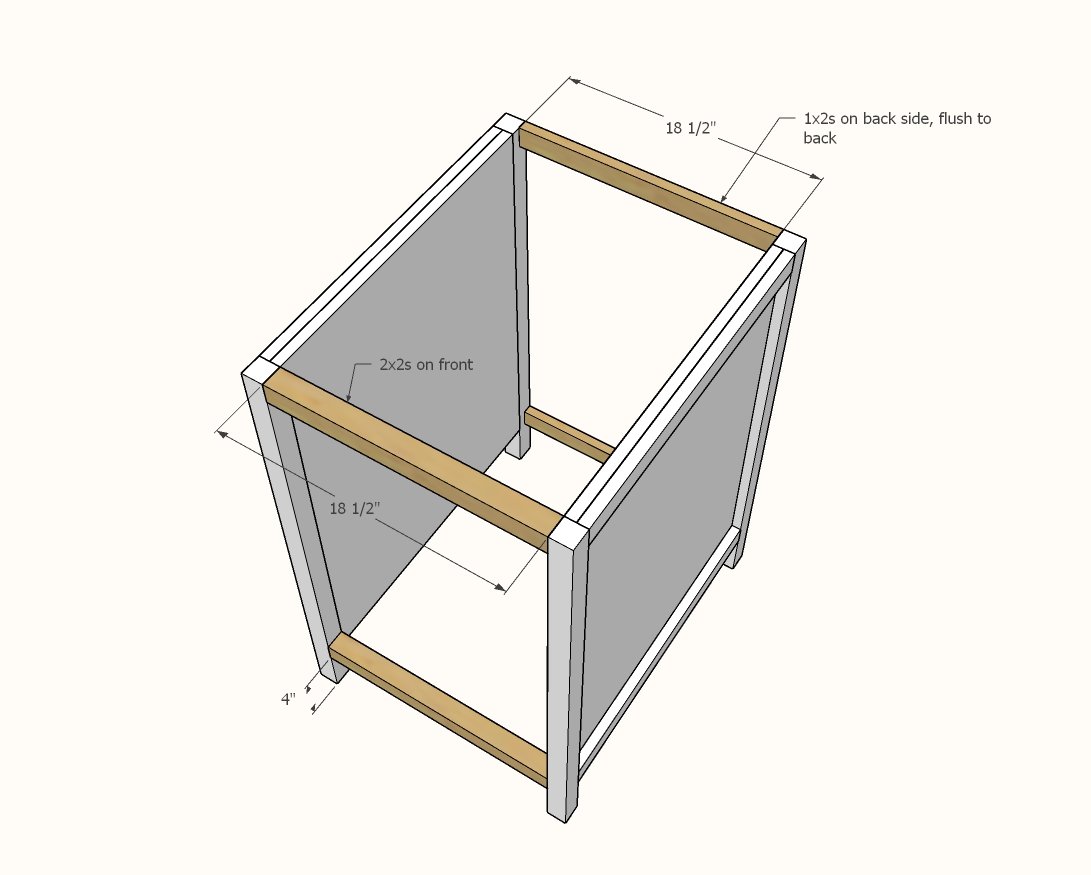
Drill two 3/4" pocket holes on both ends of the remaining 1x2 trim pieces. Attach to back with 1-1/4" pocket hole screws. Set pocket hole jig to 1-1/2" setting. Drill two pocket holes on each end of the 2x2s and attach to the legs at the front of the cabinet.
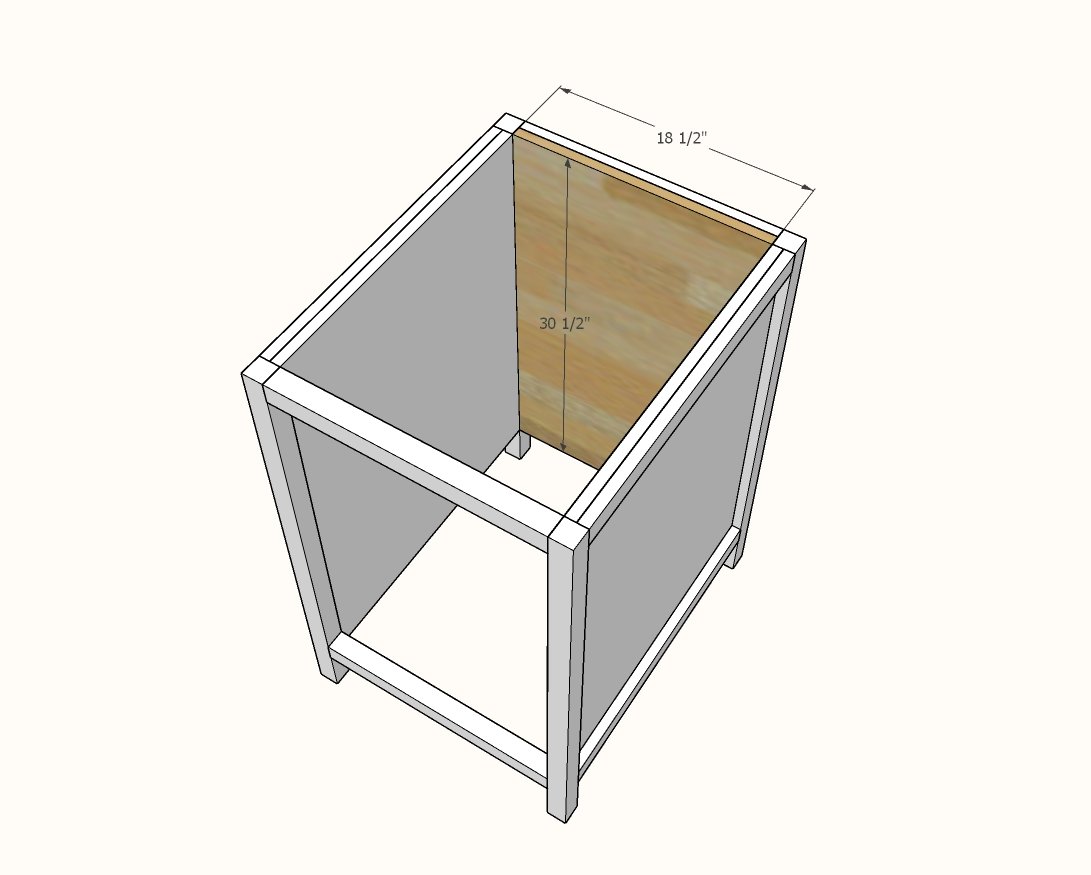
Fit back plywood panel inside the back.
Drill pocket holes along side edges and attach panel inside the back as you did the sides. This completes the carcass build.
Now it's time to work on the drawer.
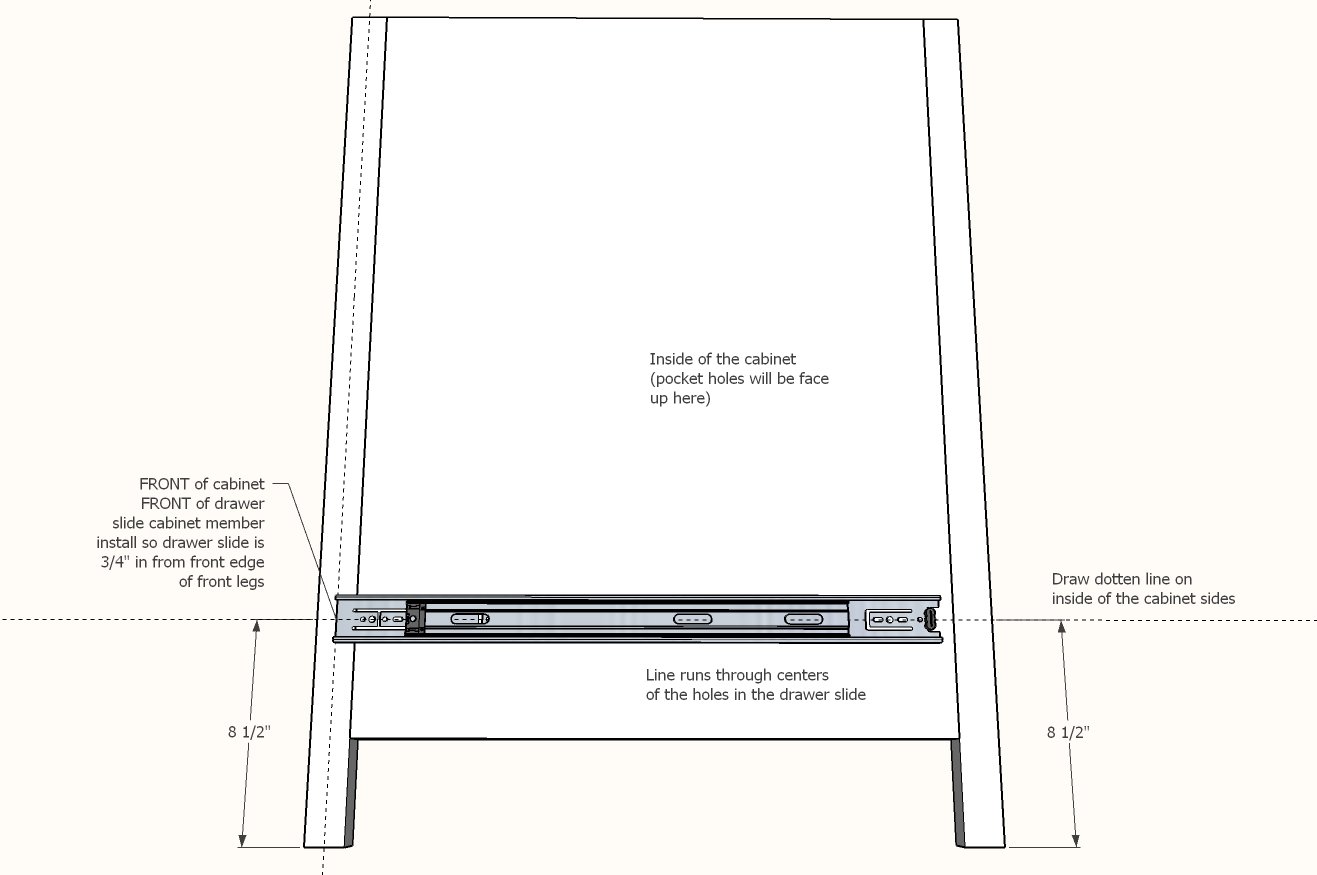
Draw a level line, 8-1/2" up from the base. Separate out the drawer slides cabinet member from the drawer member. Position the cabinet member in the cabinet so the line is centered on the screw holes of the drawer slide, set in 3/4" from the front leg of the cabinet. Attach the slide with screws into the line. Repeat on the other side of the cabinet.
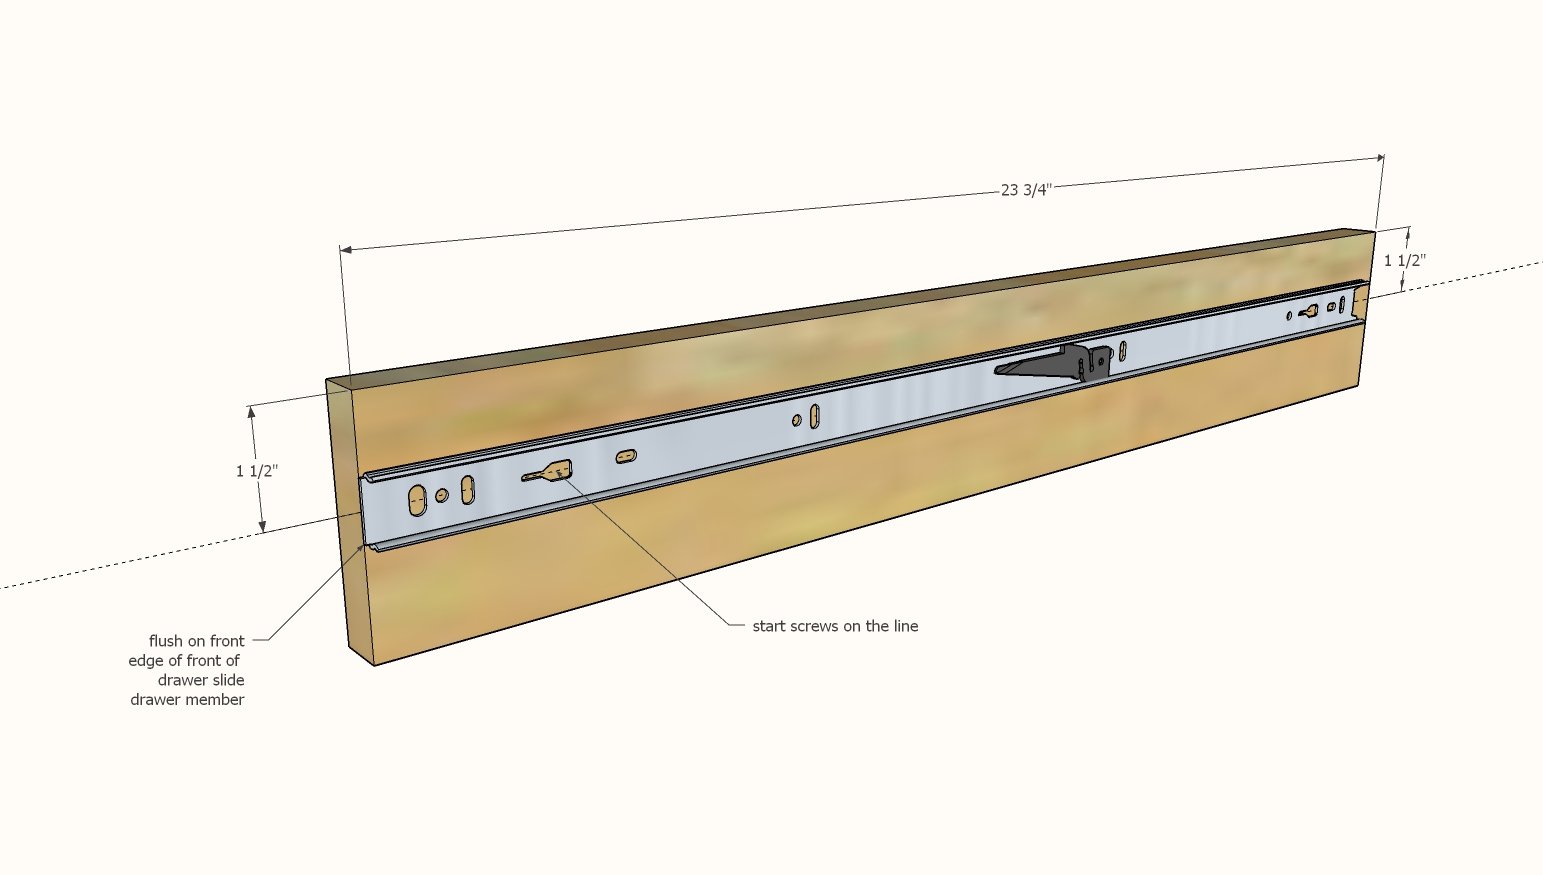
Draw a level line 1-1/2" down from the top edge of the 1x4 drawer sides.
Attach the drawer member to the 1x4, with the line centered in the screw holes of the drawer slide. Repeat for opposite side, but remember to keep the other drawer slide in mirror as it will be installed on the opposite side of the drawer.
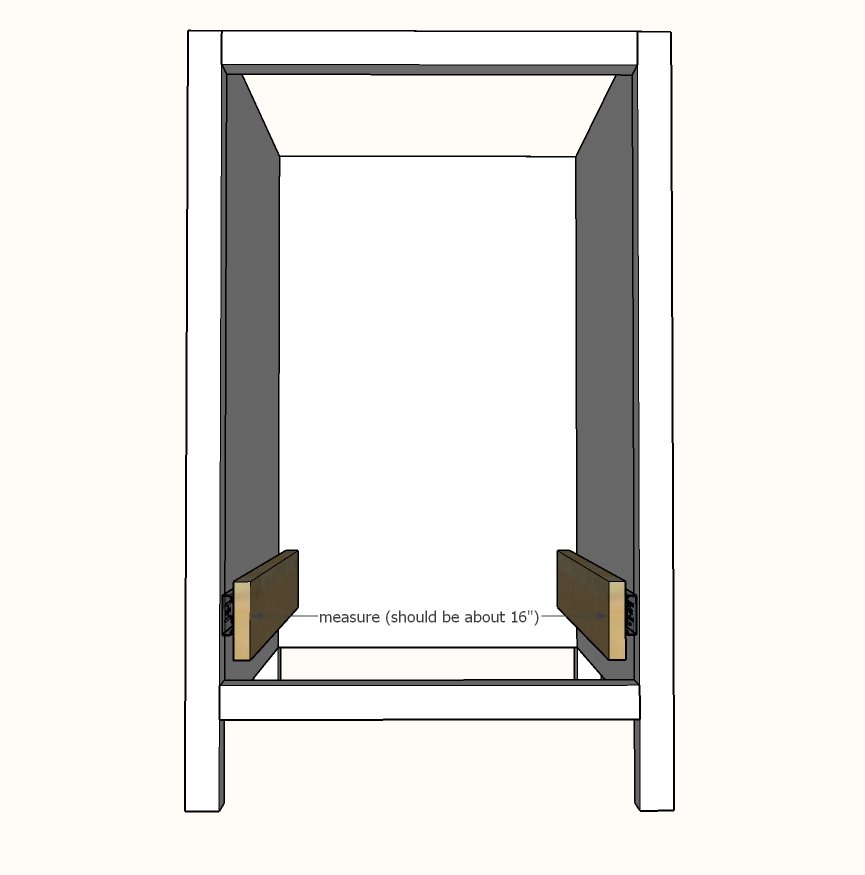
Slide the drawer sides into the cabinet members.
Measure in between the drawer sides - this should be about 16".
Step 8
Cut the back of the drawer to your measurement and attach inside the drawer box with pocket hole screws.
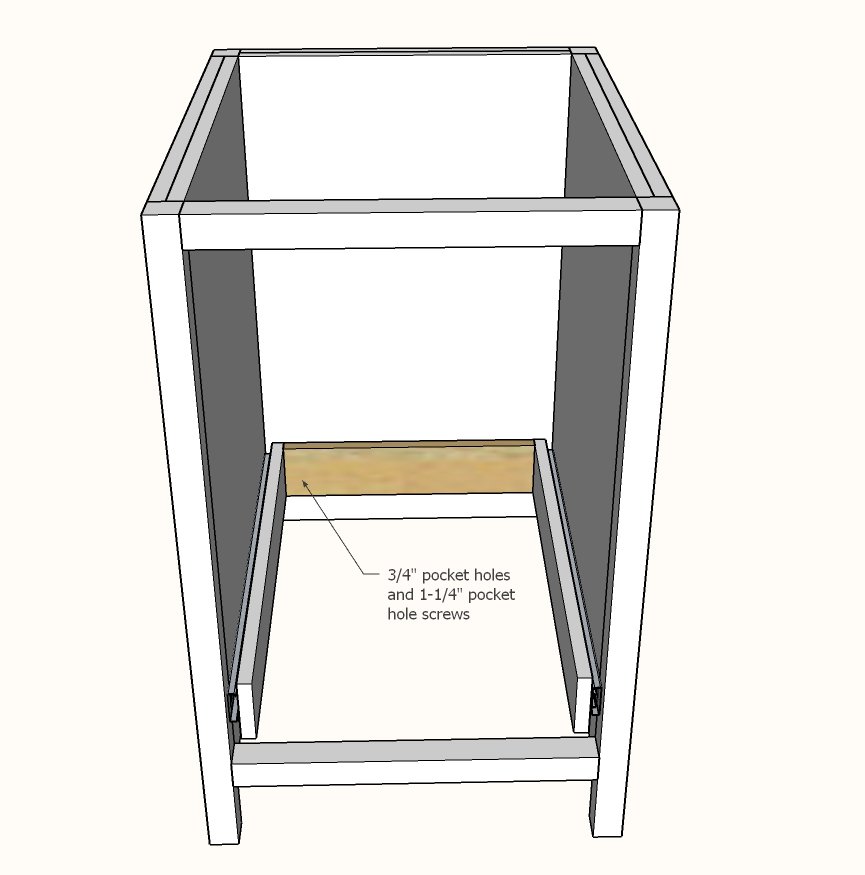
Repeat these steps for the front of the drawer.
Keep in mind that part of the plywood drawer front is exposed, so avoid pocket holes that may be visible after the drawer frame is installed.
Step 10
Attach drawer side supports with glue and pocket holes.
Measure the inside opening of the bottom of the trash drawer.
Cut 3/4" plywood to fit inside the opening. Drill 3/4" pocket holes on all four edges. Insert the panel inside the bottom of the drawer and attach with 1-1/4" pocket hole screws.
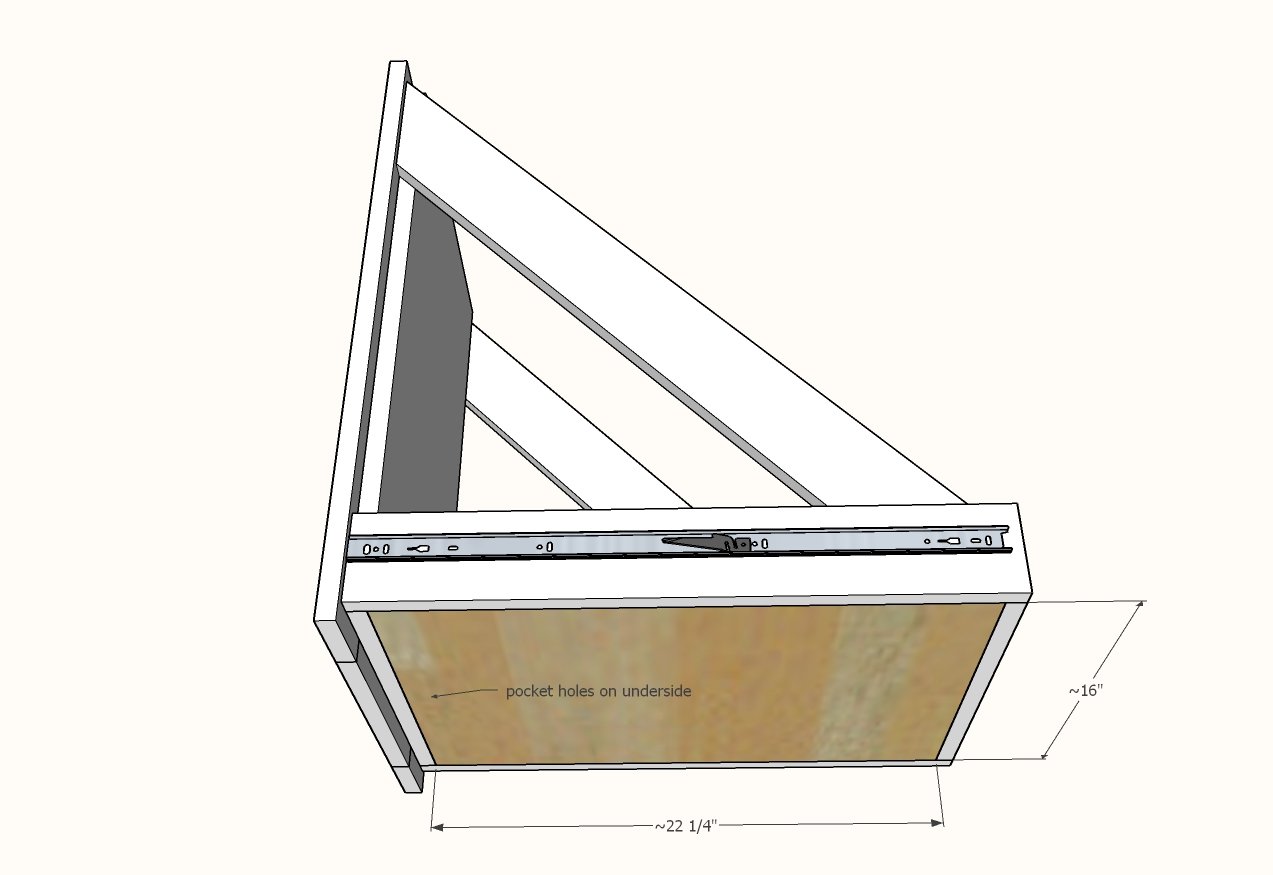
Build the drawer face with 3/4" pocket holes and 1-1/4" pocket holes screws.
Set the drawer face on the drawer and center with an even gap around all four sides. Attach with 1-1/4" brad nails and glue. Pull the drawer out and further secure with 1-1/4" screws (yes, you can use pocket hole screws).
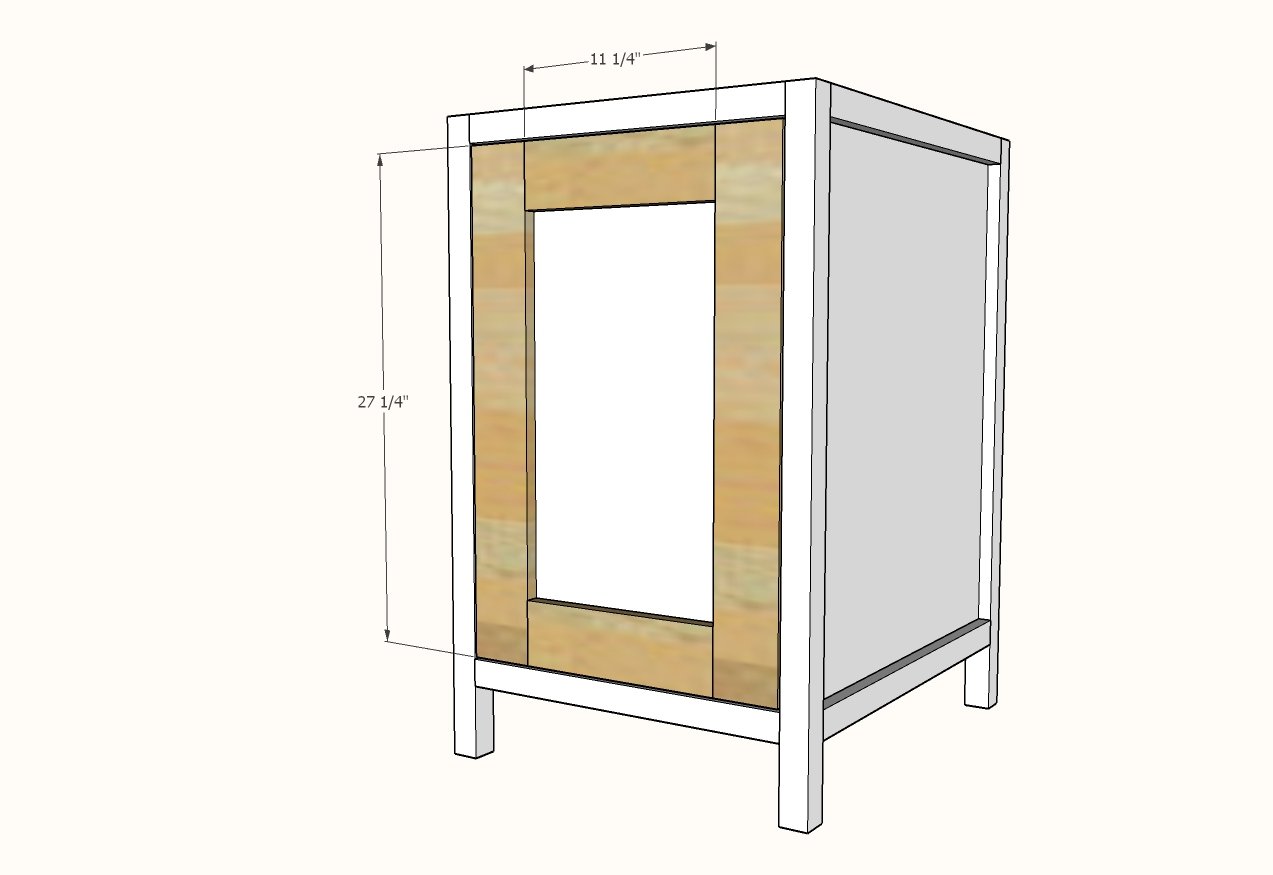
Step 13
Attach the countertop to the top of the cart with cabinet screws through underside of side trim.
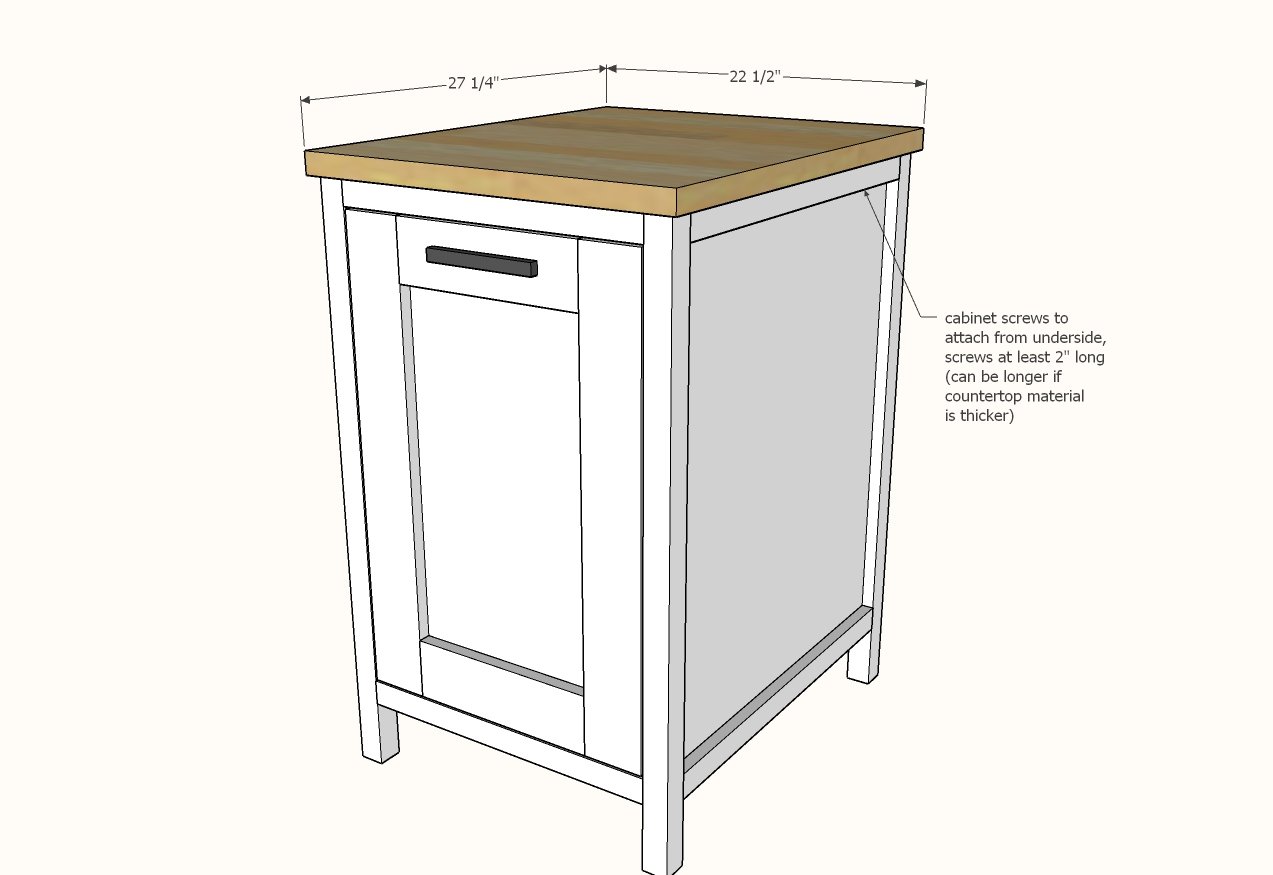
Finishing
Sand all surfaces, starting with a medium grit and finishing with fine. Wipe off the dust, fill any holes or gaps with wood filler, and sand smooth once dry. Apply primer if you're painting, then finish with your choice of paint or stain and seal with a durable clear topcoat. For outdoor projects, use exterior-rated primer, paint or stain, and sealer so the piece stands up to the weather.
Source (temporary): https://www.ana-white.com/woodworking-projects/small-kitchen-island-slide-out-double-trash-cans