Small Rustic X Console
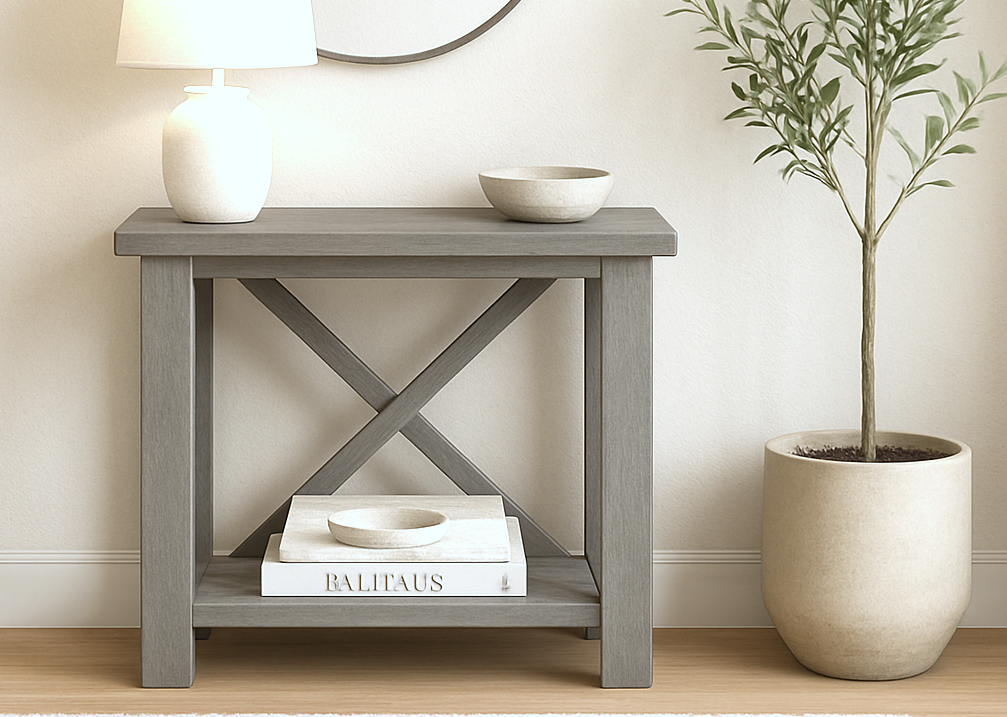
Table – Included Elevate your entryway, hallway, or living space with this beautiful Small Rustic X Console Table featuring a classic farmhouse "X" design and rich brown-gray wood stain that highlights the natural grain. This versatile piece works perfectly as a small console table, hall table, or even as a stylish sideboard for compact spaces. Designed with clean lines and timeless character, this table balances rustic charm and modern simplicity. The lower shelf provides functional storage for baskets, books, or décor, while the sturdy build ensures long-lasting durability. Key Features: • • Ideal for narrow hallways, entryways, or as side tables • Modern farmhouse design with “X” back support • Lower shelf for added storage or display Whether you're a seasoned woodworker or a beginner DIY enthusiast, our step-by-step make it easy to build your own designer-inspired hall table at a fraction of the cost. Dimensions: [Insert customizable dimensions here] Style it your way – Pair with a round mirror, neutral ceramics, and a potted olive tree for a cozy, curated look. Also check out our full size Rustic X Console Table Plans, Rustic X End Table Plans, and our Rustic X Coffee Table Plans.
Specifications
| Project type | Console Table Plans |
|---|---|
| Room | Bedroom |
| Style | Farmhouse Furniture |
| Difficulty | Intermediate |
| Estimated cost | $20 - $50 |
Dimensions
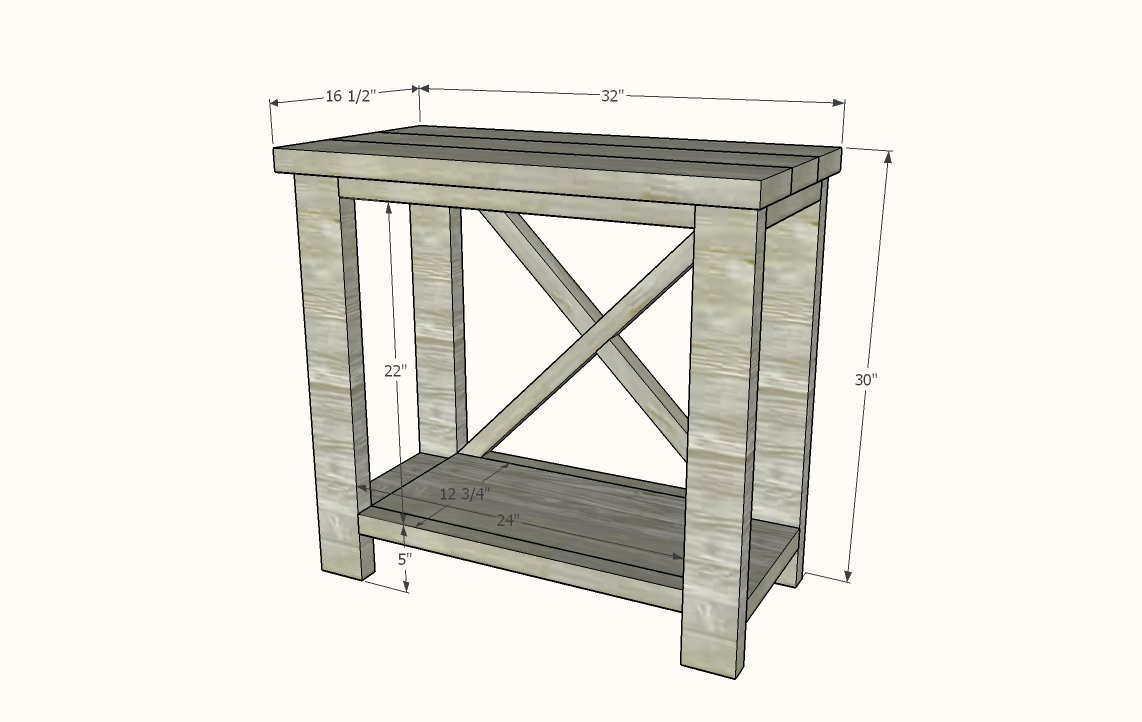
Use the size-specific shopping and cut lists below.
Shopping List
1 - 2x6 @ 8 feet long
2 - 2x2 @ 8 feet long
2 - 2x4 @ 8 feet or stud length (92-5/8") long
1 - 1x12 @ 24"
Cut List
4 - 2x4 @ 28-1/2" - legs
4 - 2x2 @ 24" - front and back trim
4 - 2x4 @ ~11-1/4" - end trim- cut to same width as the 1x12s
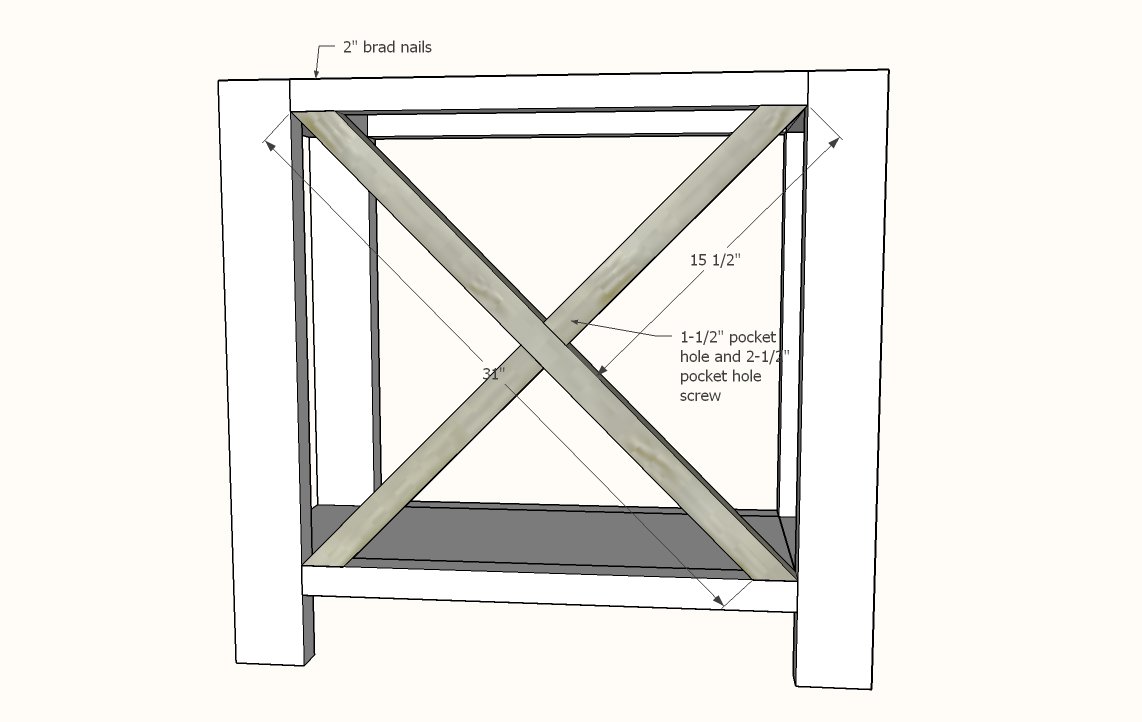
1 - 2x2 @ 31" - long point to short point measurement, both ends cut at 45 degrees, ends ARE parallel
2 - 2x2 @ 15-1/2" - one end cut at 45 degrees, long point measurement
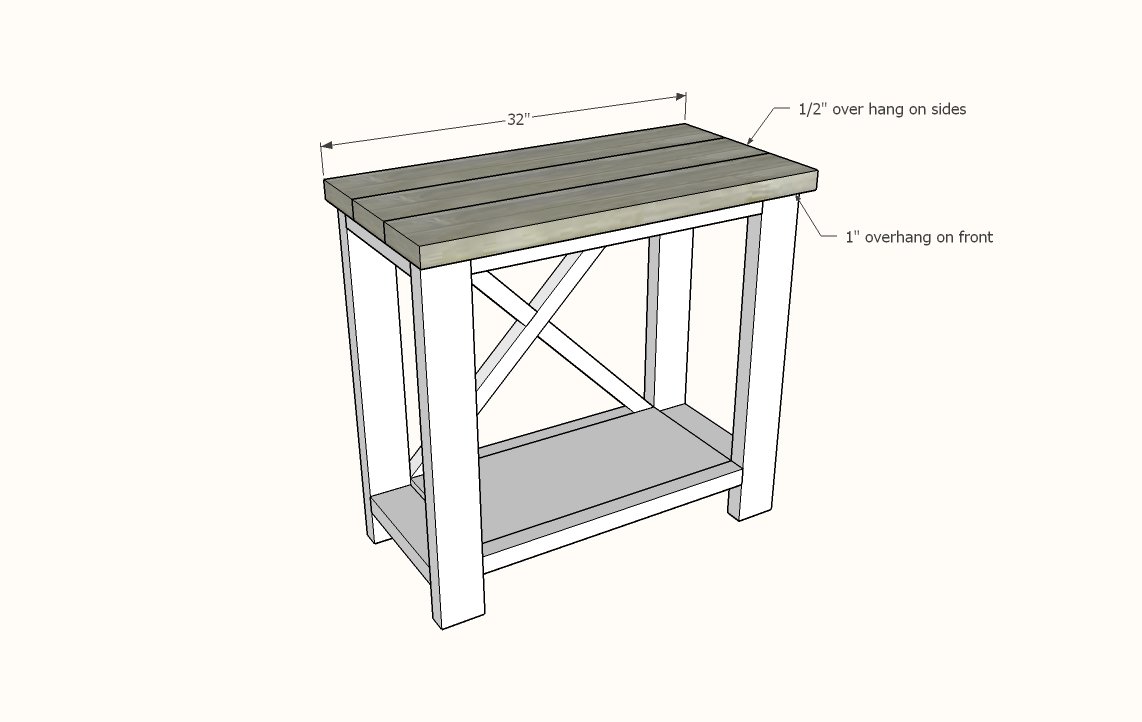
3 - 2x6 @ 32" - top
1 - 1x12 @ 24" - shelf
Tools
- measuring tape
- square
- pencil
- safety glasses
- hearing protection
- kreg-jig
- drill
- circular saw
- nailer
- sander
Step-by-step Instructions
Step 1
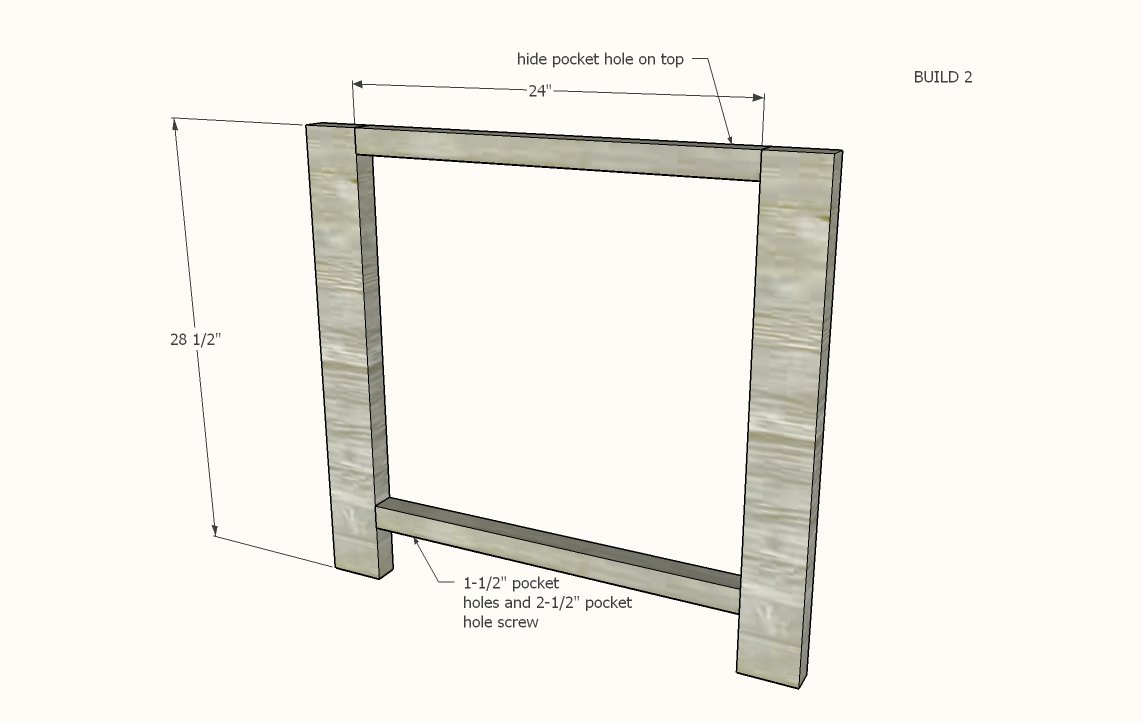
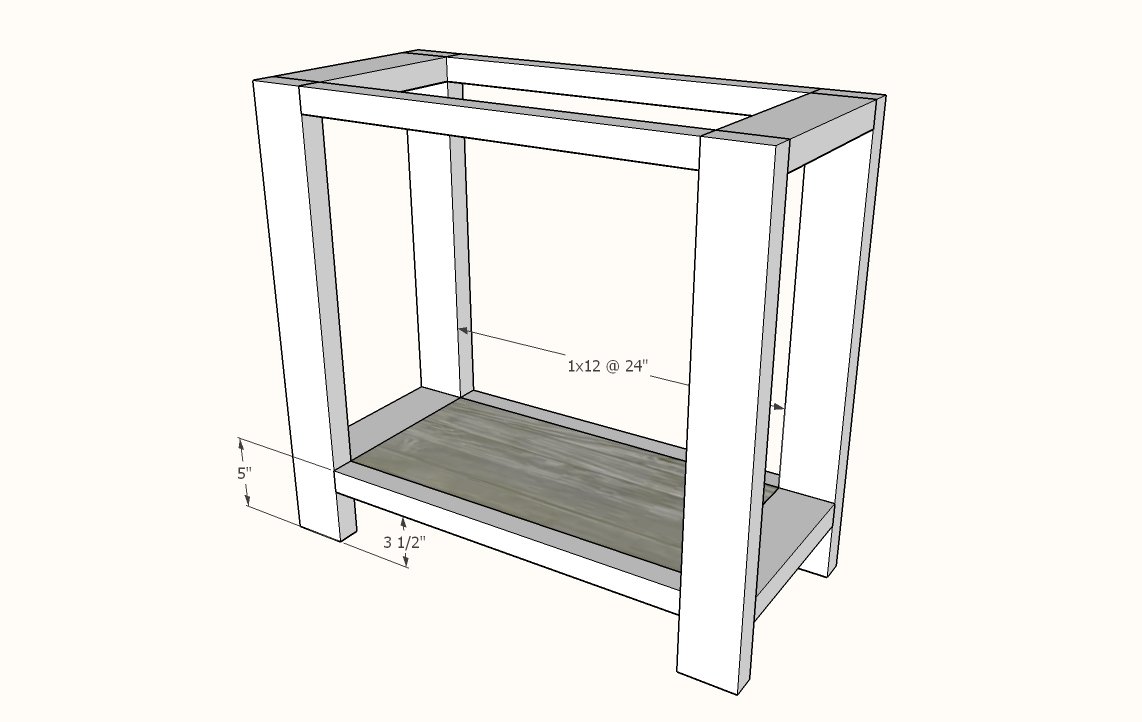
Build two of the frame for the front and back. The lower 2x2 is attached at the top 5" up on the leg (see noted in step 3 diagram)
Step 2
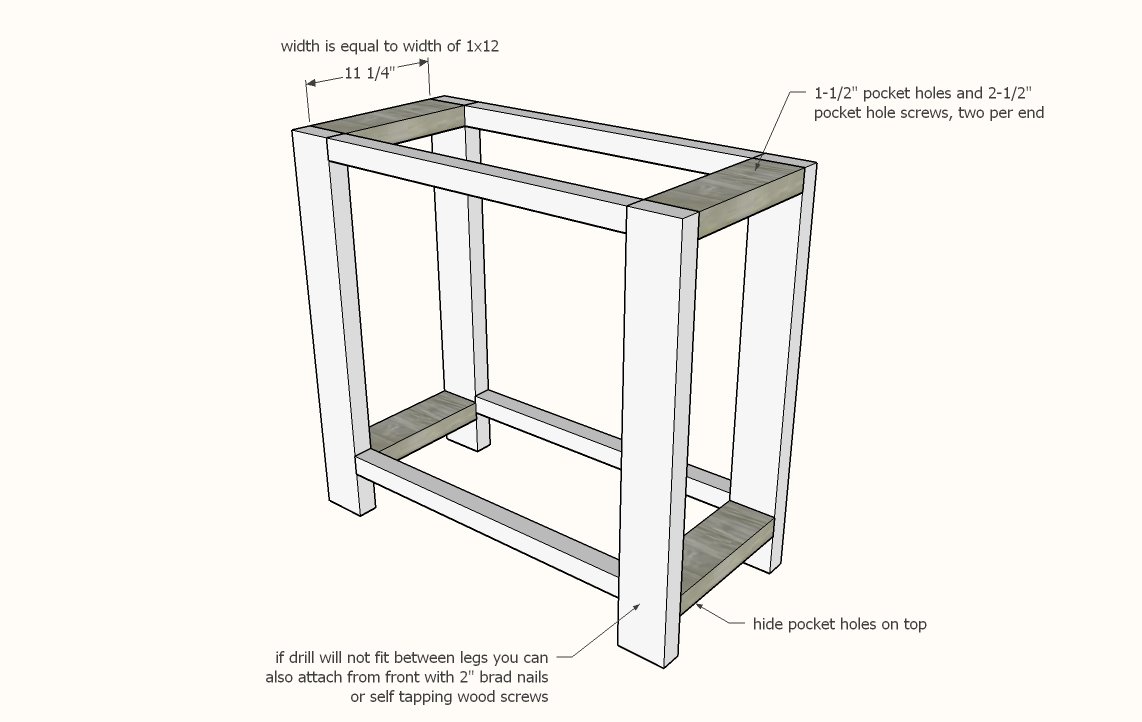
Measure the width of your 1x12 - should be 11-1/4" wide. If it differs, cut your 2x4s to this measurement. Attach the two frames together with the 2x4s. Hide pocket holes on tops and bottom. Decorative bolts can be used in place of the pocket holes.
Step 3
Set the Kreg Jig for 3/4" material. (NOTE: You may wish to finish drilling all 1-1/2" setting pocket holes before adjusting your pocket hole jig) Drill two pocket holes on ends of the 1x12 shelf, and three pocket holes along the longer edges of the 1x12s. Attach inside bottom shelf with 1-1/4" pocket hole screws, flush to the top.
Fit the X pieces in the back of the console.
Attach the longer piece first with glue. Repeat for the shorter pieces.
Cut the top boards and join together with 1-1/2" pocket holes and 2-1/2" pocket hole screw.
Then attach the entire top to the console with 2-1/2" screws from the underside of the 2x2s and 2x4s. You can use 2-1/2" pocket hole screws.
Finishing
Sand all surfaces, starting with a medium grit and finishing with fine. Wipe off the dust, fill any holes or gaps with wood filler, and sand smooth once dry. Apply primer if you're painting, then finish with your choice of paint or stain and seal with a durable clear topcoat. For outdoor projects, use exterior-rated primer, paint or stain, and sealer so the piece stands up to the weather.
Source (temporary): https://www.ana-white.com/woodworking-projects/small-rustic-x-console