Splayed Leg X Bench
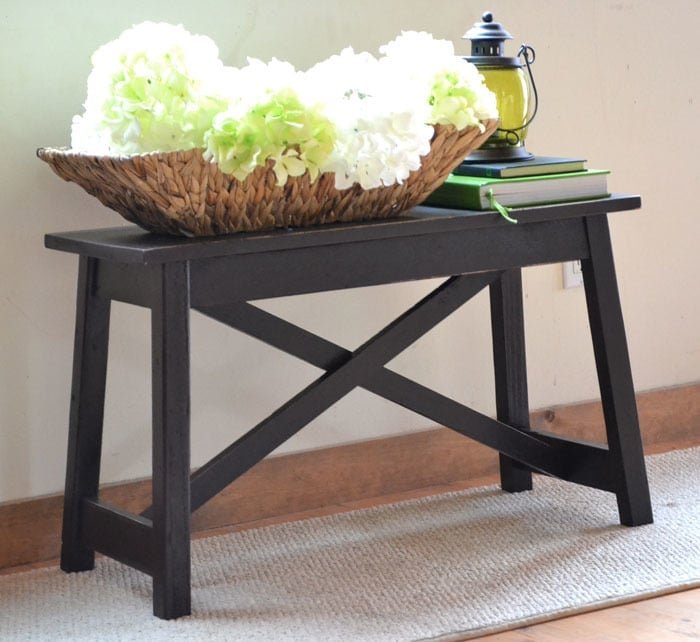
We love this cute bench! The splayed legs are extra sturdy, and the size is just perfect for moving around the home, to use as you need. It works as a nightstand, seating, or an entryway or bath bench. You can easily alter the length by just increasing the aprons and top sizes. include lots of diagrams, shopping list and cut list. UPPDATE: I have had this bench for more than 15 years. It is STILL going strong! This is a great bench because it is lightweight, NOT tippy, super sturdy, great size to use as a side table, end table or extra seating, can hold a considerable weight, doubles as a step stool, and charming design. GREAT PROJECT.
Specifications
| Project type | Bench |
|---|---|
| Room | Kids and Toys |
| Style | Farmhouse Furniture |
| Difficulty | Intermediate |
| Estimated cost | Under $20 |
Dimensions
Use the size-specific shopping and cut lists below.
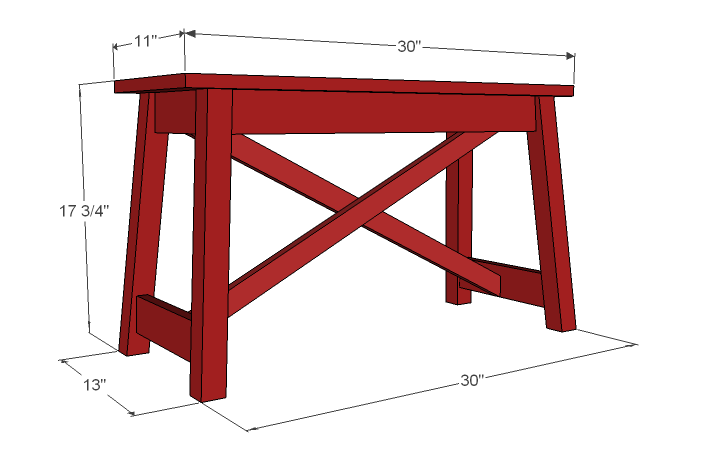
Shopping List
- 1 – 2×2 @ 8 feet long
- 2 – 1×3 @ 8 feet long
- 1 - 1x2 @ 8 feet long
- 1 – 1×4 @ 8 feet long
- 1 – 1×12 @ 30″ long
- 2″ and 2 1/2″ screws or pocket hole screws
- Glue, wood filler, 120 grit sandpaper and finishing supplies
Cut List
- 4 – 2×2 @ 17 1/4″, end cut parallel to each other at a 5 degree angle off square and a 5 degree bevel
- 2 – 1×3 @ 7″ (both ends cut 5 degrees off square, NOT parallel to each other, short point to short point)
- 2 – 1×3 @ 9 1/4″ (Both ends cut at 5 degrees off square, NOT parallel to each other, short point to short point)
- 2 – 1×3 @ 24″ (both ends cut at 5 degrees off square, NOT parallel to each other, short point to short point)
- 2 – 1×2 @ 48″ (approximate, just cut your 1×2 in half)
- 1 – 1×12 @ 30″ (Top)
This list has been updated per reader comments.
Tools
- measuring tape
- square
- pencil
- safety glasses
- hearing protection
- drill
- compound miter saw
- sander
- level
- countersink drill bit
Step-by-step Instructions
Cut the Legs
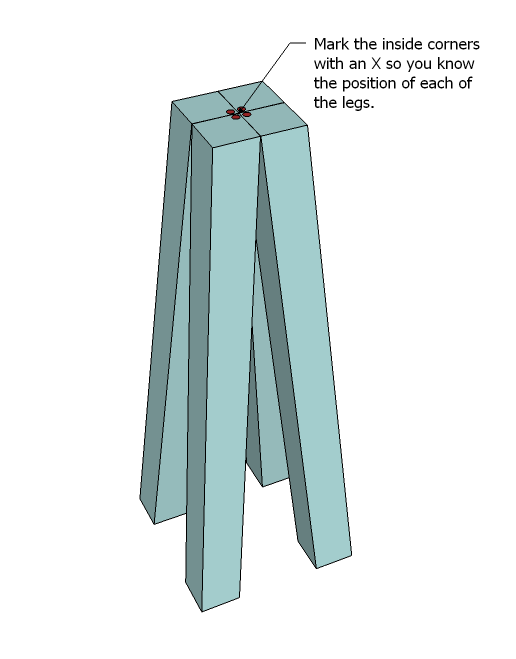
Just like yesterday’s Simple Stool Plan, you will need to cut your legs at a double bevel. I highly recommend a compound miter saw set at 5 degrees angle (this would be like rotating your saw so that it makes a pizza shaped cut) and a five degree bevel (this would be like cutting carrots, with the knife blade cutting at an angle away from your hand as you cut diagonal strips) at the same time. The legs are the ONLY pieces that need to be cut at a double bevel. The legs need to be cut at 5 degrees off square (angle) and a 5 degree bevel, 17 1/4″ to 17 1/4″, with the ends parallel to each other (so you would make your first cut, slide your board down 17 1/4″ and make a second cut to have your first leg. Then simply slide your board down and make a third cut to have two legs. Then slide the board again and so on until all four legs are cut. Line your legs us as shown above, and mark the inside corner. This is very important, as with such a slight angle, it will be easy (I’ve done it many times) to get confused as to what direction your legs should be placed at.
End Apron and Base
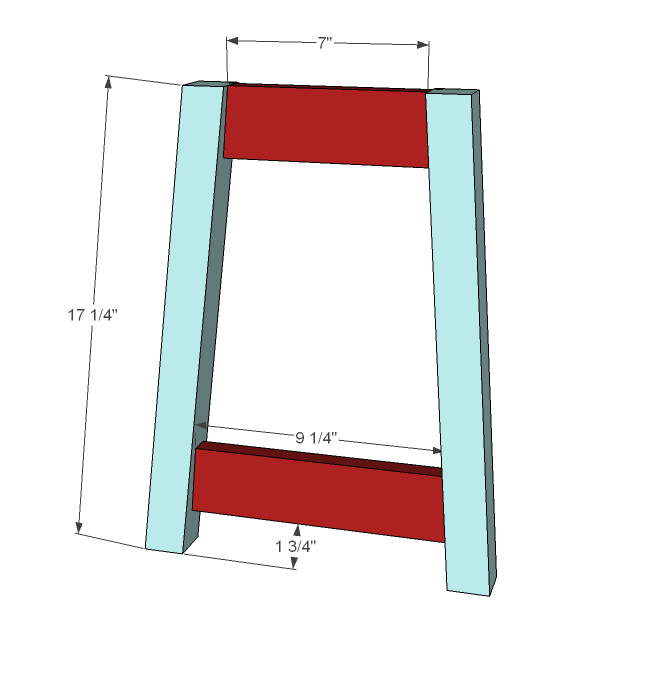
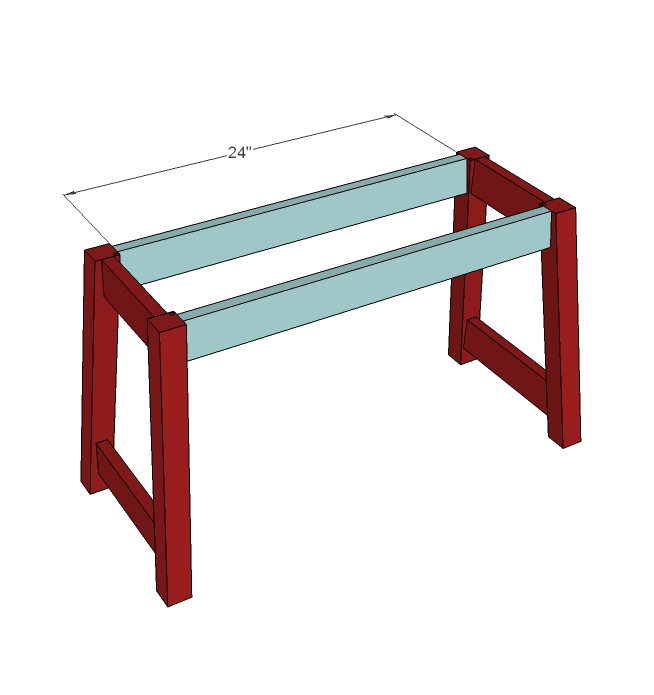
Okay, start by marking the placement of the end boards as shown above. Predrill your holes (I used pocket holes, but you could use countersunk screws and glue). Center the boards on the legs and attach. The boards should be parallel to the ground, not in line with the legs. The top is flush with the top. You will need to make two of these. Remember the placement of the mark on the top of the leg. End pieces are cut at 5 degrees off square, ends NOT parallel to each other, measurement given is short point to short point.
Side Aprons
Attach the side aprons to the ends as shown above, same as above. The top aprons are cut at 5 degrees of square, ends NOT parallel to each other, measurement given is short point to short point.
Cutting Cross Supports
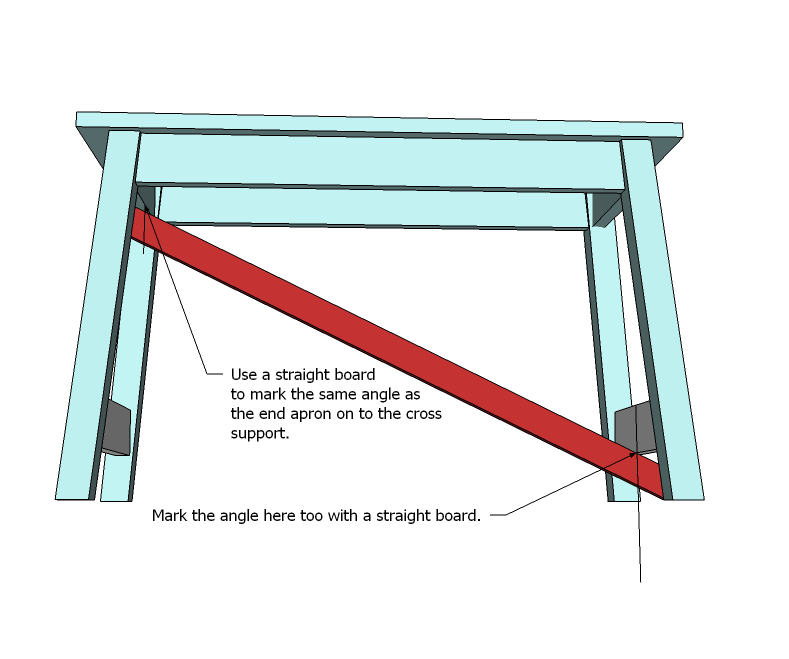
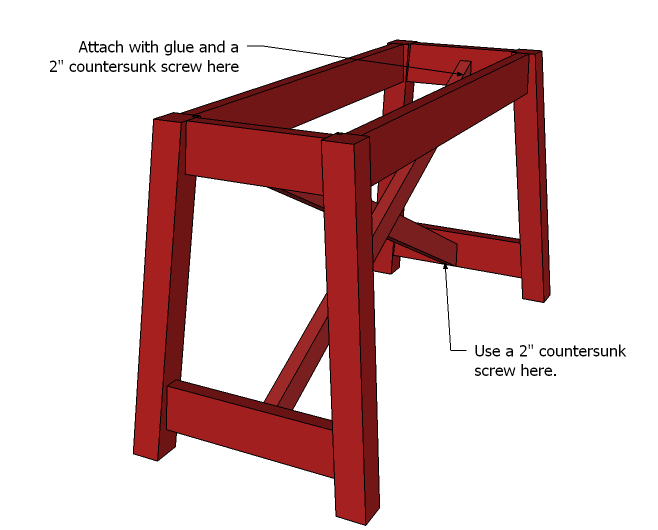
I wanted to do this step so that you could make your bench longer without trouble. And also, I understand that if you just slightly moved your aprons in or out, it would change your measurements and angles for the cross support. So good old common sense is going to help us out today. Mark the centers of the top and bottom aprons. Flip the bench over. Grab one of the 1x2s cut at 48″ and rest it on the bottom of the top apron and the bottom of the opposite side base board. Use a square or scrap wood piece to mark the angle of the apron and side base board onto the 1×2 as shown in the diagram above. Cut these marks as shown above. Fit, (see fit below) cut again, and fit until you are happy with the fit. You will need to cut two of these. The top and bottom angles ARE NOT THE SAME so you will need to pay attention to the rotation of your cross supports.
Step 5
Top
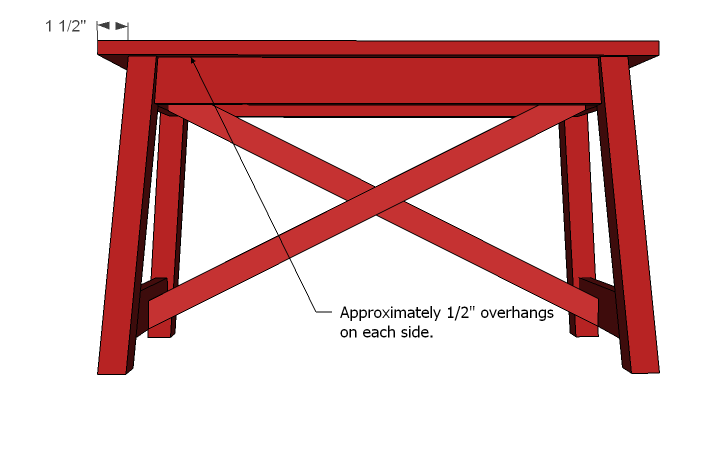
Mark the underside of the top 1 1/2″ in from both ends. Attach to the top (I knew I was painting so I just used 2″ screws through the top) with screws and glue. The side overhangs should be approximately 1/2″ (depends on your 1×12 width).
Finishing
Sand all surfaces, starting with a medium grit and finishing with fine. Wipe off the dust, fill any holes or gaps with wood filler, and sand smooth once dry. Apply primer if you're painting, then finish with your choice of paint or stain and seal with a durable clear topcoat. For outdoor projects, use exterior-rated primer, paint or stain, and sealer so the piece stands up to the weather.
Source (temporary): https://www.ana-white.com/woodworking-projects/splayed-leg-x-bench