Standing Rotating Can Rack
I am a couponer, one of those crazy ladies that needs more space than she ever has. And, as such, I needed an organized and easy way to store canned goods while making sure nothing was expiring or going to waste. They sell fancy contraptions that do such a thing, but in the nature of trying to save a few bucks, I knew I had to make one myself.
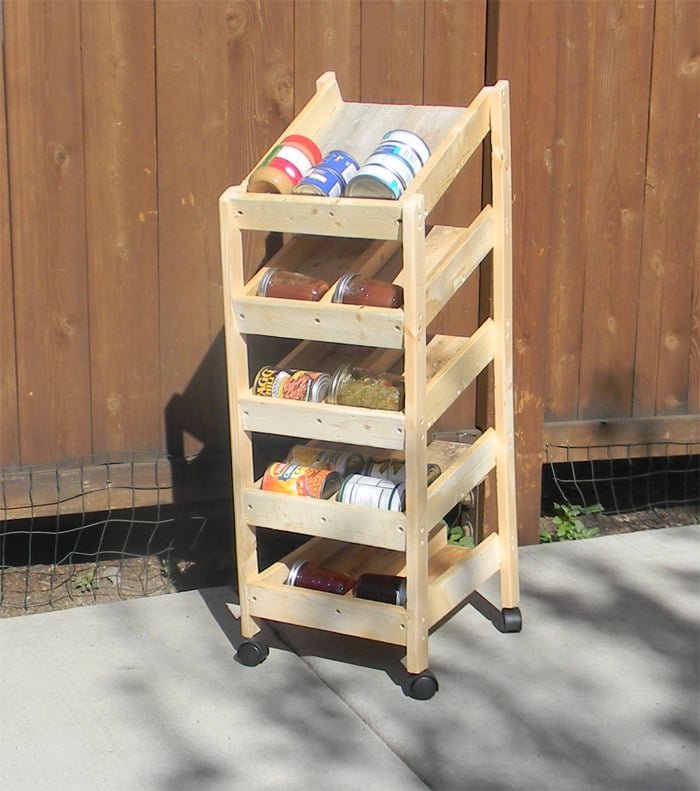
Specifications
| Project type | Other Projects |
|---|---|
| Room | Closets |
| Style | Modern Style Furniture Plans |
| Difficulty | Intermediate |
| Estimated cost | scraps |
Shopping List
4-1×2 @8 feet (approx. $1 each)
3-1×6 @8 feet (approx. $6 each) You will have extra left over, and could get away with 2, but I would recommend 3 for any “oops” OR if you can find pallets with 1x6s, use those to conserve and re-use. Plus no one will see these once the rack is stocked.
1 1/4″ or 1 1/2″ screws
Countersinking bit, or drill bit
Wood Glue
Tape Measure
Cut List
Cuts:
10- 1×2 @10 1/2″ (shelf supports) 2 per tier
5- 1×2 @11 3/4″ (front aprons)
2- 1×2 @ 29 1/2″ cut at an angle to 28 1/2″ on one end, with 29 1/2″ being the longest point (front legs)
2- 1×2 @36″ cut at an angle to 35″ on one end, with 36″ being the longest point (back legs)
Cut the shelves for each tier as follows:
Tier 1-
3- 1×2 @14″ (side aprons and center divider)
2- 1×6 @14″ (shelves)
Tier 2-
3- 1×2 @14 1/4″ (side aprons and divider)
2- 1×6 @14 1/4″ (shelves)
Tier 3-
3- 1×2 @14 1/2″ (side aprons and divider)
2- 1×6 @14 1/2″ (shelves)
Tier 3-
3- 1×2 @15″ (side aprons and dividers)
2- 1×6 @15″ (shelves)
Tier 4-
3- 1×2 @15 1/4″ (side aprons and dividers)
2- 1×6 @15 1/4″ (shelves)
Tier 5-
3- 1×2 @15 1/2″ (side aprons and dividers)
2- 1×6 @15 1/2″ (shelves)
Tools
- measuring tape
- square
- pencil
- safety glasses
- drill
- jigsaw
- sander
- level
- countersink drill bit
Step-by-step Instructions
Step 1
Start by building each shelf with the bottom supports, shelve pieces and dividers. Pre-drill and countersink (optional) each piece as you go! Pre-drilling will keep the wood from splitting, and save you tons of time in the long-run!
Step 2
Put side aprons on each shelf
Step 3
Put front apron on each shelf, and mark shelves with number for placement on rack
Step 4
Apply legs one at a time, starting with bottom shelf. This can be tricky, and having a helper will be ideal. However, I did it solo, and it worked fine The bottom shelf begins 1″ up from the front legs, and 2 1/2″ up from the bottom of the back legs, giving you a 1 1/2″ drop for cans to roll
Step 5
Add each subsequent shelf up 4″ from top of previous shelf front, and 5 1/2″ up front top of bottom shelf back.
Finishing
Sand all surfaces, starting with a medium grit and finishing with fine. Wipe off the dust, fill any holes or gaps with wood filler, and sand smooth once dry. Apply primer if you're painting, then finish with your choice of paint or stain and seal with a durable clear topcoat. For outdoor projects, use exterior-rated primer, paint or stain, and sealer so the piece stands up to the weather.
Source (temporary): https://www.ana-white.com/woodworking-projects/standing-rotating-can-rack