Storage Stairs for the Playhouse Loft Bed
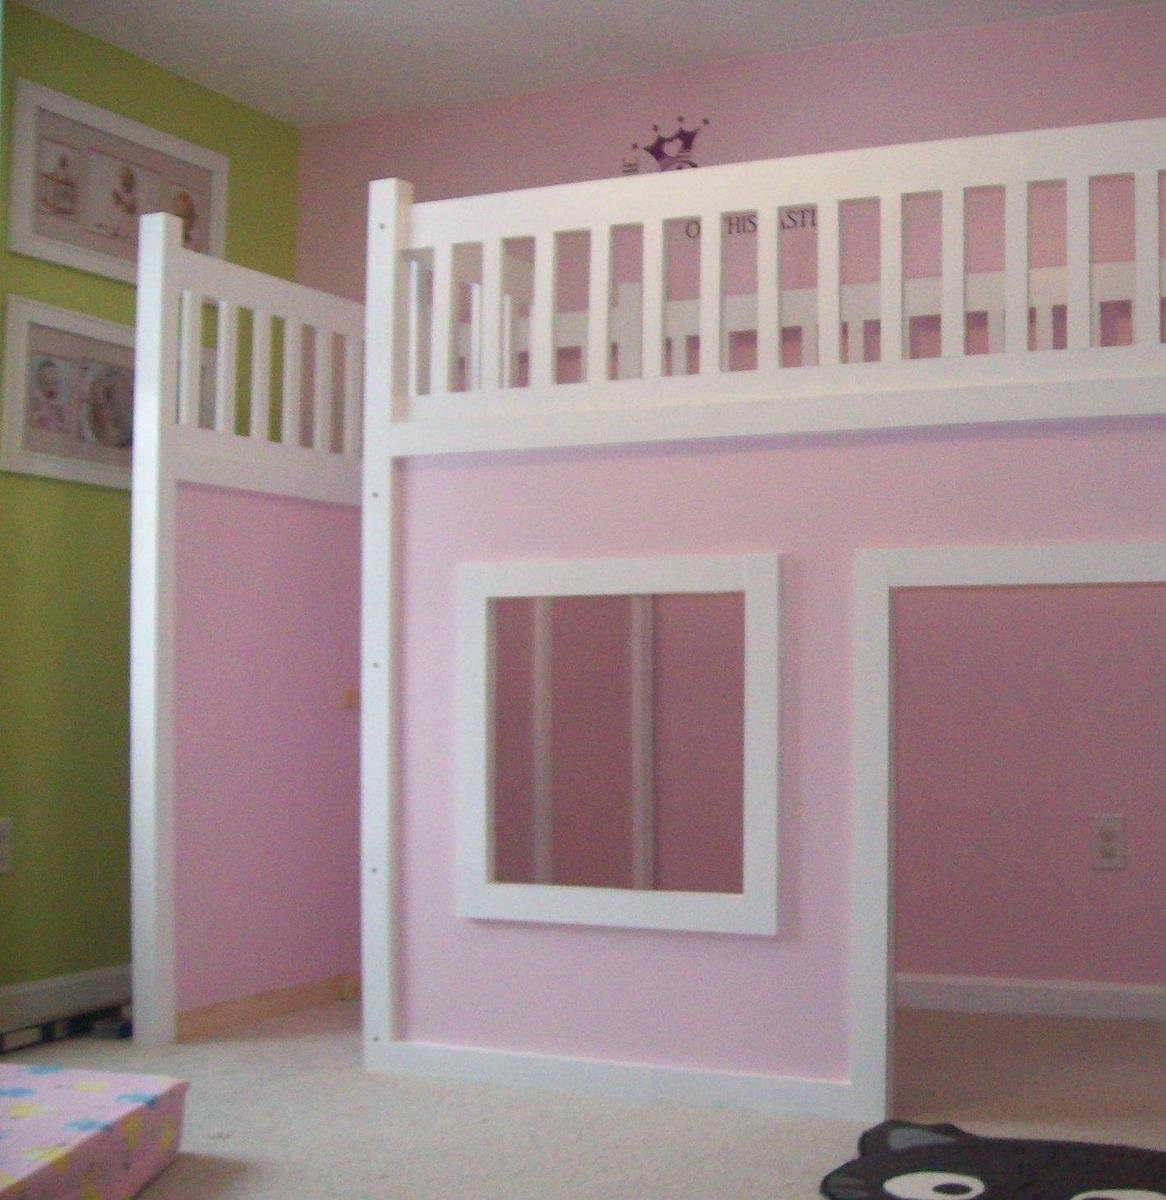
Stairs for the playhouse loft bed. Featuring lift top storage, behaving much like a large hidden toybox. Give your child easy safe access to their bed! Special thanks to Kimberly for sharing her
Specifications
| Project type | Beds and Bed Frames |
|---|---|
| Room | Bedroom |
| Style | Children's and Kid's Room Furniture and Toy Plans |
| Difficulty | Advanced |
| Estimated cost | $150 - $200 |
Dimensions
Use the size-specific shopping and cut lists below.
Shopping List
In addition to what you purchased for the playhouse loft bed without the stairs, you will need:
Another sheet of 3/4″ MDF or Plywood or Particle Board
4 feet of 1×10 Boards
6 – 1×3 Boards
6 – 1×2 Boards
2 – 1×4 Board, 10 feet long
1 – 1×3 Board, 10 feet long (you can use a 1×4 here if you can’t find a 1×3)
3 – Sets of Hinges
Cut List
Because of the complexity of this plans and since it is a modification of a previous plan, cut list will go with each step.
Step-by-step Instructions
Step 1
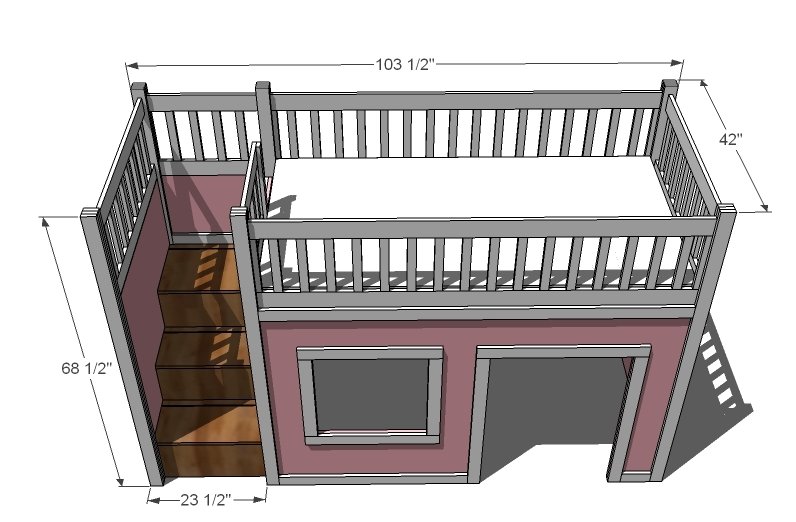
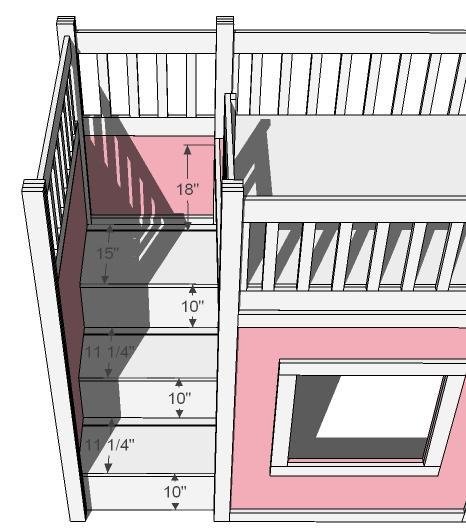
The top platform is 18″ (bench height) below the mattress slats, so your little one (and probably you too) will have somewhere to stand and climb on to the mattress from. The stairs are 10″ rises – a full 3″ greater than what they should be for regular stairs, but I did quite a bit of research on these types of bed stairs, and concluded that what you buy is built to these same standards. And a big improvement over a ladder for little ones.
Build the Front and Side Wall
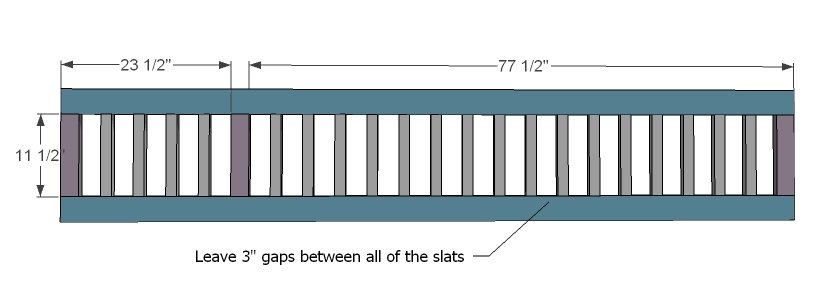
Follow the directions in the ladder Playhouse Loft Bed plans to build the front wall and the wall without the ladder. ONLY BUILD ONE FRONT RAILING. Do not cut all the boards shown in the cut list, as the cut list changes with the addition of the ladder. 2 – 1×4 @103 1/2″ (Top and Bottom Trim) 3 – 1×3 @ 11 1/2″ (Rails for Back Legs) 20 – 1×2 @ 11 1/2″ (Rails) Instead of building two of the front rails, build only one front rail, and the back rail as shown above. The purple boards are 1x3s, blue are 1x4s and white are 1x2s. Leave a 3″ gap between the boards. Mark the joints on the top and bottom trim and drill pocket holes on both ends of all the rails. Attach with 1 1/4″ pocket hole screws and glue.
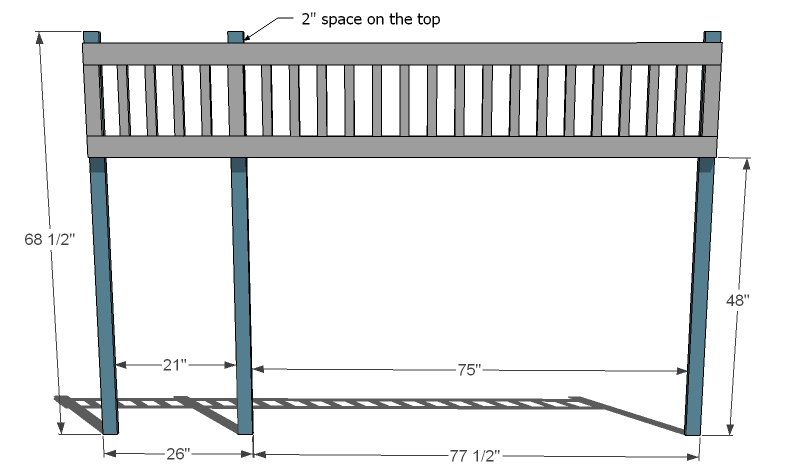
3 – 1×3 @ 68 1/2″
Attach the back legs to the railing as shown above. Use 1 1/4″ screws and glue. Adjust for square.
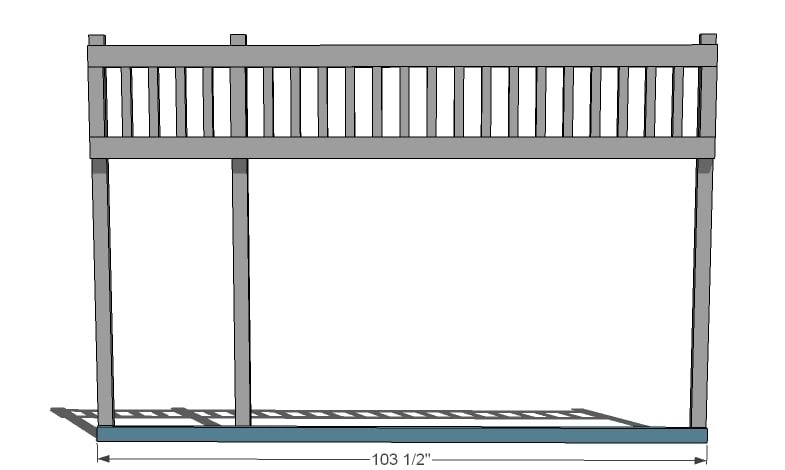
1 – 1×3 @ 103 1/2″ (Bottom Support)
If you can’t find a 1×3 103 1/2″ long, go ahead and use a 1×4. Check for square and attach to the bottom of the legs, as shown above. Use 1 1/4″ screws and glue.
Step 5
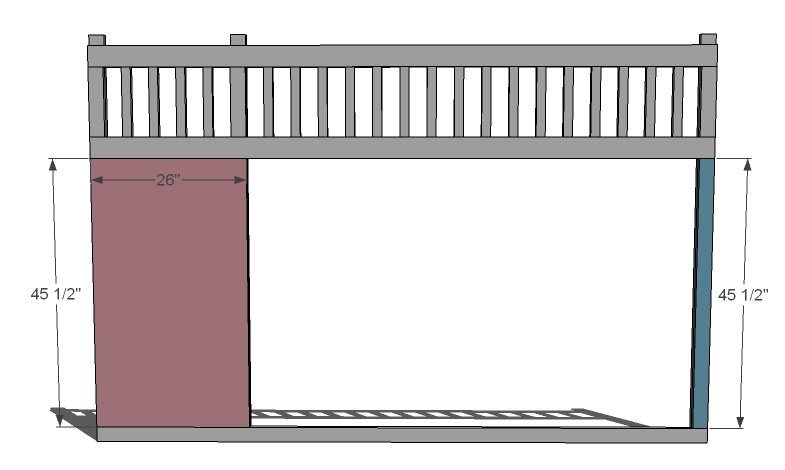
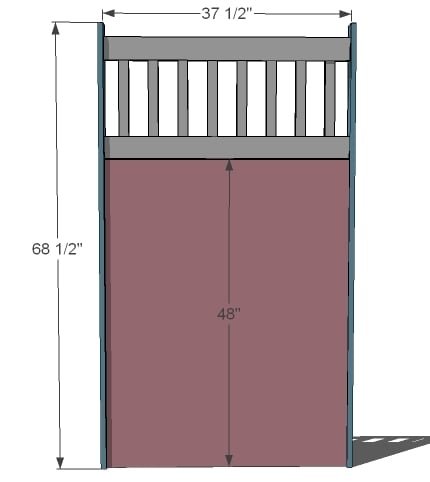
2 – 1×4 @ 37 1/2″
8 – 1×2 @ 11 1/2″ Outside Stair Wall Railing Build your railing with pocket hole screws as you did all the other railings. Space railing as shown in the diagram directly above.
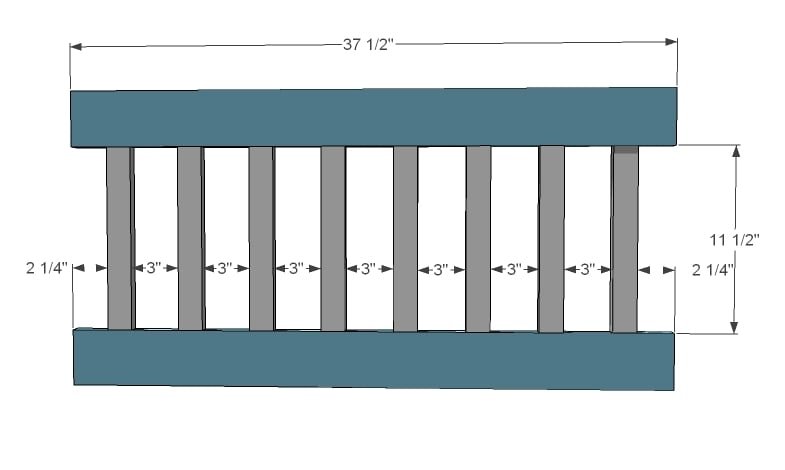
2 – 1×3 @ 68 1/2″ (Legs)
Outside Stair Wall Legs Attach the legs to the sides of the stair wall. At this step, it is very important that you leave 3/4″ on the inside of the leg and 1″ on the outside of the leg as opposed to centering the leg on the plywood and railing.
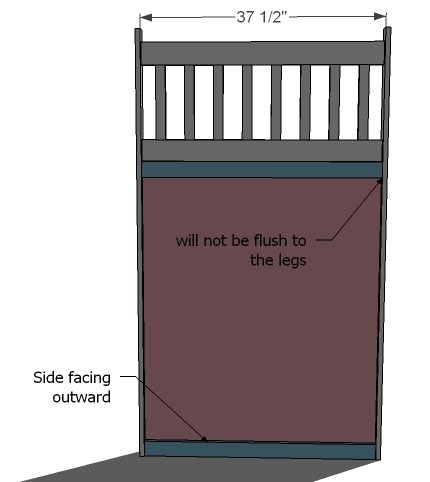
2 – 1×3 @ 37 1/2″ (Trim Boards)
Outside Wall Exterior Trim On the outside side of the outside wall (the side you left 1″ of space) attach with 1 1/4″ nails or screws the trim pieces as shown above.
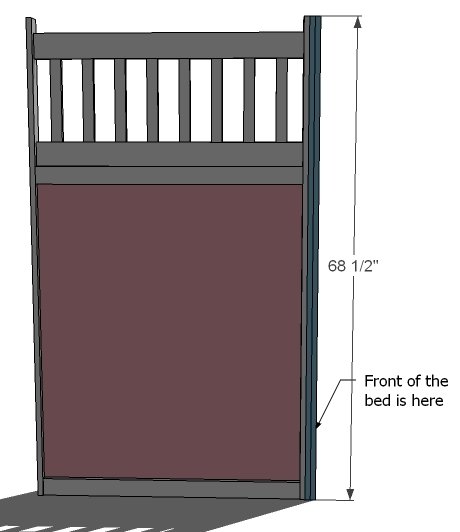
2 – 1×3 @ 68 1/2″ (Legs)
Front Legs for the Outside Wall Attach two more legs to the front leg of the outside wall as shown above. Keep all outside edges flush and use 2″ finish nails and glue. And this finishes the outside wall! Just one more wall and the stairs to go! Click on page 3 below to see the next wall.
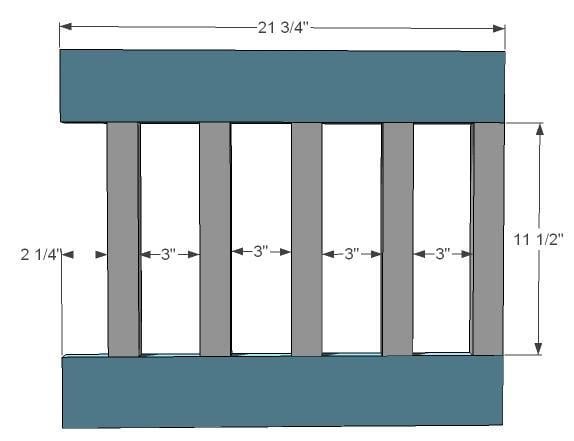
5 – 1×3 @ 11 1/2″ (Rails)
2 – 1×4 @ 21 3/4″ (Top and Bottom Trim) Inside Stair Wall Railing As you have built the other railings, mark out the rail joints on the trim boards. Then drill two pocket holes in both ends of the rails. Attach to the trim boards with 1 1/4″ screws and wood glue.
2 – 1×3 @ 68 1/2″ (Legs)
1 – 1×2 @ 66 1/2″ ( Interior Railing Support) Putting the Interior Wall Together As you did with the other walls, attach the railing and the plywood panel to the legs with either pocket hole screws from the plywood and railing into the legs or with 2″ screws (predrilled) from the exterior of the legs into the plywood panel. Leave 3/4″ on the legs on the inside (where the stairs go) and 1″ on the playhouse side (shown above. Attach the stair support to the railing with 1 1/4″ screws and glue. Attach to the plywood all the way down.
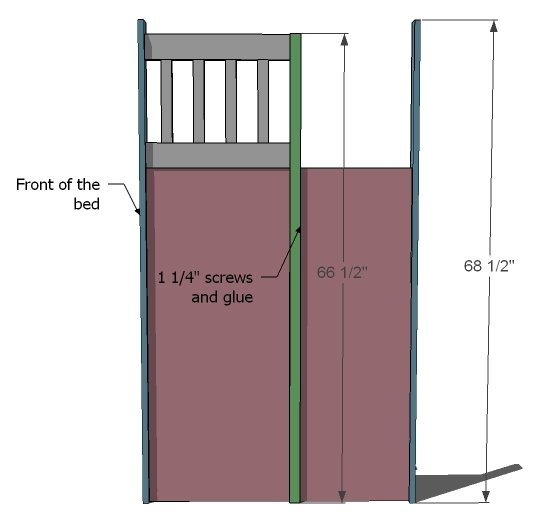
1 – 1×3 @ 15 3/4″
Inside Stair Trim Attach the inside stair trim to the top edge of the inside of the wall (where the mattress goes) with 1 1/4″ screws or nails and glue.
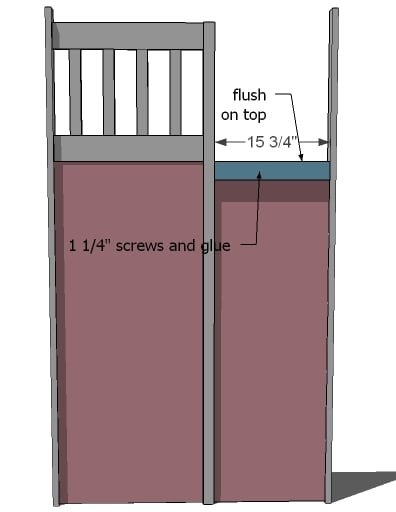
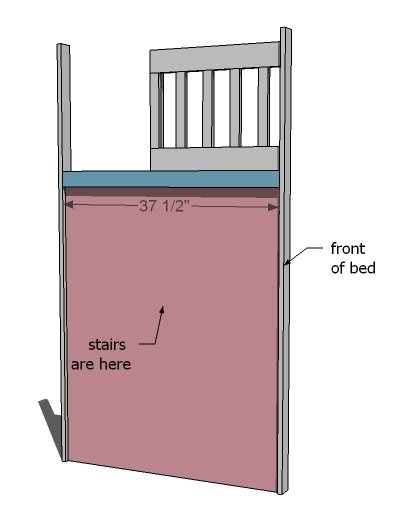
1 – 1×3 @ 37 1/2″ (Trim)
Trim on Stair Side Flip the wall over and add the final piece of trim, as shown above. Overlap the trim on the railing by 1″ to secure the railing in place. You may wish to add one additional 1×2 to the inside top exposed edge of the plywood (the 1×2 would be 15 3/4″ long). This completes the inside stair wall. See next page for details on assembly and constructing the stairs.
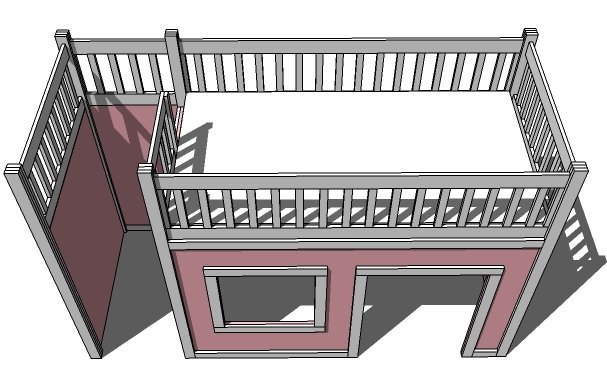
Assembly
With the five walls built, assemble the bed by attaching the three short walls to the back wall. Use 2″ screws and glue, screwing together the leg pieces. Then attach the front wall to the side walls. The remaining end wall will feel flimsy at this stage – not to worry, the step will “beef” it up. You can also attach your cleats and slats as directed in the playhouse loft bed plans with ladder.
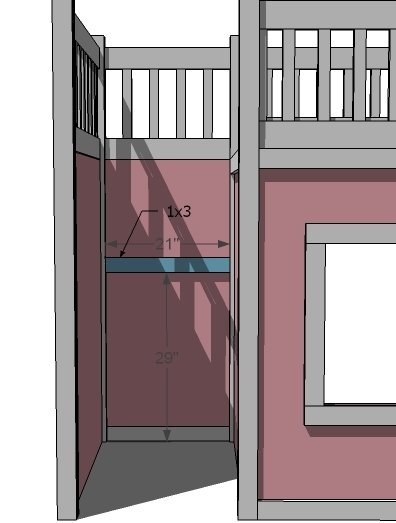
1- 1×3 @ 21″ (Top Stair Trim)
Stair Back Trim Now we begin to build the stairs. Use glue and 1 1/4″ screws or nails to fasten the back trim piece inside the stairs, with 29″ below the piece. This is just a trim piece.
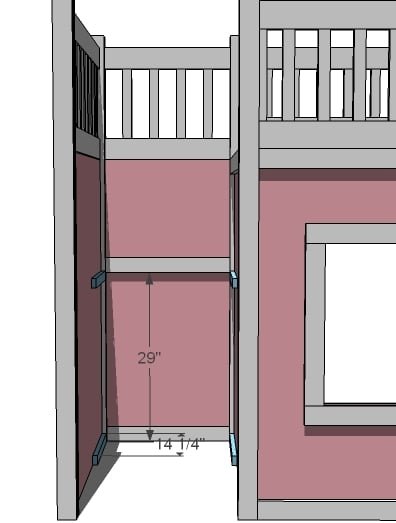
4 – 1×2 @ 14 1/4″ (Top Stair Cleats)
Top Stair Cleats Now measure up 29″ from the tops and bottoms of the stairs and glue and screw the cleats in place. Use a level to make sure the cleats are level. The top of the cleat sits at 29 1/4″. Do this on both sides. Also add the bottom cleats.
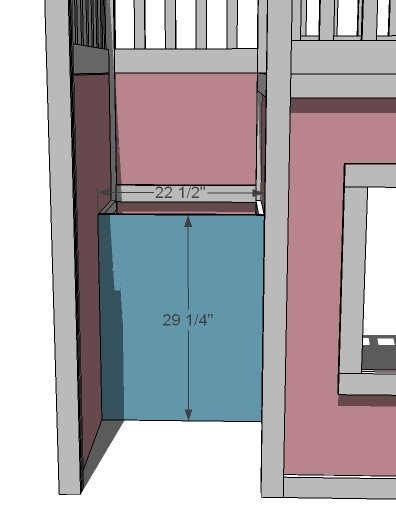
3/4″ Plywood, MDF or Particle Board @ 29 1/4″ x 22 1/2″
Top Step Plywood Panel Slide the plywood in place. Place just two screws near the top of the plywood so that you can easily slide it out when dis assembling the bed. DO NOT USE GLUE.
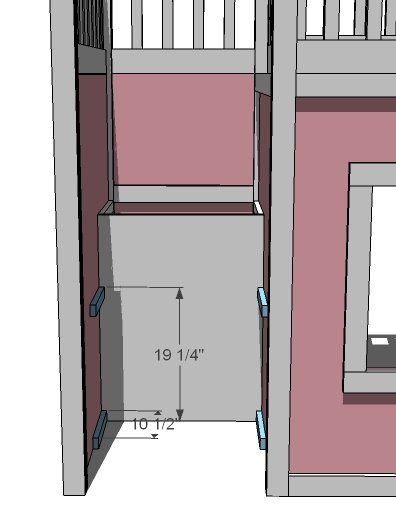
4 – 1×2 @ 10 1/2″ (Middle Stair Cleats)
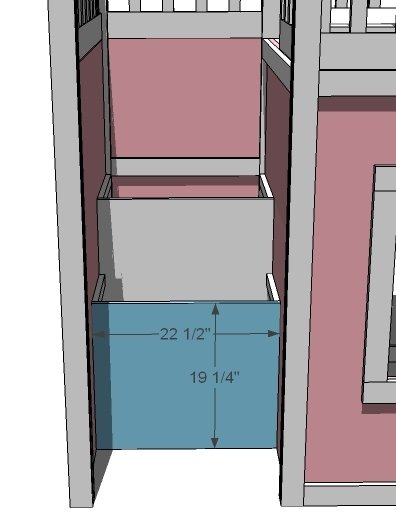
Middle Stair Cleats Measure up 19 1/4″ and attach the middle stair cleats. These cleats will hold the top stair plywood in place as well. Use glue and 1 1/4″ screws and glue. By using this method, you can simple pull take out just a few screws and pull the plywood panels out to dis assemble the bed.
1 – 3/4″ Plywood @ 22 1/2″ x 19 1/4″
Middle Stair Plywood As you did the top stair, place the middle stair plywood flush with the cleats and screw to the cleats with just two screws. Image is shown a
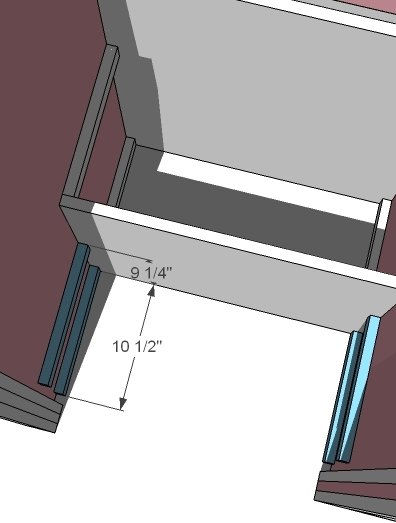
4 – 1×2 @ 10 1/2″ (Bottom Stair Cleats)
Bottom Stair Cleats Measure up 9 1/4″ from the bottom. This is the top of your bottom stair cleats. Attach the cleats with glue and 1 1/4″ screws to the plywood. Use a level to ensure that the cleats are level. Make sure there is a 3/4″ gap between the cleats and the front legs. You may need to adjust the length of your cleats accordingly.
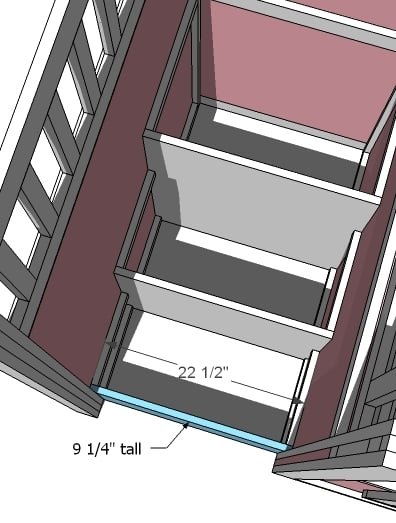
1 – 3/4″ Plywood or MDF @ 22 1/2″ x 9 1/4″
Bottom Stair Plywood Slide the bottom stair plywood in place. It should fit snugly. You can screw from the inside of the plywood into the wall legs if necessary.
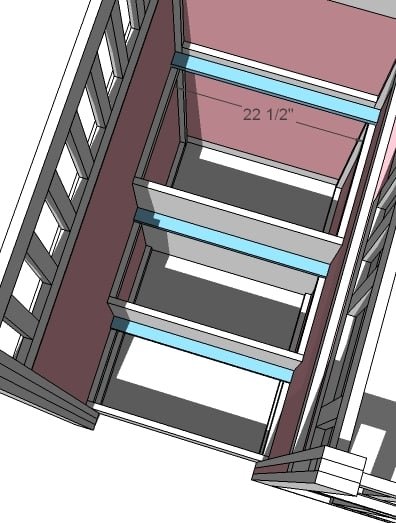
3 – 1×2 @ 22 1/2″ (Stair Hinge Supports)
Step 22: Stair Hinge Supports Attach the stair hinge supports with 2″ screws and NO GLUE. You want these to be easily removeable. Keep edges flush with the plywood panels on the stairs behind the supports.
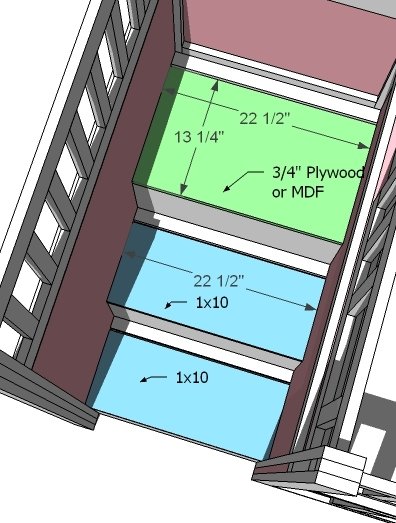
2 – 1×10 @ 22 1/2″
1 – 3/4″ Plywood, MDF or particle board @ 13 1/4″ x 22 1/2″ Step 22: Stair Treads Use the hinges to attach the stair treads to the supports from step 21. Remember, the real support comes from the cleats, not the 1×2 hinge support. This completes the easy part. Finishing is going to be quite the project! I highly recommend painting the entire bed white, and then cutting in the color afterward on the panels. A sprayer would be a luxury too!
Finishing
Sand all surfaces, starting with a medium grit and finishing with fine. Wipe off the dust, fill any holes or gaps with wood filler, and sand smooth once dry. Apply primer if you're painting, then finish with your choice of paint or stain and seal with a durable clear topcoat. For outdoor projects, use exterior-rated primer, paint or stain, and sealer so the piece stands up to the weather.
Source (temporary): https://www.ana-white.com/woodworking-projects/storage-stairs-playhouse-loft-bed