Timeless Storage Bed with 12 Drawers
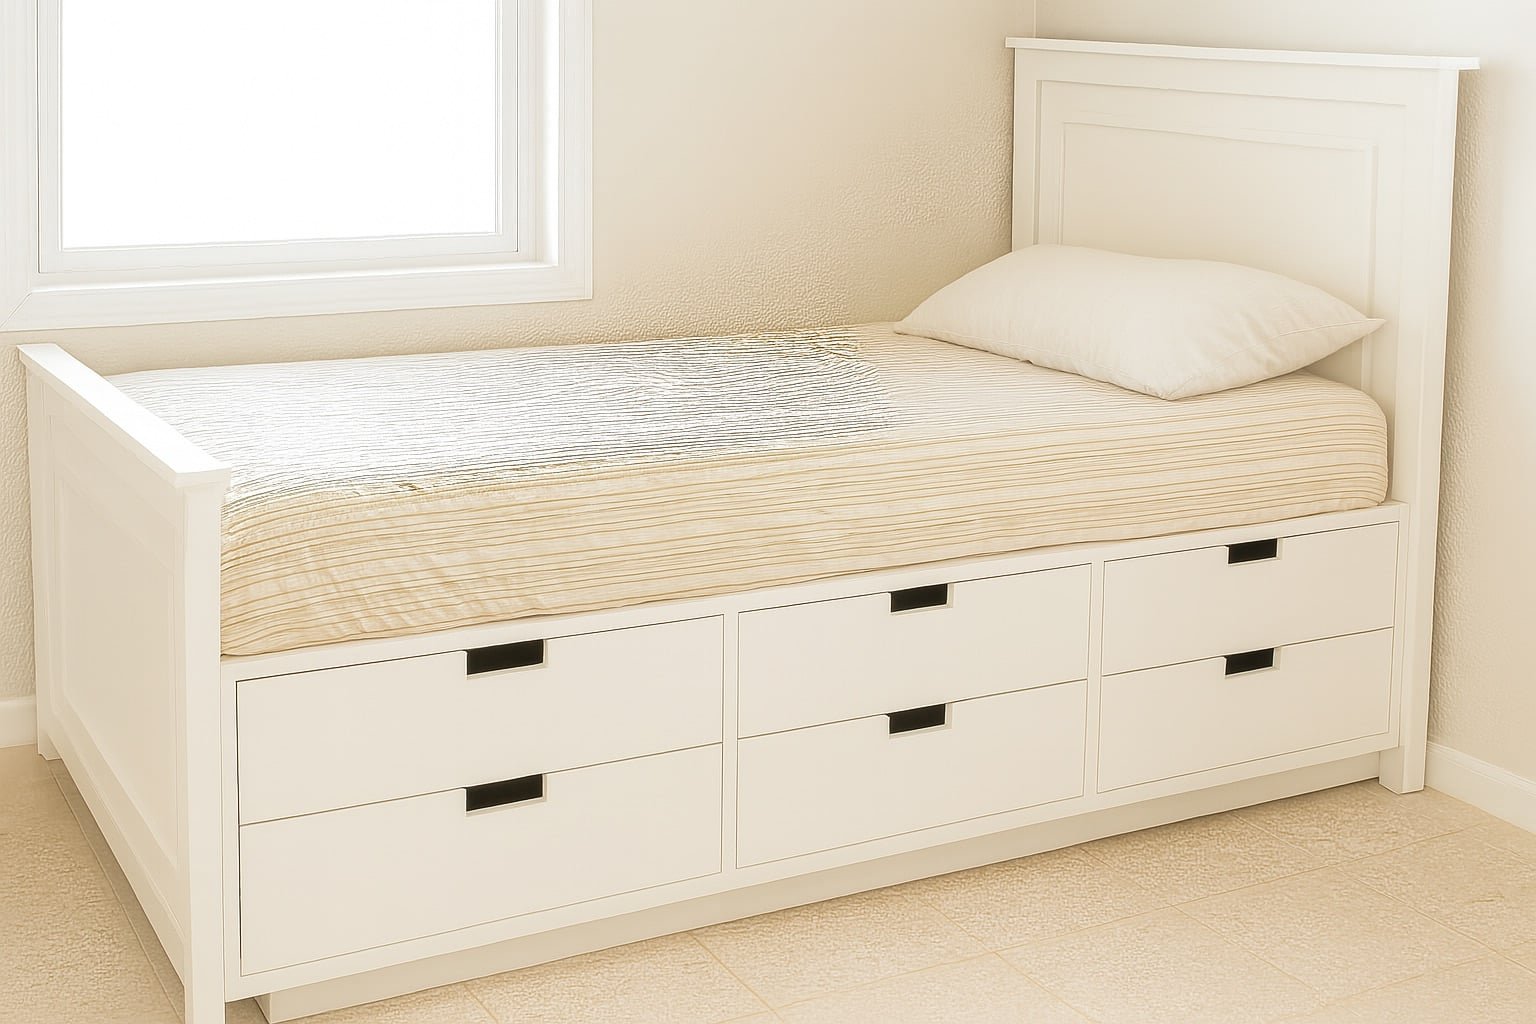
This beautiful twin storage bed features a classic headboard and footboard design with a whopping 12 drawers —perfect for maximizing space in any bedroom. Built-in storage means no need for a separate dresser, and the timeless style works for kids, teens, or guest rooms. include step-by-step diagrams, detailed instructions, and a cut list to make building easy and efficient. A smart and stylish way to add storage without sacrificing floor space!
Specifications
| Project type | Beds and Bed Frames |
|---|---|
| Room | Bedroom |
| Style | Children's and Kid's Room Furniture and Toy Plans |
| Difficulty | Advanced |
Dimensions
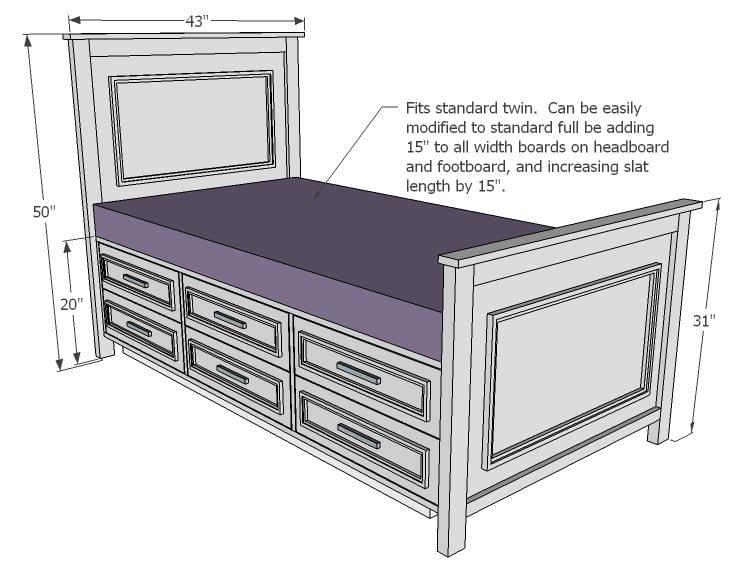
Use the size-specific shopping and cut lists below.
Shopping List
Headboard/Footboard
- 1 – Sheet 3/4" Plywood
- 2 – 1x3 @ 8 feet long
- 2 – 2x3 @ 8 feet long
- 1 – 1x2 @ 8 feet long
- 2 – small moulding pieces 8 feet long
- 3/4” finish nails
- 1-1/4” pocket hole screws
Storage Bases (for two storage bases, one on each side
- 2 – Sheets ¾” plywood cut into strips 15 3/4" wide, referred to as 1x16 boards throughout this plan
- 2 – sheets ¼” plywood or other backerboard
- 4 – 2x4 @ 8 feet long
- 2 – 2x2 @ 8 feet long
- 2 – 1x3 @ 8 feet long (for the slats – try and burn up small scraps here)
- 7 – 1x4 @ 8 feet long
- 4 – 1x8 @ 6 feet long
- Optional drawer moulding
- 12 – Drawer Knobs or handles
- 12 – 14” long drawer slides, the white euro style bottom corner mount ones will work best
- 1-1/4” and 2-1/2" pocket hole screws
- 1 1/4” brad nails
Cut List
Headboard/Footboard
- 2 – 3/4" plywood or MDF @ 36” x 26 3/4"
- 2 – 1x3 @ 36”
- 2 – 1x2 @ 36”
- 2 – 2x3 @ 49 1/4”
- 2 – 2x3 @ 30 1/4"
- 2 – 1x3 @ 43”
- 4 – Moulding pieces @ 30” (long point to long point, both ends cut at 45 degrees off square, not parallel to each other)
- 4 - Moulding pieces @ 16 3/4” (long point to long point, both ends cut at 45 degrees off square, not parallel to each other)
Storage Bases (builds two, one for each side)
- 4 – 1x16 @ 75”
- 8 – 1x16 @ 14 7/8”
- 2 – ¼” plywood @ 75” x 16 ¼”
- 4 – 2x4 @ 70”
- 4 – 2x4 @ 10”
- 2 – 2x2 @ 75”
- 14 – 1x3 or 1x2 scraps @ 7”
Drawers
- 24 – 1x6 @ 14”
- 12 – 1x6 @ 21 ½” (omitted optional fronts to save materials)
- 12 – 1x8 @ 23 ¾” (Drawer Faces)
- 12 - ¼” plywood @ 23” x 14” (Drawer Bottoms)
Tools
- measuring tape
- square
- pencil
- safety glasses
- kreg-jig
- drill
- compound miter saw
- table saw
- nailer
- sander
Step-by-step Instructions
Step 1
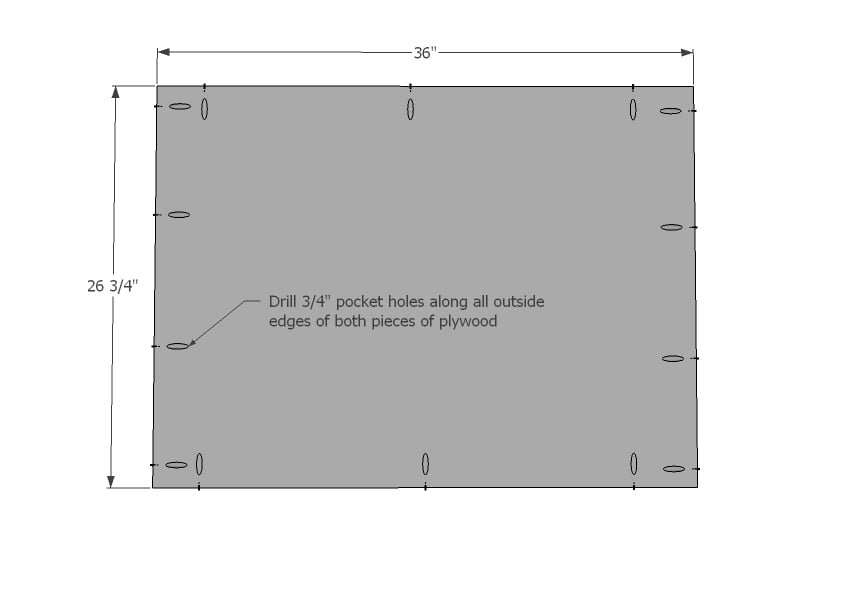
For the headboard and footboard, start by drilling 3/4" pocket holes around the top and side edges of panels with Kreg Jig.
Step 2
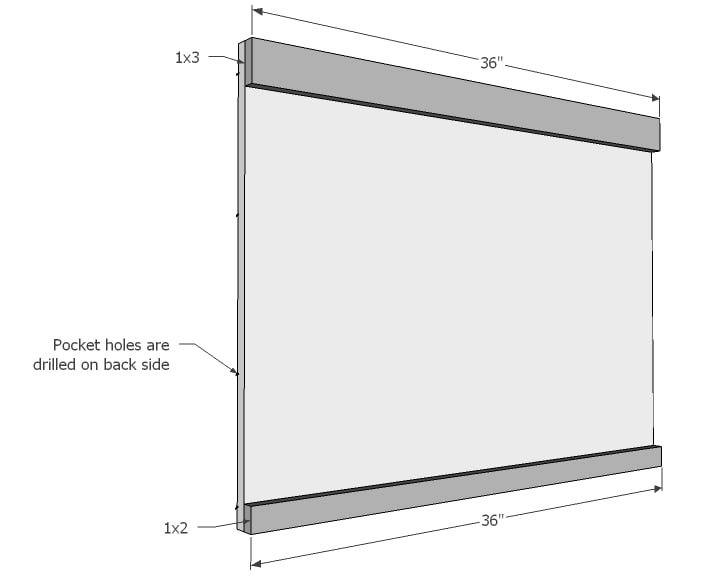
On the front side, attach top and bottom trim.
Step 3
Use 1-1/4" pocket hole screws to attach legs to panel - flush to trim and back of plywood.
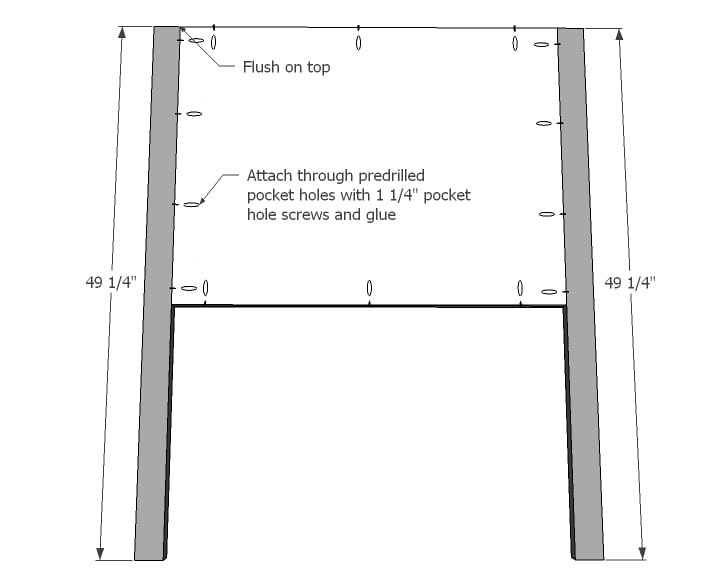
Step 4
Now add the top piece with the predrilled pocket holes from the back side.
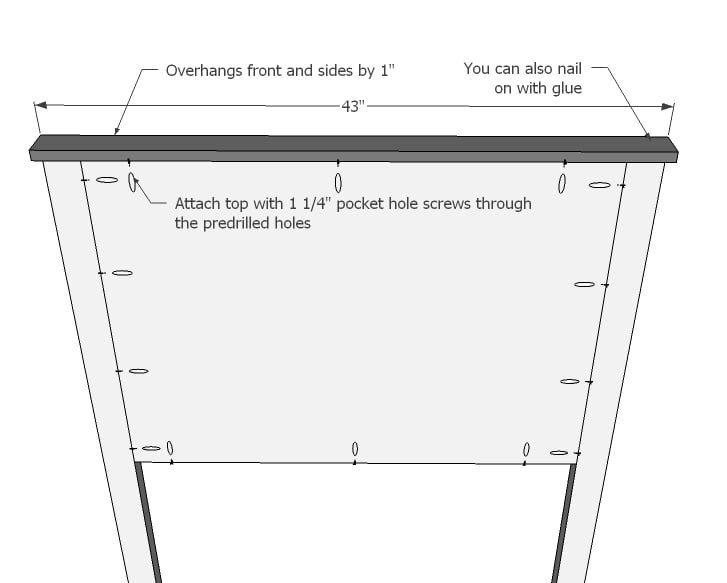
Step 5
Add optional moulding detail to the panels with glue and 3/4" brad nails.
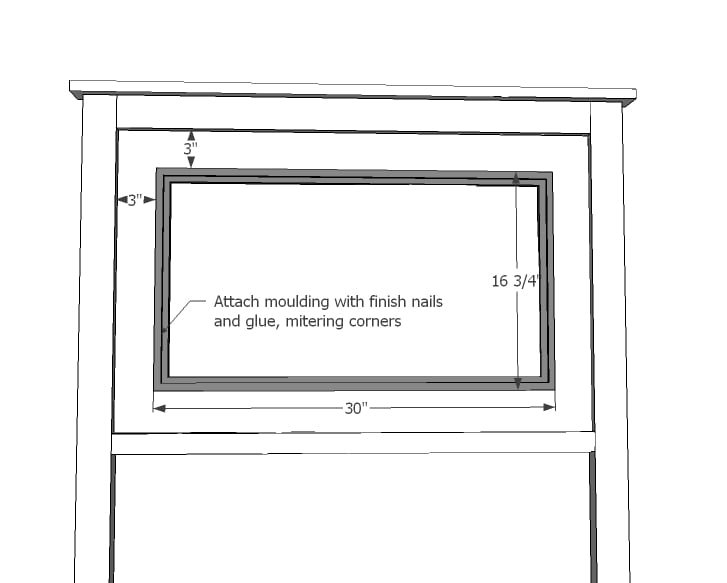
Step 6
The footboard just has shorter legs.
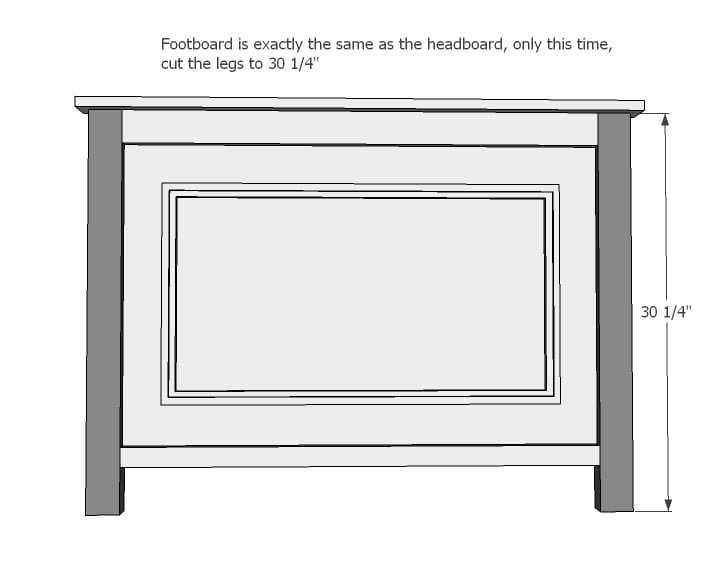
Step 7
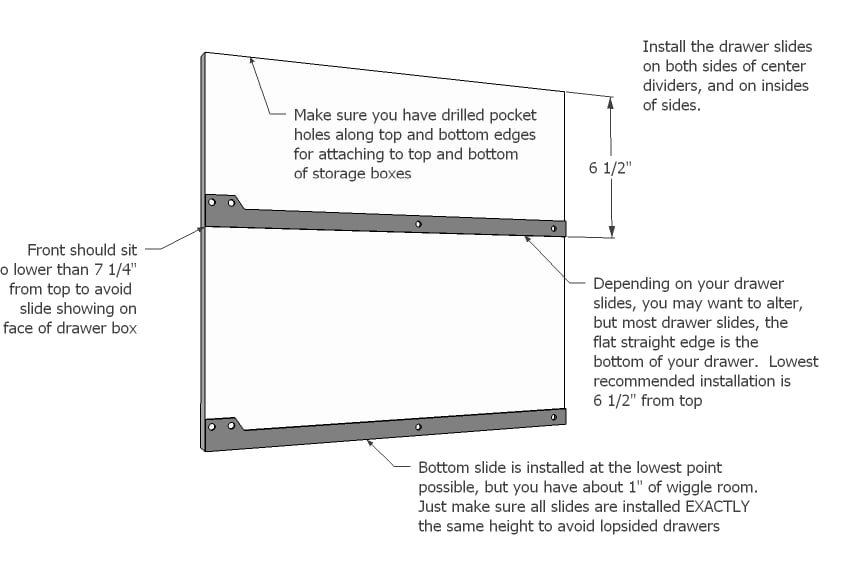
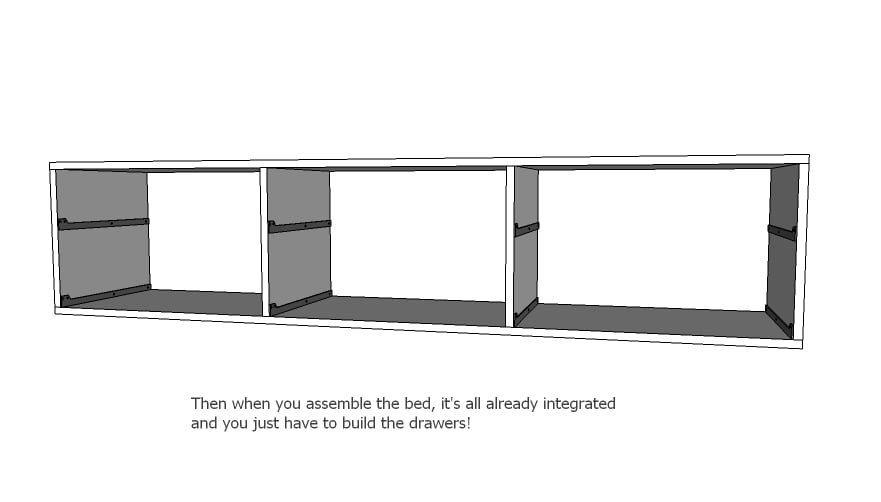
Depending on your skill level and how confident you are, I would attach drawer slides now rather than later. Attach to both ends on insides, and then on both sides of center dividers. IMPORTANT: For drawer faces, inset slides 3/4" to give room for a drawer face. Here is a video showing how I install these drawer slides, please watch
Step 8
Now add tops and bottoms to the dividers, you can attach with pocket holes or use 1-1/4" brad nails and glue. Add the 1/4" plywood to the back with 3/4" brad nails. Use the 1/4" plywood to square up the storage boxes.
Step 9
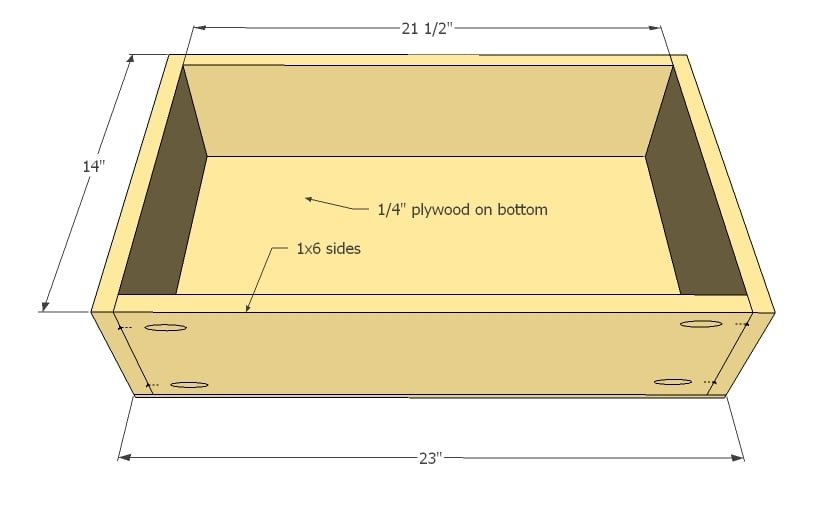
Build drawers using 1-1/4" brad nails to attach the 1x4 drawer box piece together, and 3/4" brad nails to attach the bottom to the drawer boxes. Drawers MUST be 1" less in width than overall width for standard slides requiring 1/2" clearance for each slide. Make sure you measure before building drawer boxes - your widths may need to be adjusted.
Step 10
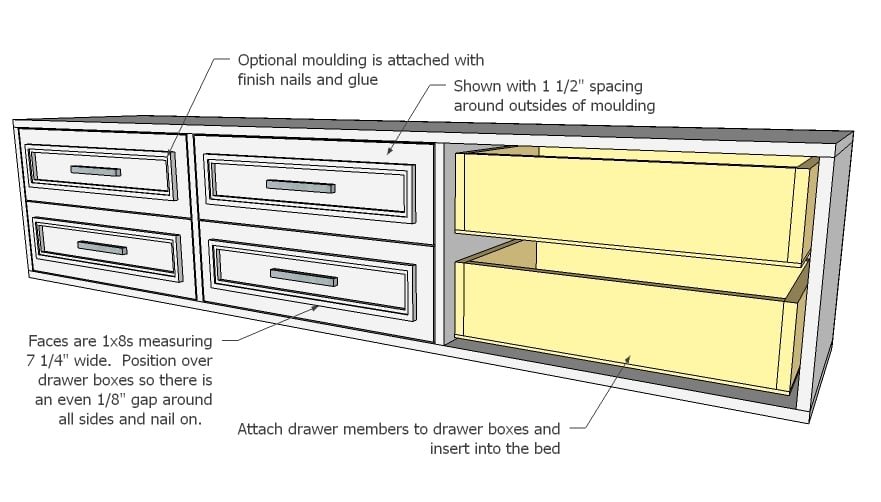
Attach drawer members to drawers and insert in bed. Attach drawer faces to drawer boxes and add moulding if desired.
Step 11
These boxes are to support the weight of your drawers. They will be heavy. Attach flush to back and headboard side.
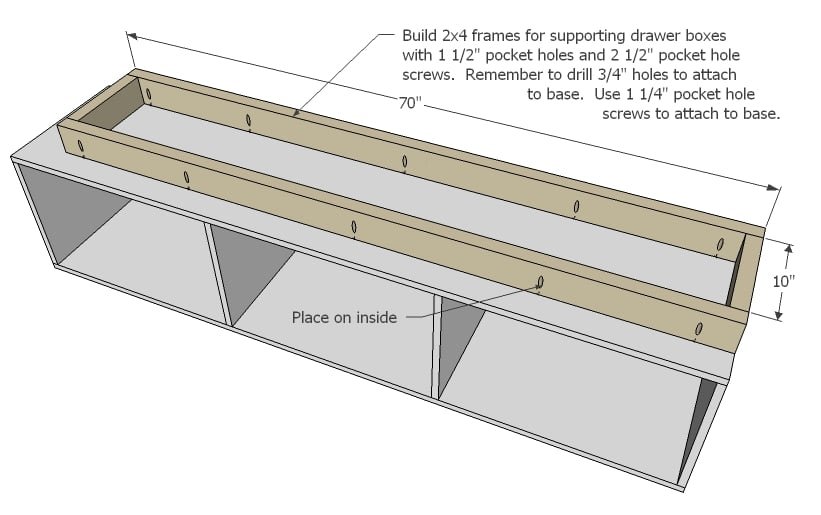
Step 12
When you go to assemble the bed, add a 2x2 cleat and 1x2 or 1x3 slats to support the mattress. Screw footboard and headboard to storage boxes.
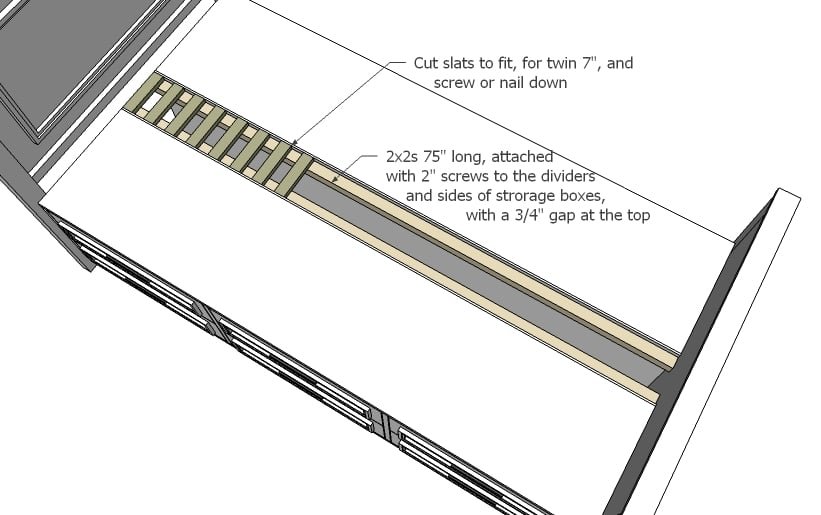
Finishing
Sand all surfaces, starting with a medium grit and finishing with fine. Wipe off the dust, fill any holes or gaps with wood filler, and sand smooth once dry. Apply primer if you're painting, then finish with your choice of paint or stain and seal with a durable clear topcoat. For outdoor projects, use exterior-rated primer, paint or stain, and sealer so the piece stands up to the weather.
Source (temporary): https://www.ana-white.com/woodworking-projects/timeless-storage-bed-12-drawers-free-plans