Tiny House Loft with Bedroom, Guest Bed, Storage and Shelving
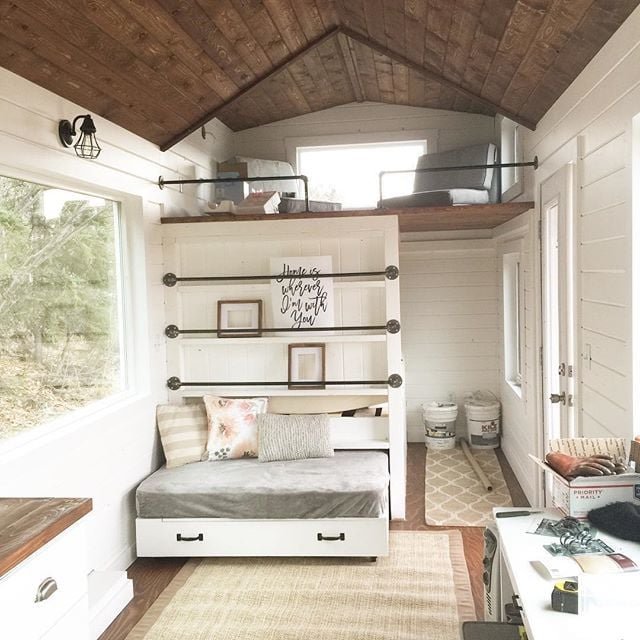
Plans for a tiny house loft with lower bedroom, storage drawers, and hidden sofa that converts to a guest bed. Detailed
Specifications
| Project type | shelves |
|---|---|
| Room | Bedroom |
| Difficulty | Intermediate |
Dimensions
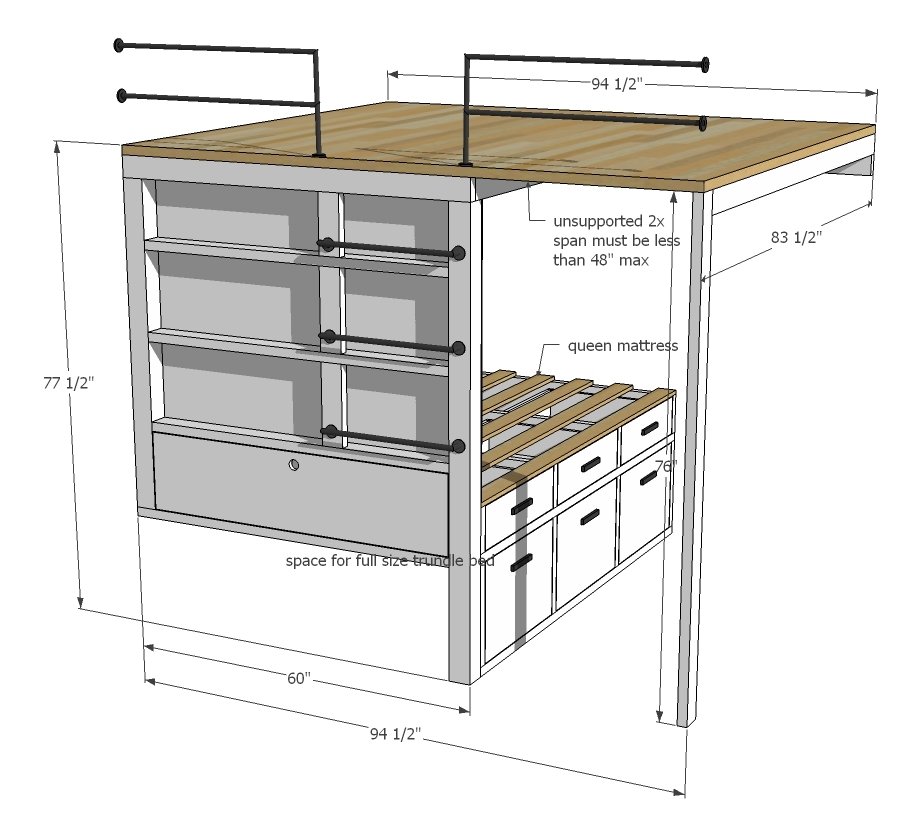
Use the size-specific shopping and cut lists below.
Shopping List
- 2 - 4X4 @ 6 FEET LONG
- 14 - 2X4 @ 8 FEET LONG
- 1 - 2X8 @ 8 FEET LONG
- 2 - 2X8 @ 10 FEET LONG
- 3 - 1X6 @ 8 FEET LONG
- 2X6 TONGUE AND GROOVE FOR UPSTAIRS LOFT OF OTHER FLOORING
- 1 SHEET OF 1/4" PLYWOOD FOR DRAWER BOTTOMS/SHOE STORAGE BACKS
- 1 SHEET OF BEADBOARD, PANELING OR 1X6 T&G FOR BACK OF WALL
- 1 SHEET OF 3/4" PLYWOOD FOR DRAWER/DOOR FACES
- 2-1/2" POCKET HOLE SCREWS
- 2-3/4" SELF TAPPING WOOD SCREWS (SPAX OR SIMILAR)
- 5" LAG SCREWS FOR ATTACHING 4X4 TO WALL (JUST NEED A FEW)
- 1-1/4" NAILS FOR ATTACHING SLATS TO FRAMING AND WALL MATERIAL BACKING
- 3 - 24" BOTTOM SIDE MOUNT DRAWER SLIDES (WHITE)
- 4 SETS OF HINGES IF HINGES ARE NOT SELF CLOSING MAY NEED CLASPS OR HASPS
- 6 KNOBS OR HANDLES
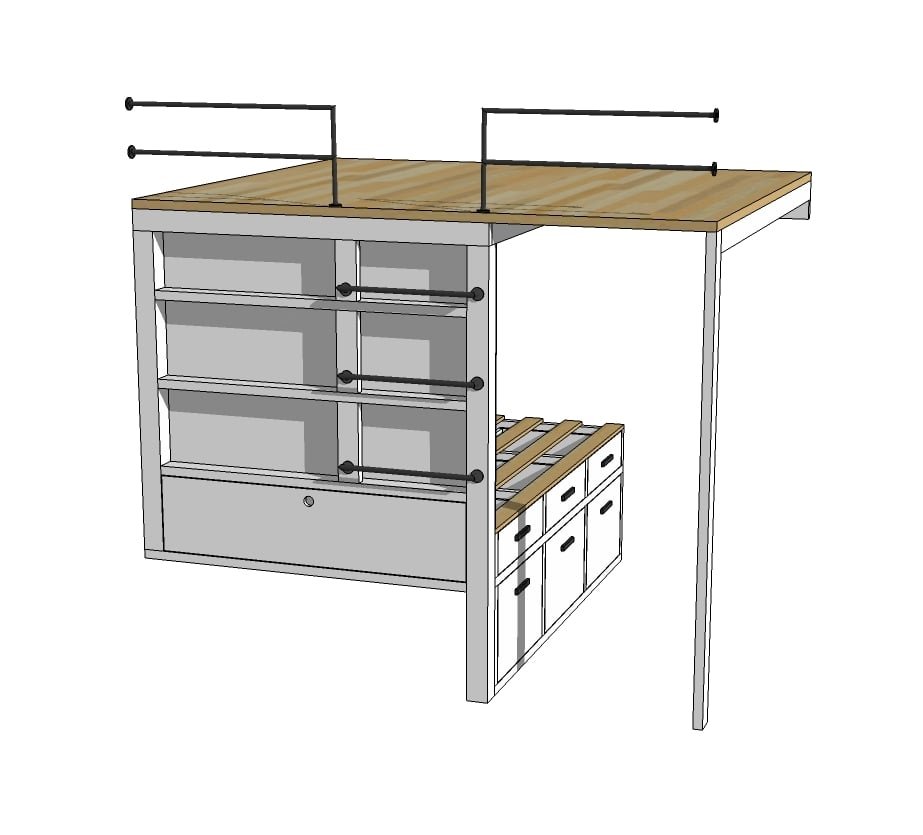
- BLACK PIPE FOR LADDER AND RAILING
Cut List
WALL
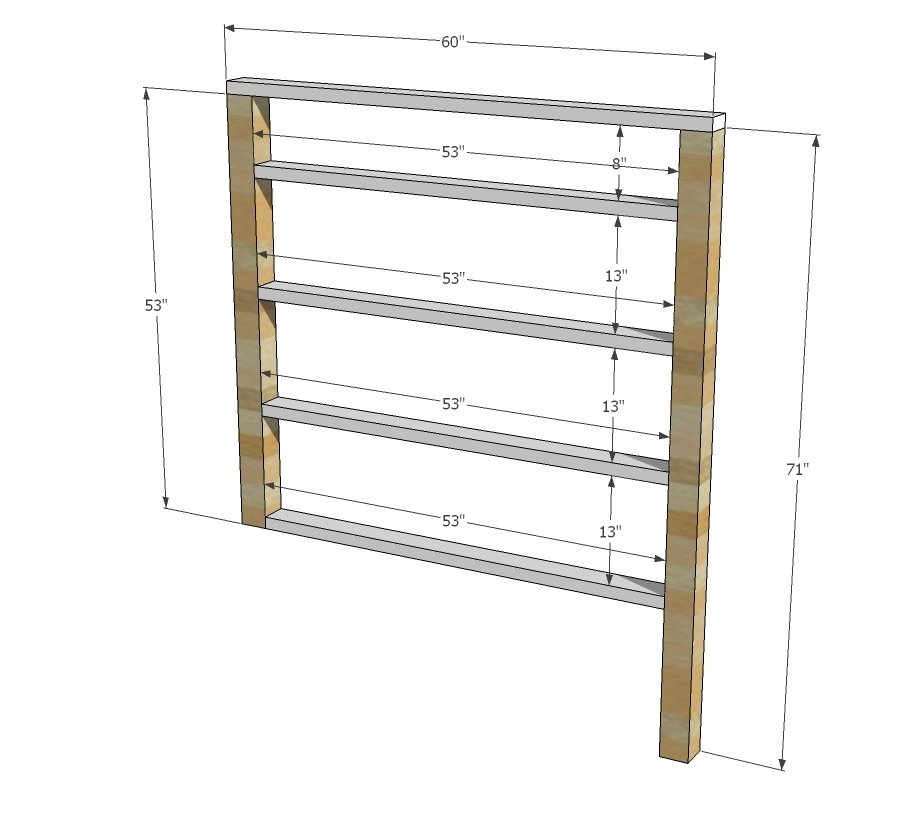
- 1 - 4x4 @ 52"
- 1 - 4x4 @ 71"
- 4 - 2x4 @ 53"
- 2 - 2X4 @ 13" - LADDER SUPPORTS
- 1 - 2X4 @ 8" - LADDER SUPPORT
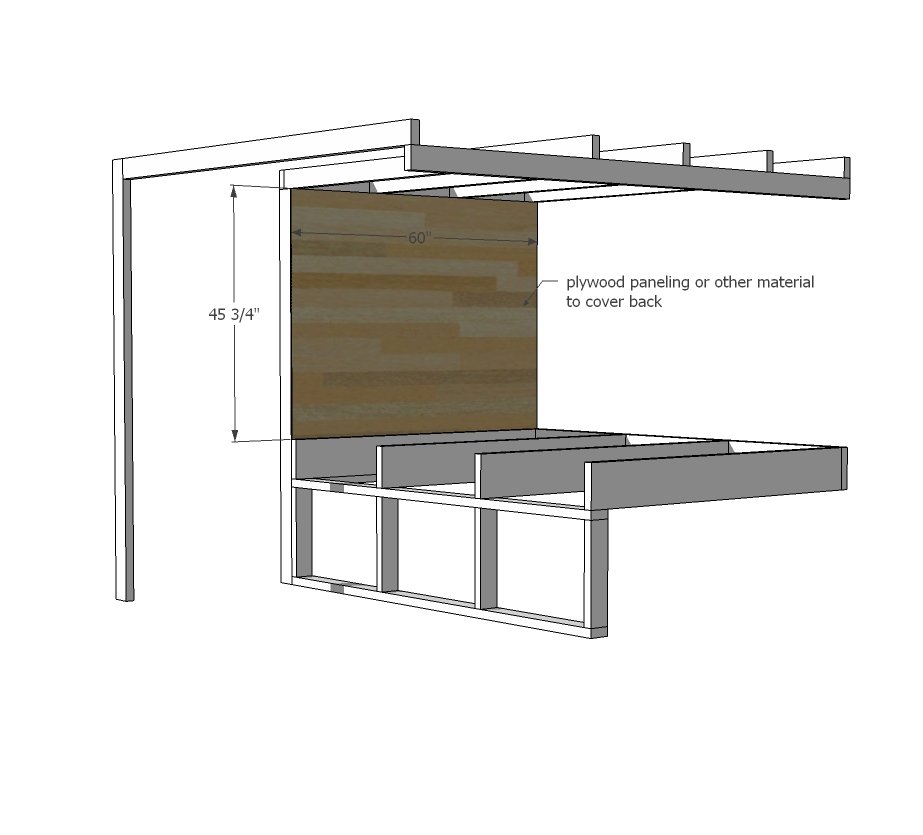
- 1 - 1/4" PLYWOOD OR PANELING @ 45-3/4" X 60"
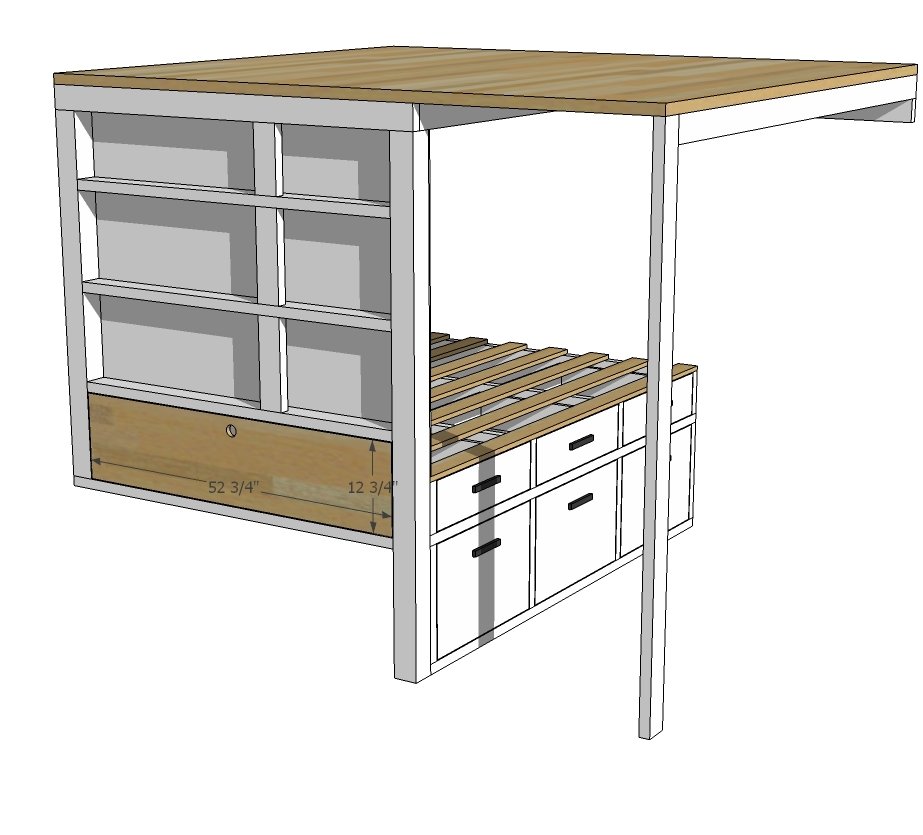
- 1 - 3/4" PLYWOOD @ 52-3/4" X 12-3/4" (HIDDEN STORAGE DOOR)
QUEEN BED
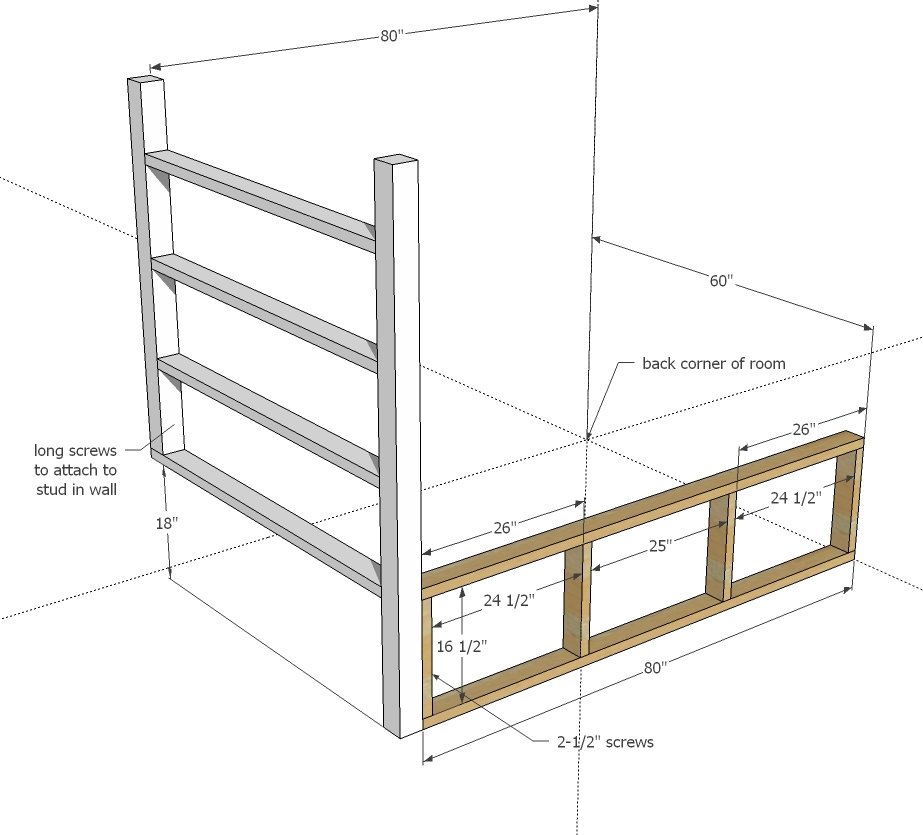
- 2 - 2x4 @ 80"
- 4 - 2x4 @ 16-1/2"
- 1 - 2X8 @ 80"
- 4 - 2X8 @ 58-1/2"
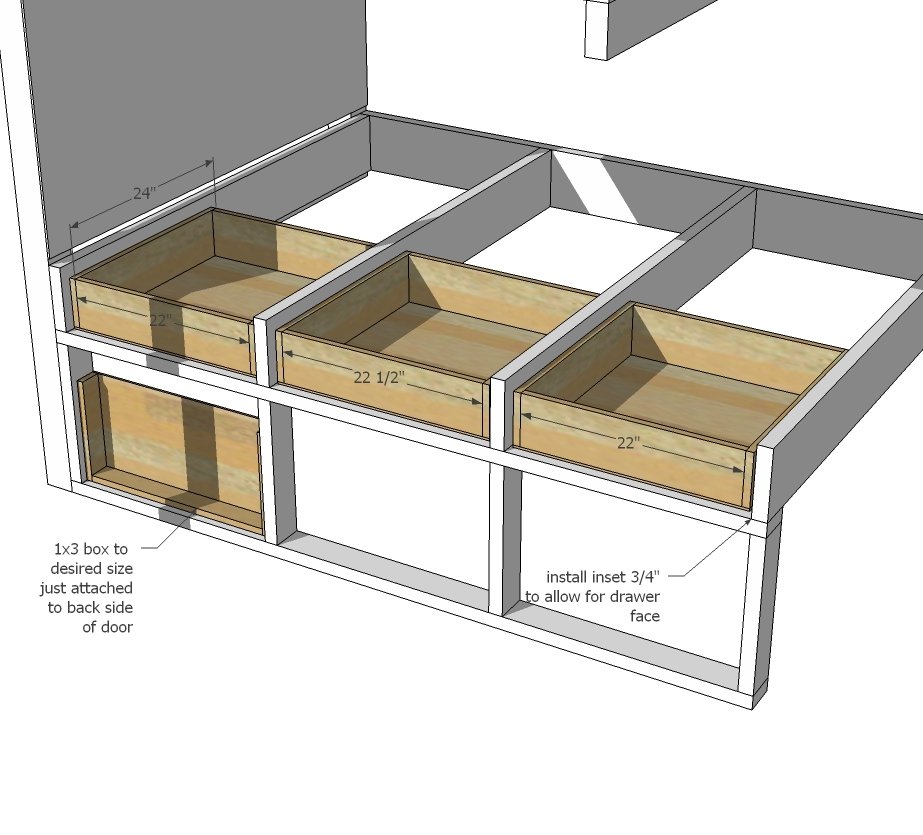
QUEEN BED DRAWERS (CUT TO FIT)
- 6 - 1x6 @ 24"
- 4 - 1x6 @ 22"
- 2 - 1x6 @ 22-1/2"
- 2 - 1/4" plywood @ 24" x 23-1/2"
- 1 - 1/4" plywood @ 24" x 24"
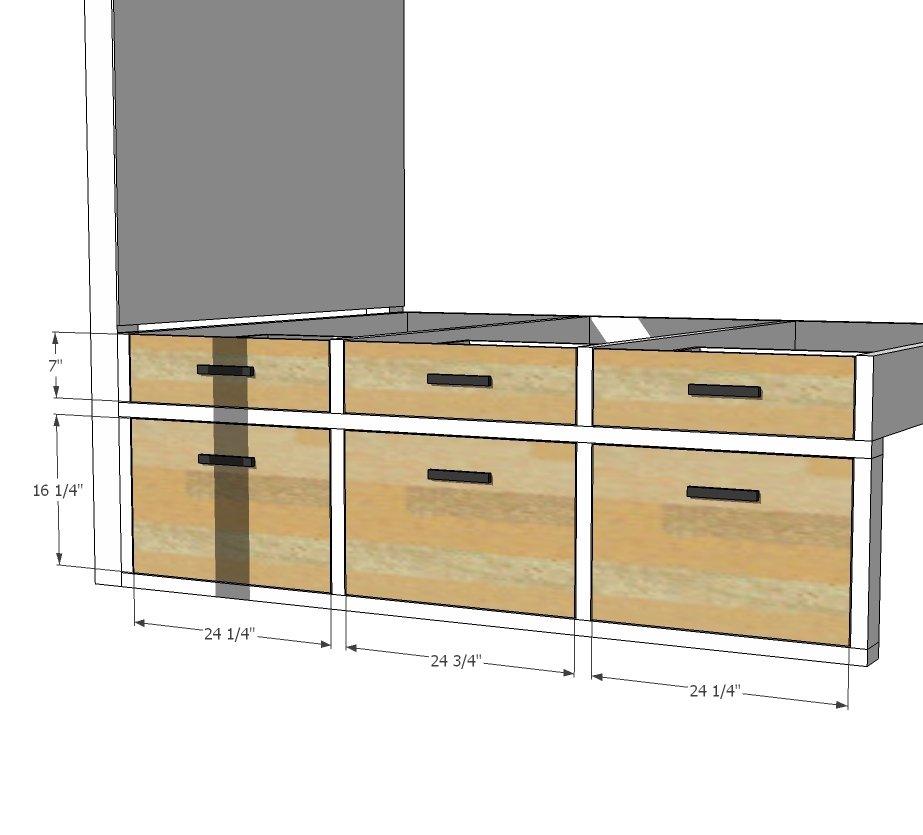
- 2 - 3/4" plywood or 1x8s ripped to fit 7" x 24-1/4"
- 1 - 3/4" plywood or 1x8s ripped to fit 7" x 24-3/4"
- 2 - 3/4" plywood 16-1/4" x 24-1/4"
- 1 - 3/4" plywood 16-1/4" x 24-3/4"
- Bed slats are total of 80" long
WALL CLEATS 1 - 2x4 @ 76"
- 1 - 2X4 @ 80"
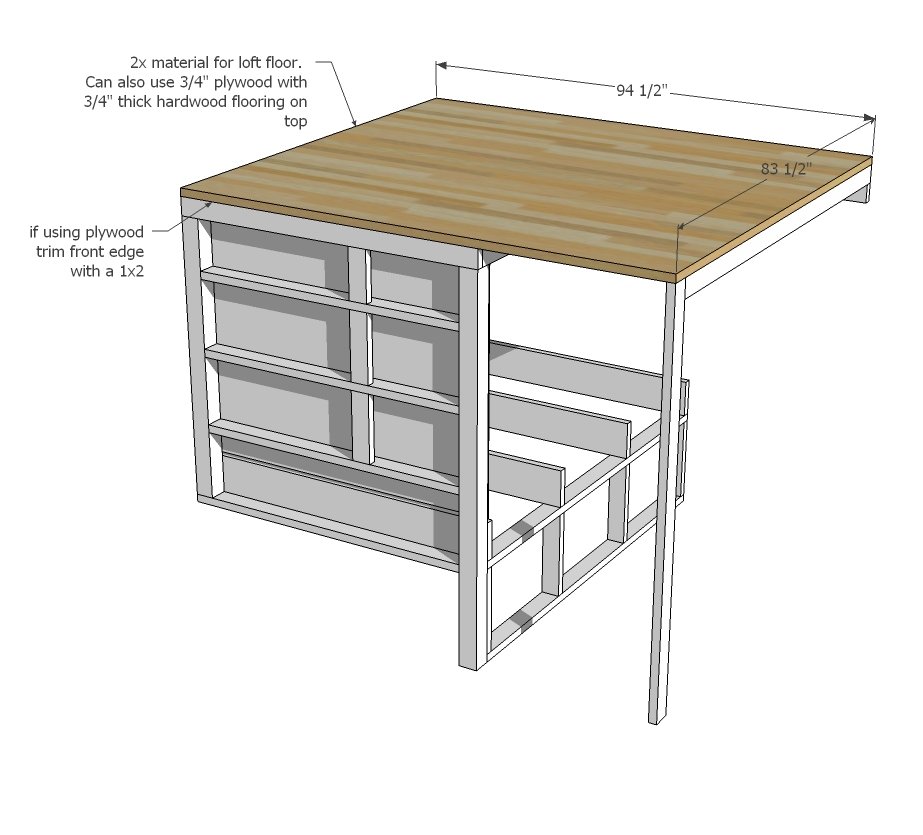
- 1 - 2X4 @ LENGTH OF ROOM (OURS WAS 94-1/2")
LOFT FLOOR FRAMING
- 1 - 2X4 @ 60"
- 4 - 2X4 @ 82"
- 2X6 TONGUE AND GROOVE FOR FLOORING/CEILING
Tools
- measuring tape
- square
- pencil
- hammer
- safety glasses
- hearing protection
- kreg-jig
- drill
- compound miter saw
- table saw
- nailer
- sander
- level
- countersink drill bit
Step-by-step Instructions
Step 1
Build the main wall system. The best way to attach into the 4x4 posts is with a Kreg Jig, hiding pocket holes on underside.
Step 2
Next, build the 2x4 bed support. We made ours using the self tapping wood screws (2-3/4" length but similar lengths would work just fine). Make sure this area is very square. Then attach the two pieces to the walls in the room and together using the 2-3/4" screws. You will need longer lag screws to attach 4x4s to the wall.
Step 3
Use a level to attach wall cleats to studs in the wall using the 2-3/4" screws.
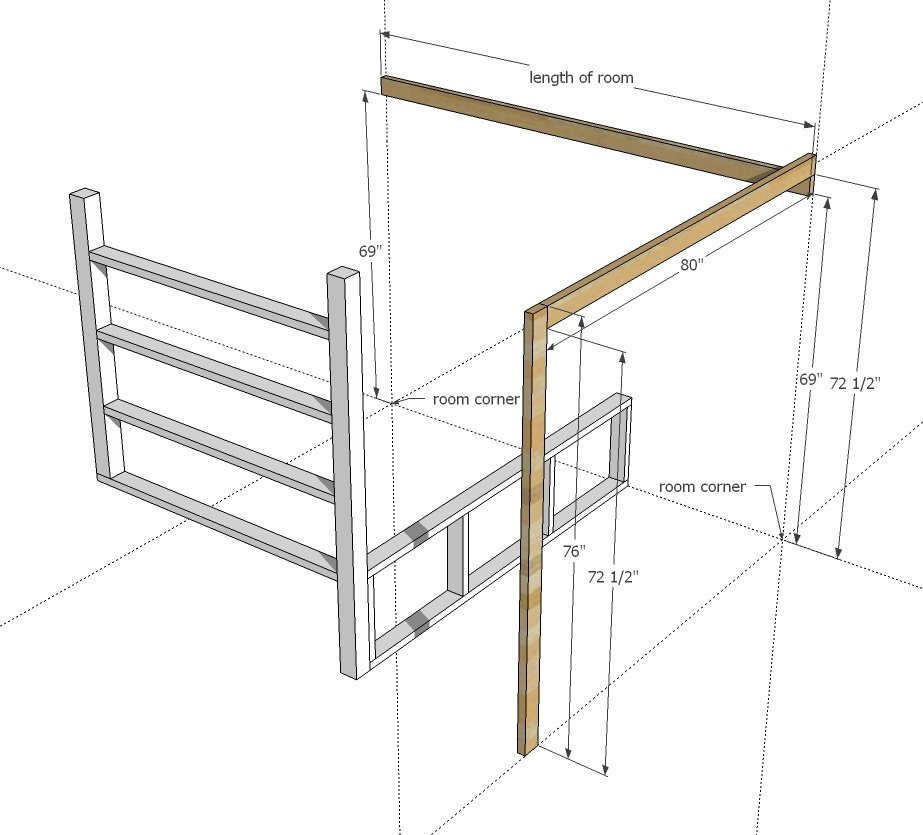
Step 4
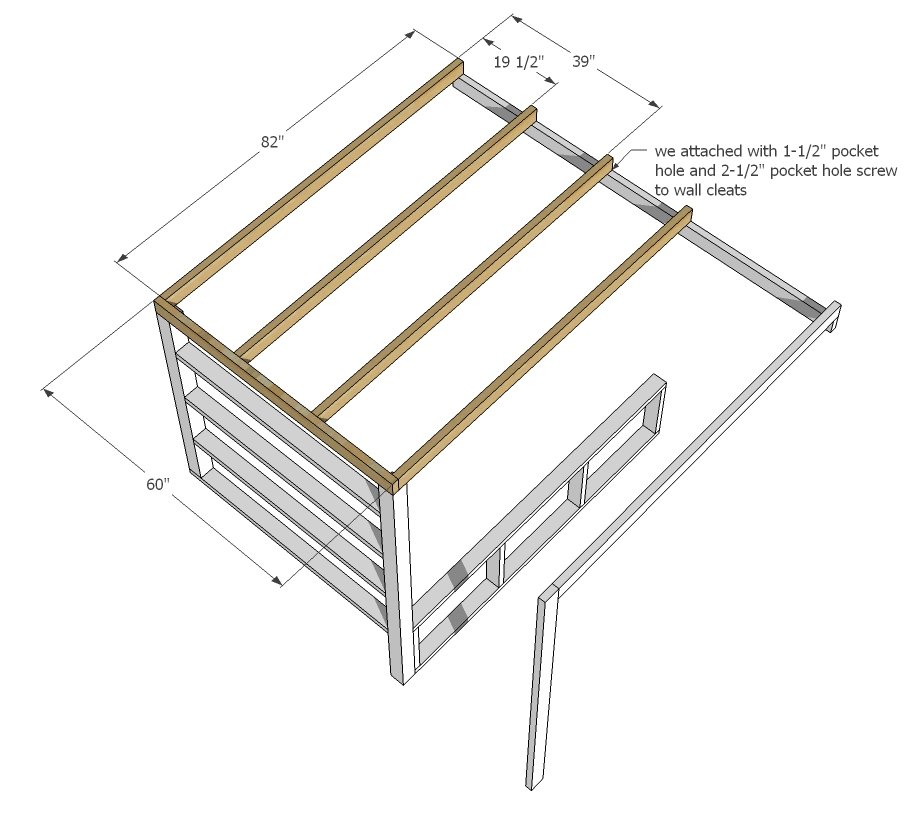
Step 5
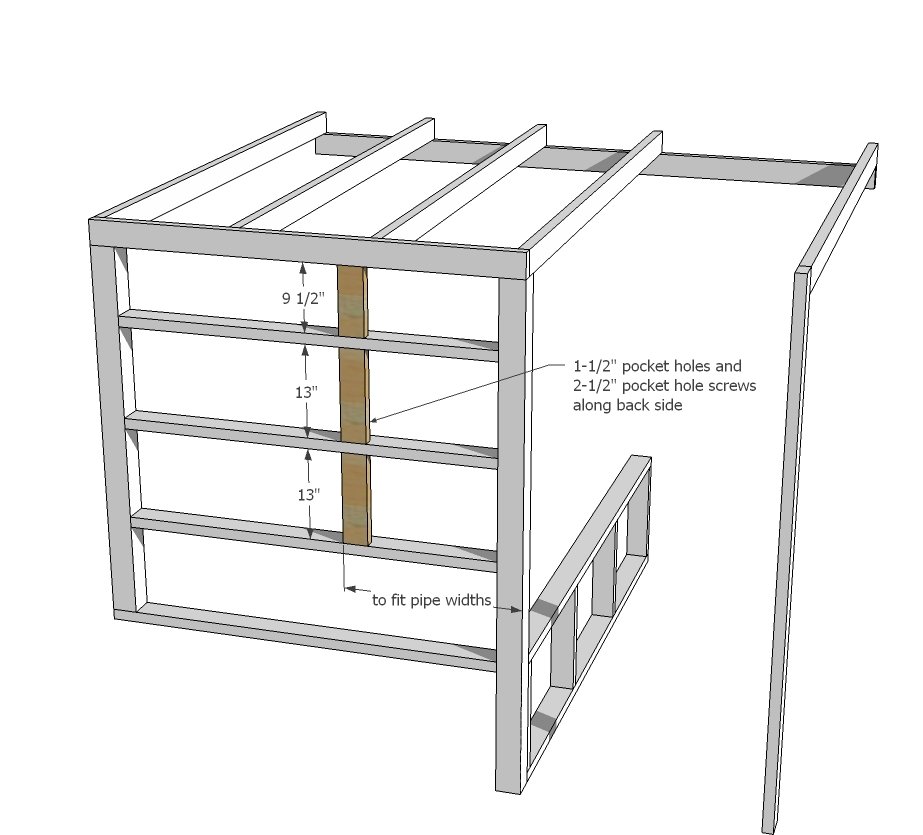
Step 6
I decided to use the 2x8s to support the mattress because it creates a nice sized cavity for drawers. 2x4 or 2x6 framing would have been fine too if you are not doing the drawers. If doing drawers take extra care to make sure the boards are attached square so you don't have a cockeyed drawer that doesn't slide right.
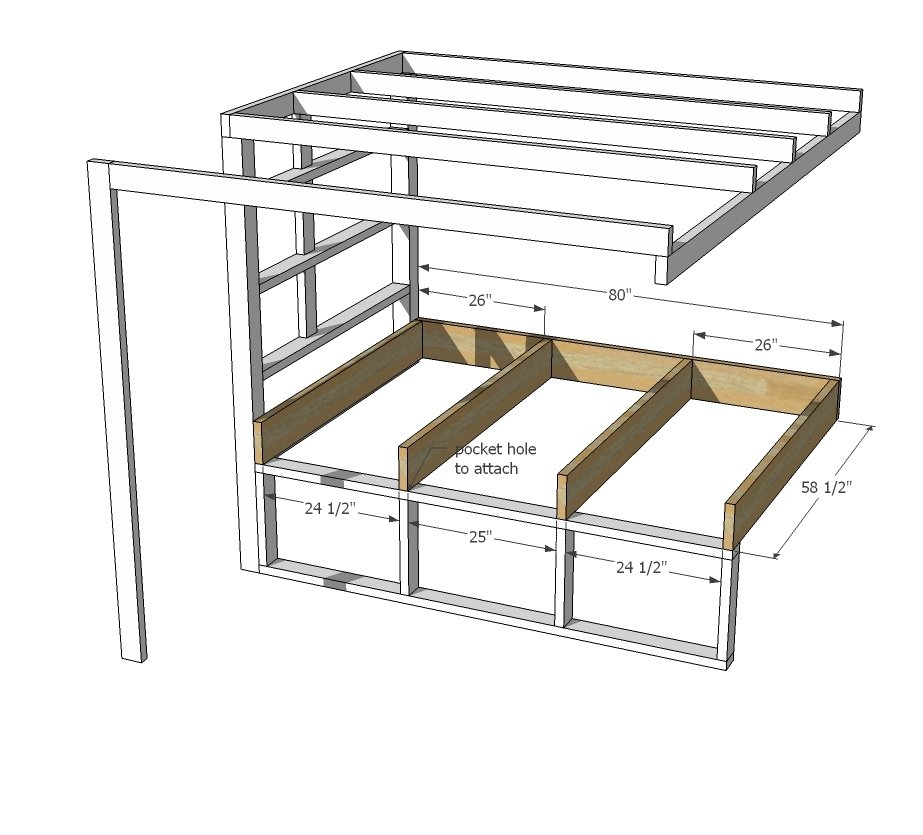
Step 7
We used leftover 1x6 tongue and groove from the wall paneling to cover the back of the "wall" but any material will do - beadboard, paneling, plywood - your choice. It's nice that this area is less than a full sheet of plywood. Just cut and attach with nails and glue.
Step 8
We used 2x6 tongue and groove for the upstairs loft. You could probably get away with 1x material, but not sure if I would recommend it with the span over the doorway being so close to 36". Another option is 3/4" plywood, then top with 3/4" hardwood flooring running the opposite direction.
Step 9
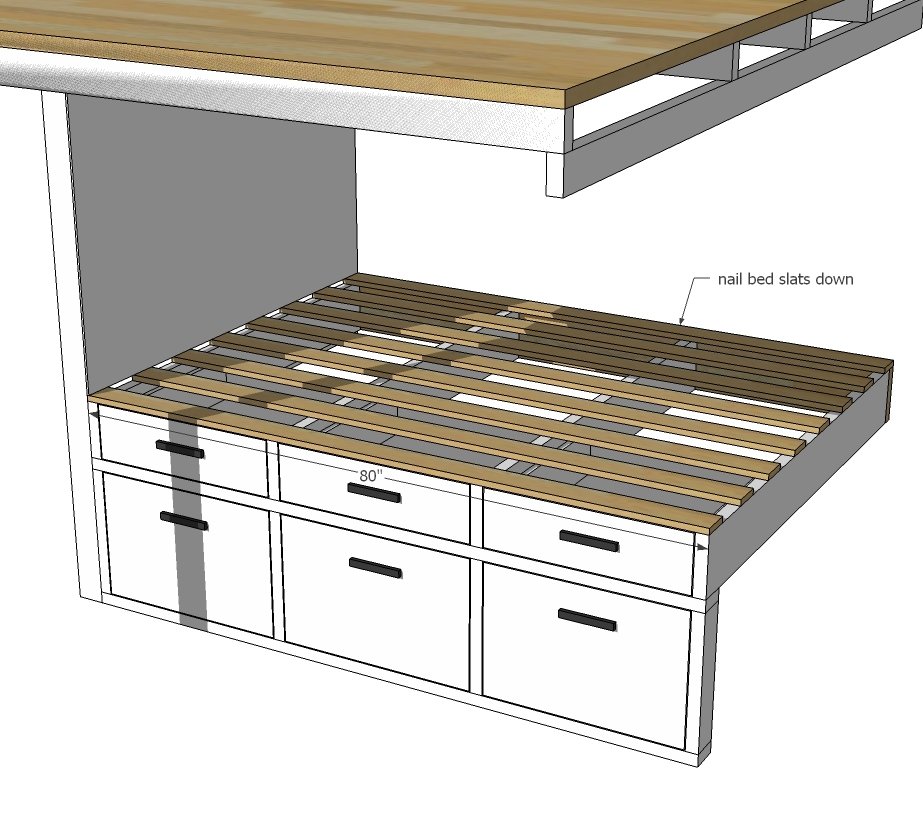
Drawers should always be built to fit openings and drawer slides. The picture shows the perfect situation. For the shoe tilt out drawers I just used 1x3s to box out an area, and scrap 1/4" plywood on the back, all attached to the door (see next step).
Step 10
Attach drawer faces and doors. There should be an 1/8" gap on all sides of the doors/drawers when installed properly.
Step 11
For the bed slats, I used a full length board (front edge painted) for the first slat, then burned up any 3/4" material for the remaining slats, splicing joints over the 2x8 framing.
Step 12
I hinged a piece of 3/4" plywood over the opening in the front. We cut a circle out in the middle to act as a handle.
Step 13
Store bought black iron pipe is an easy railing (though not code approved so please be reasonable and safe here) and ladder.
Finishing
Sand all surfaces, starting with a medium grit and finishing with fine. Wipe off the dust, fill any holes or gaps with wood filler, and sand smooth once dry. Apply primer if you're painting, then finish with your choice of paint or stain and seal with a durable clear topcoat. For outdoor projects, use exterior-rated primer, paint or stain, and sealer so the piece stands up to the weather.
Source (temporary): https://www.ana-white.com/woodworking-projects/tiny-house-loft-bedroom-guest-bed-storage-and-shelving