Toddler Farmhouse Bed Using Crib Mattress
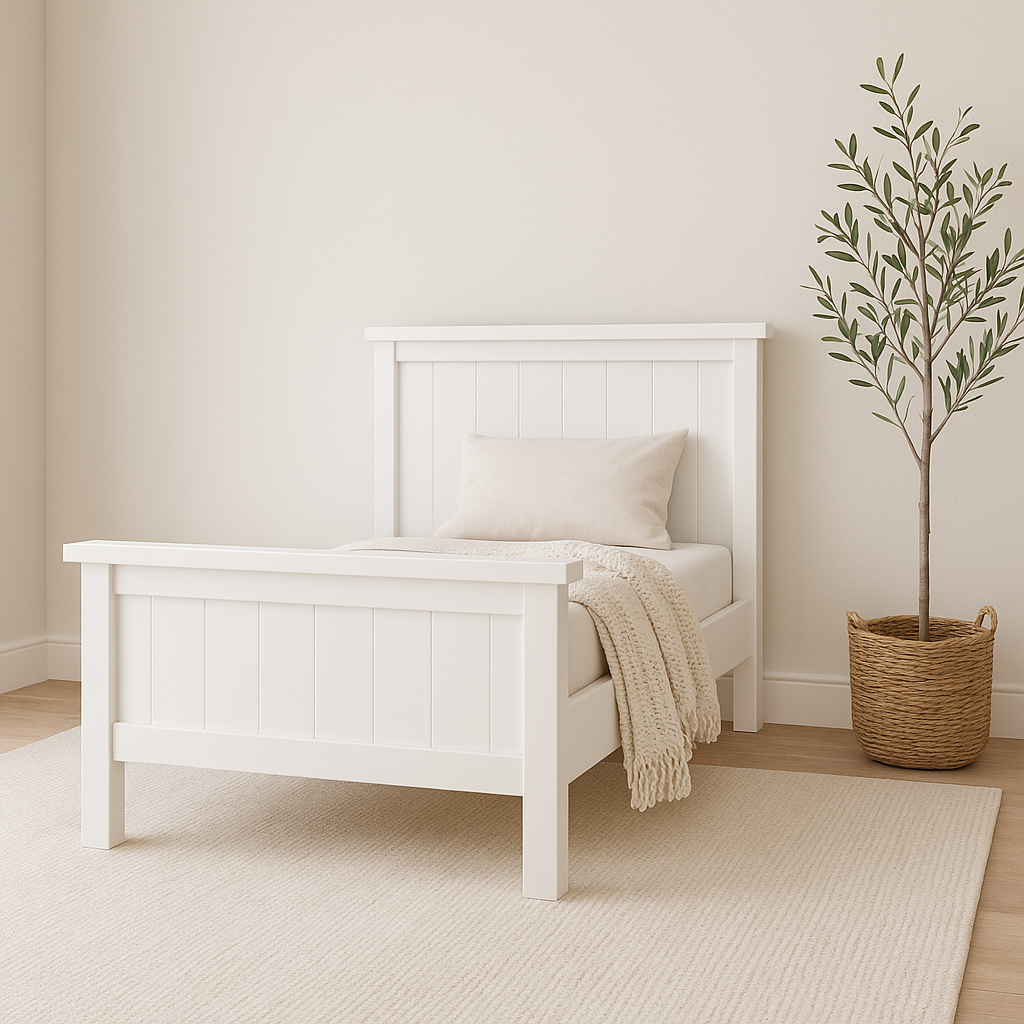
Toddler rooms can be cute too! Build a mini farmhouse bed with! Step by step plans with lots of reader submitted photos from
Specifications
| Project type | Beds and Bed Frames |
|---|---|
| Room | Bedroom |
| Style | Farmhouse Furniture |
| Difficulty | Beginner Projects |
| Estimated cost | Under $20 |
Dimensions
Use the size-specific shopping and cut lists below.
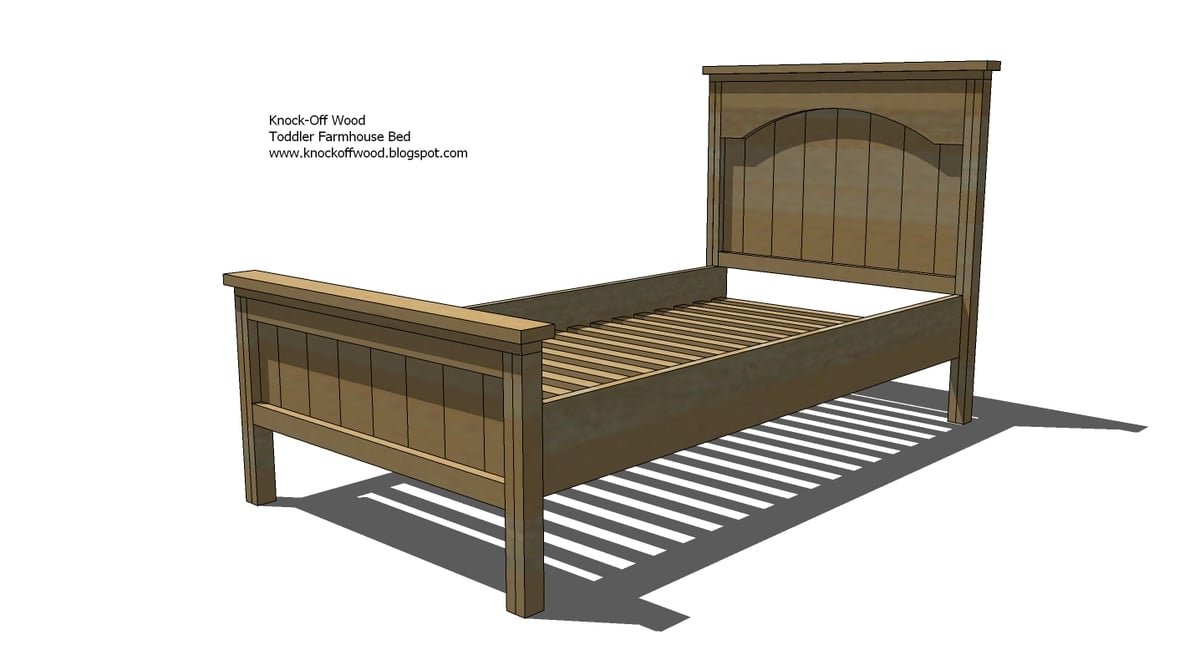
Shopping List
- 10 – 1×2 Boards, 8′ Long
- 1 – 1×3 Board, 8′ Long
- 2 – 1×4 Boards, 8′ Long
- 2 – 1×6 Boards, 8′ Long - adjust plans if not cutting arch
- 2″ Screws
- 1 1/4″ Screws
- 1 1/4″ Brad Nails
- Wood Glue
- Wood Putty
- Sandpaper
Cut List
Cut List for the Headboard
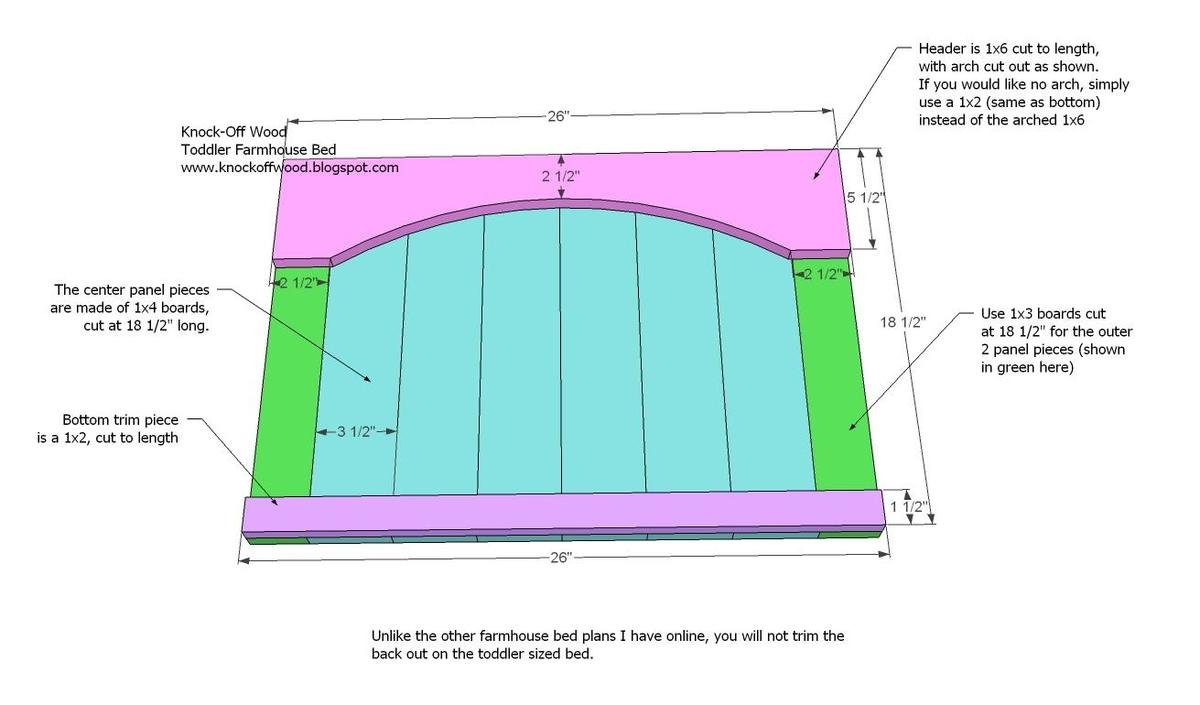
A) 6 – 1×4 @ 18 1/2″ (Center Panel)
B) 2 – 1×3 @ 18 1/2″ (Side Pieces for Center Panel)
C) 1 – 1×2 @ 26″ (Cut to measurement, headboard trim – cut 2 if you do not want a arch)
D) 1 – 1×6 @ 26″ (Cut to measurement, headboard header, use 1×2 if you do not want arch)
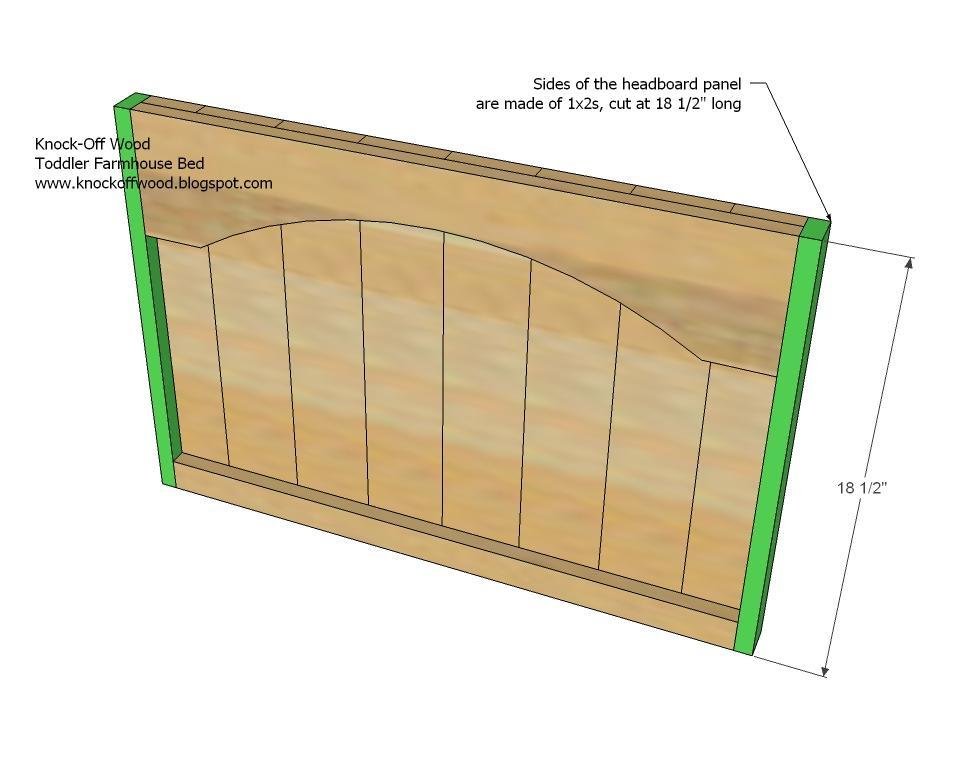
E) 2 – 1×2 @ 18 1/2″ (Inside Leg Pieces) F) 2 – 1×2 @ 30″ (Full Legs)
G) 1 – 1×2 @ 29″ (Top of Panel and Legs)
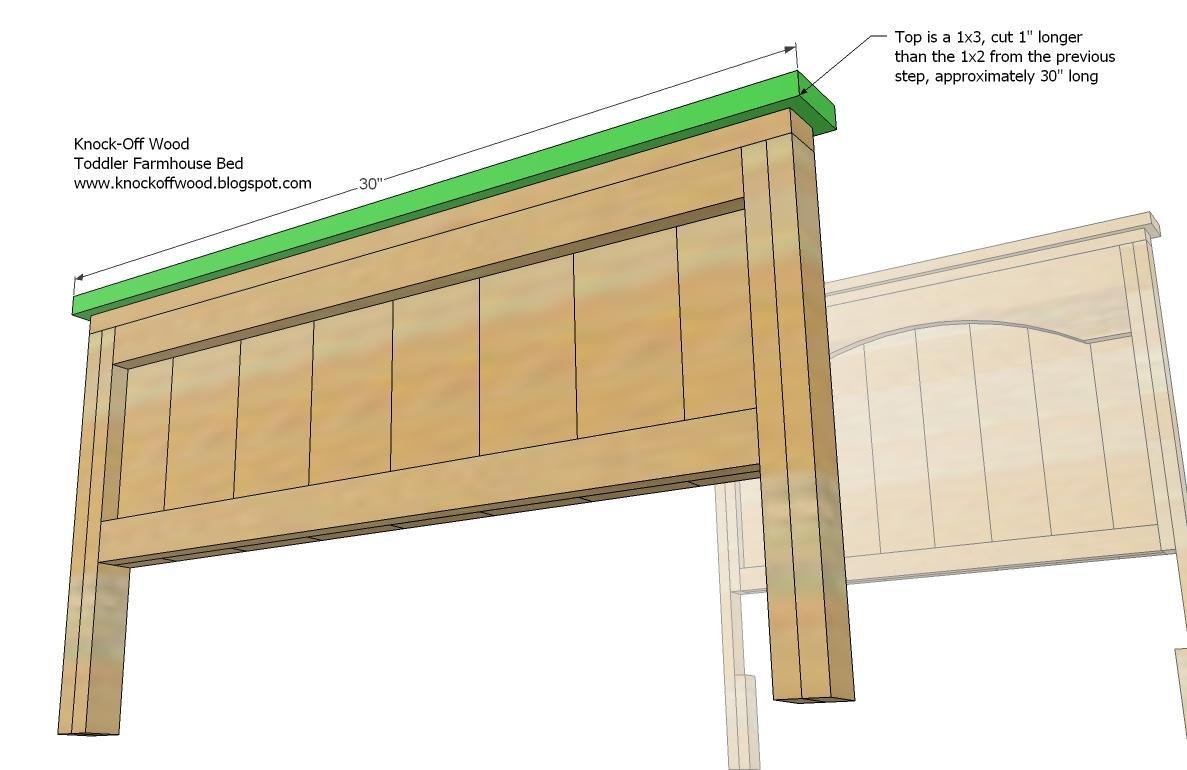
H) 1- 1×3 @ 30″ (Top of Headboard)
I) 2 – 1×2 @ 6″ (Cut to measure, Inside bottom Leg Pieces) Cut List for Footboard
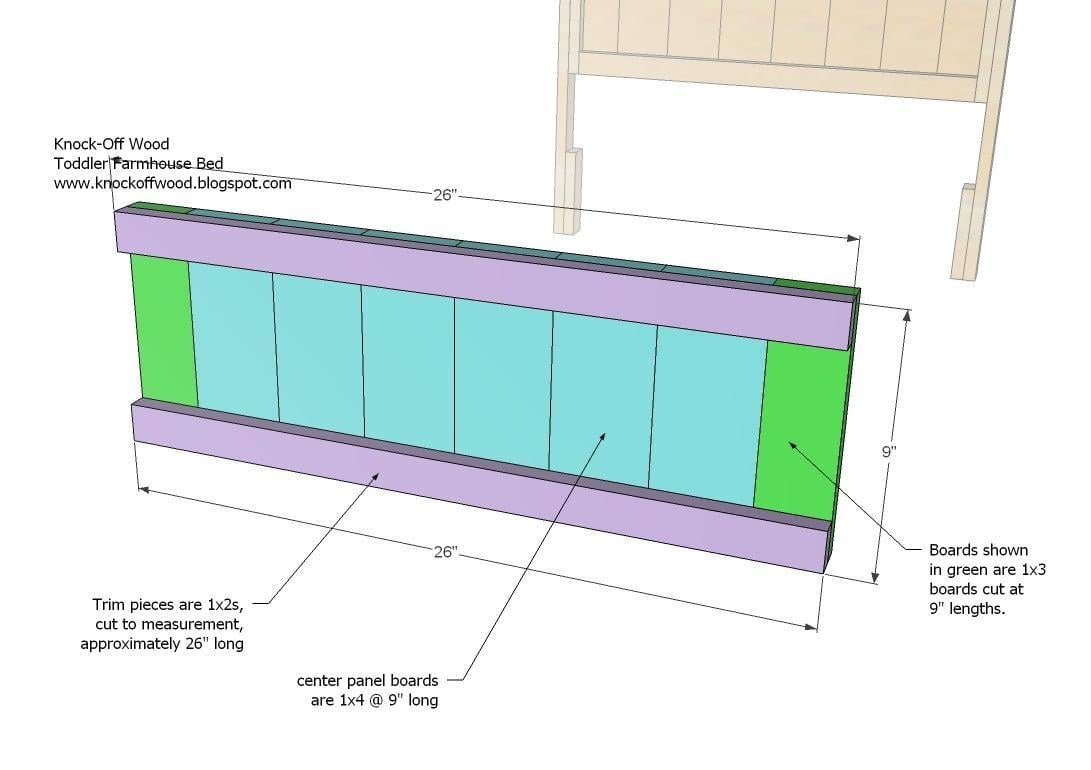
J) 6 – 1×4 @ 9″ (Center Panel)
K) 2 – 1×3 @ 9″ (Side Pieces of Center Panel)
L) 2 – 1×2 @ 26″ (Trim for the center panel, cut to measure)
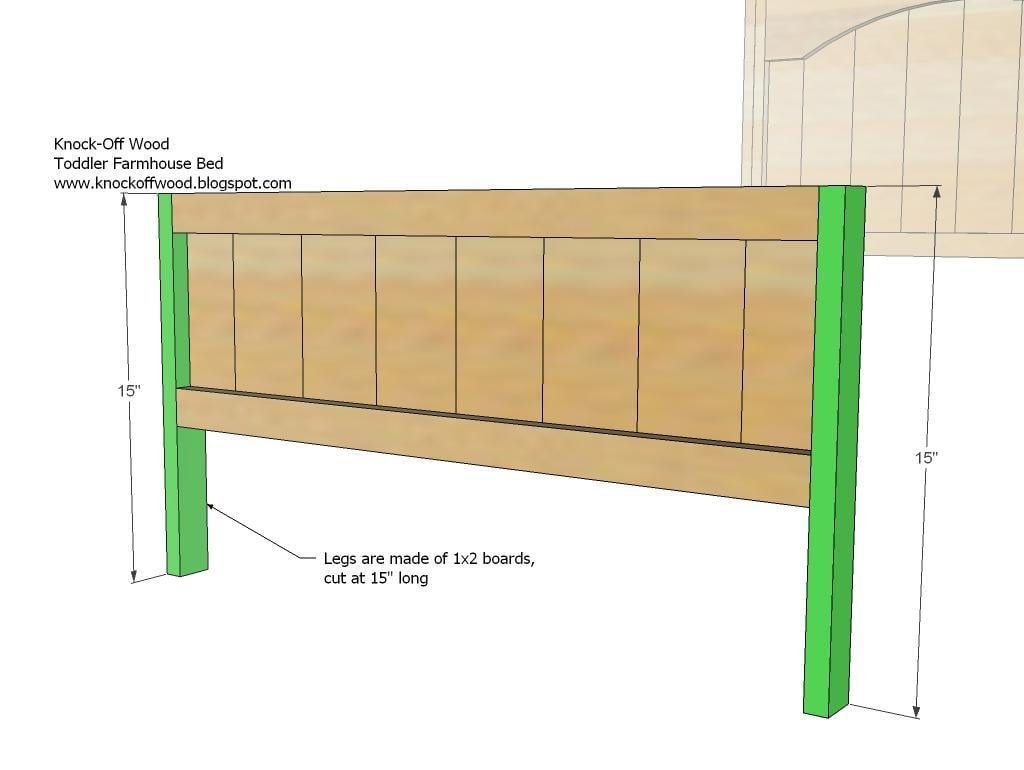
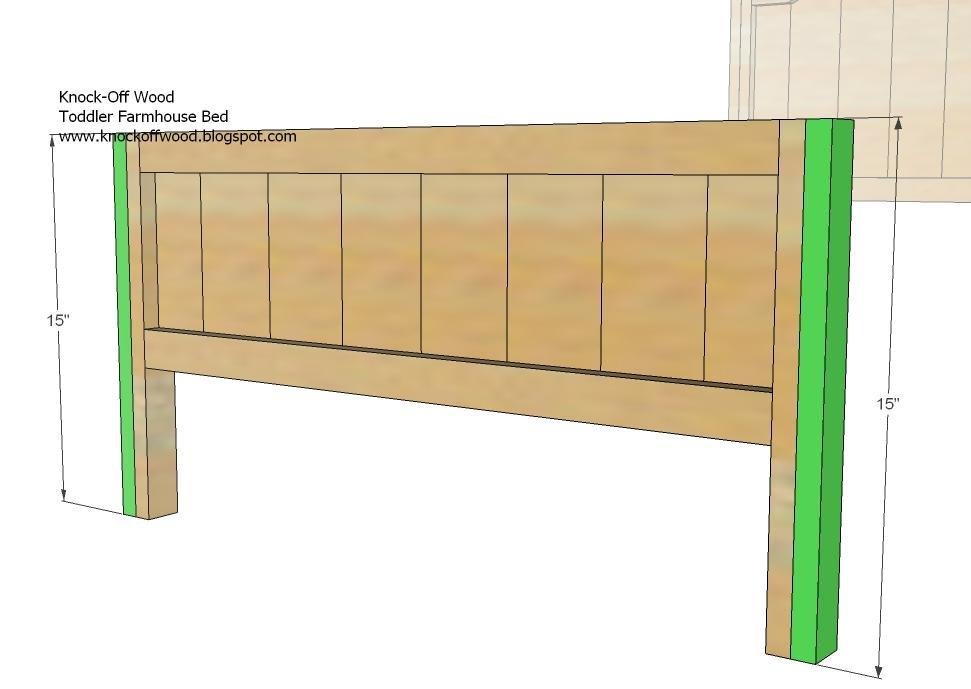
M) 4 – 1×2 @ 15″ (Legs)
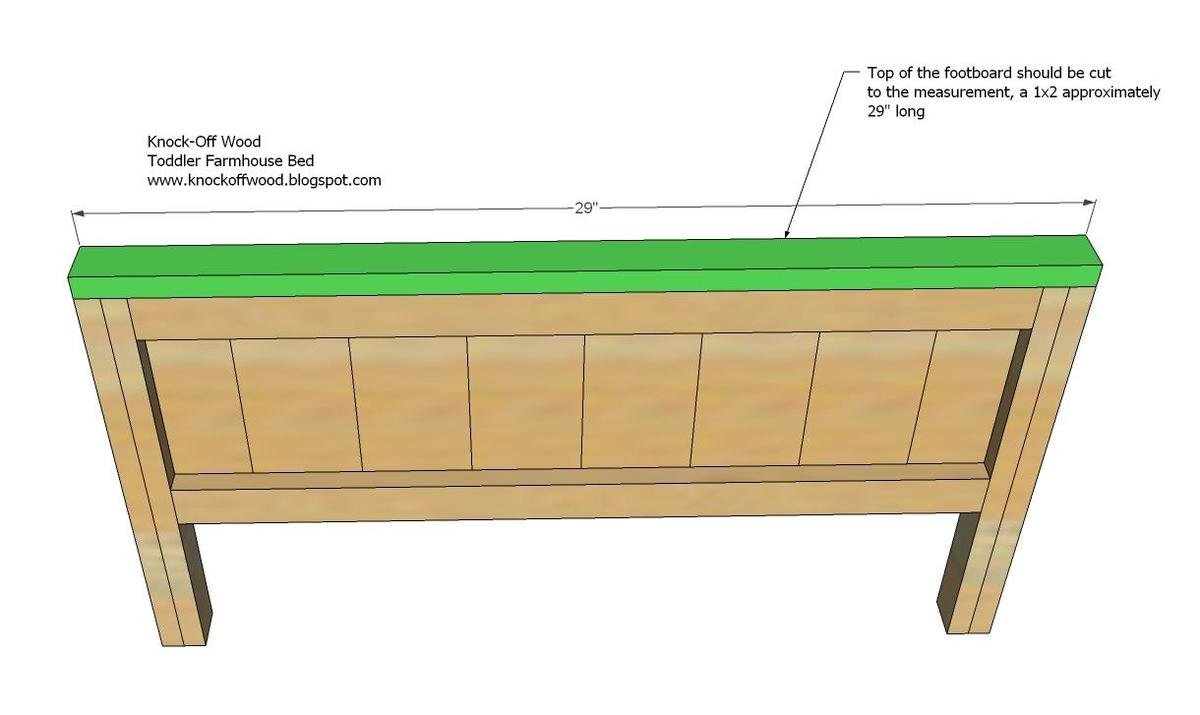
N) 1 – 1×2 @ 29″ (Top of the Panel and Legs)
O) 1 – 1×3 @ 30″ (Top of the Footboard) Bed Frame
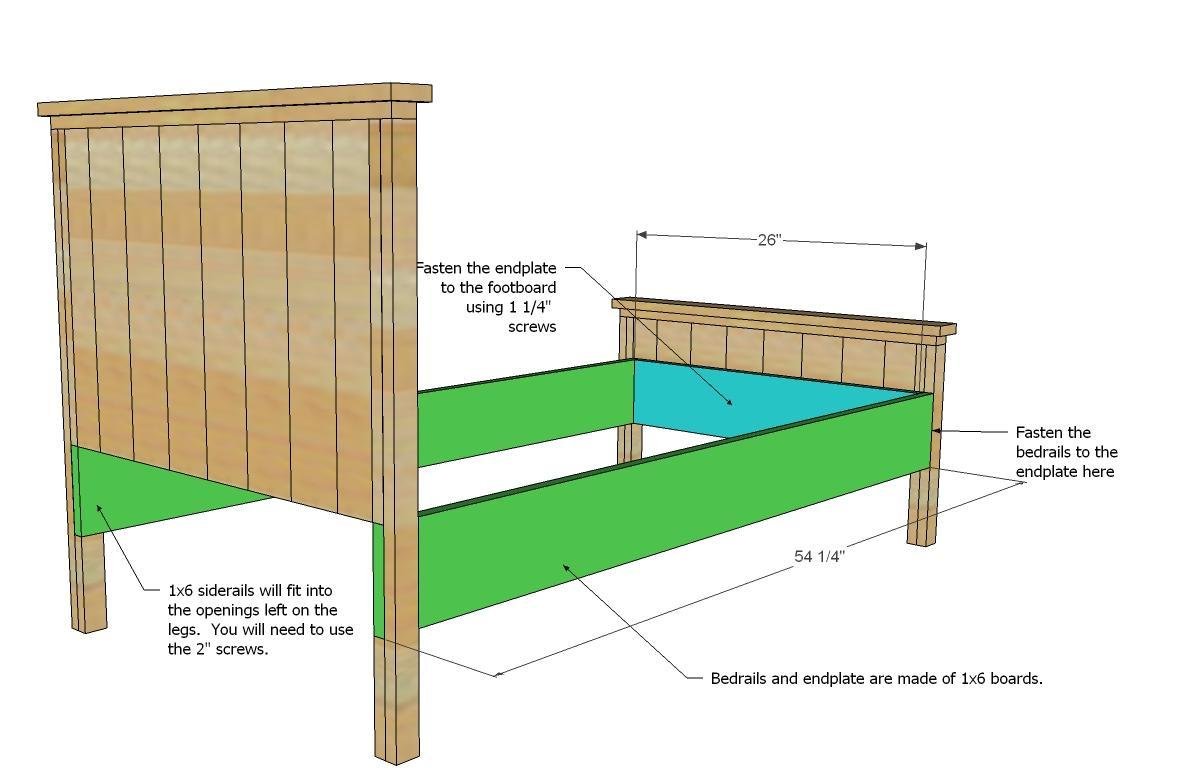
P) 2 – 1×6 @ 54 1/2″ ( Side Rails)
Q) 1- 1×6 @ 26″ (Endplate)
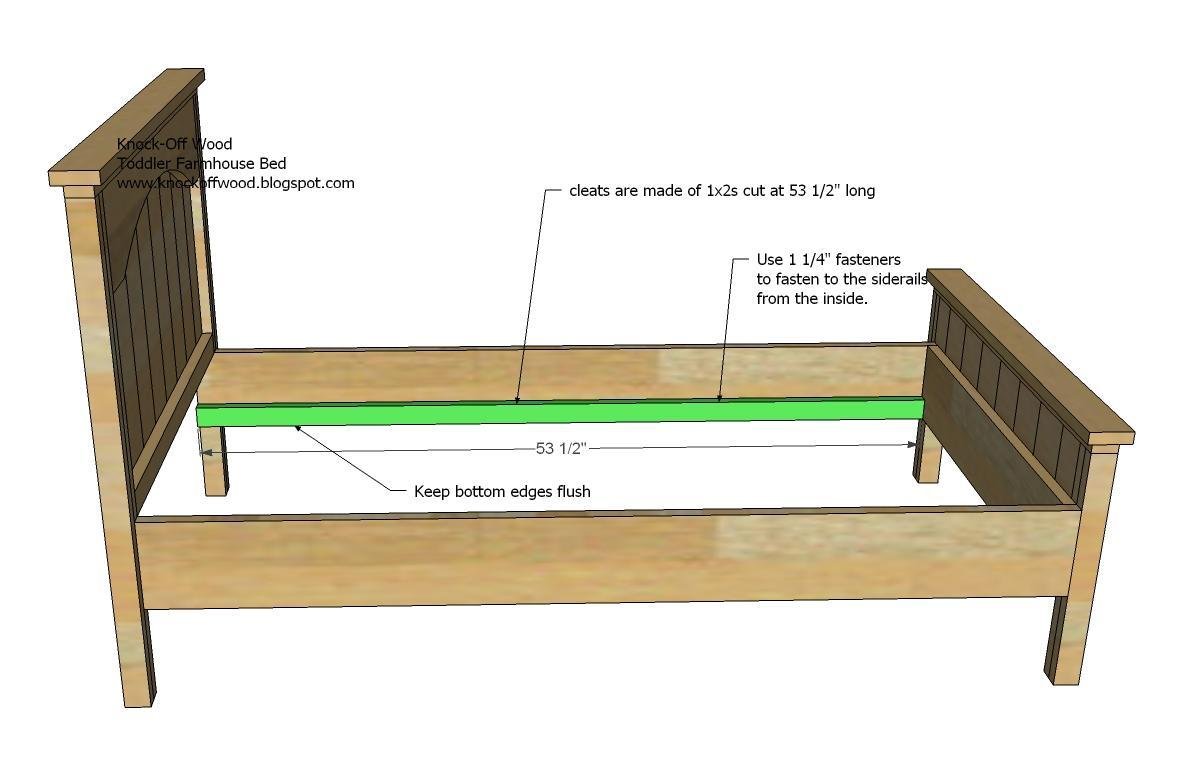
R) 2 – 1×2 @ 53 1/2″ (Cleats)
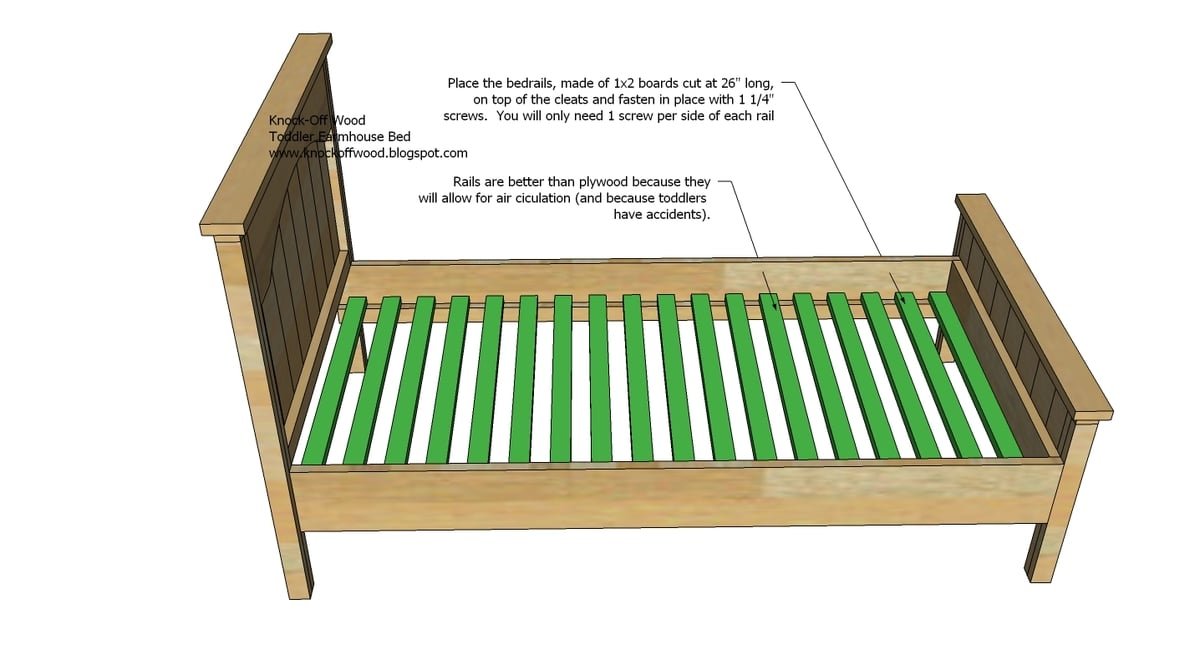
S) 18 – 1×2 @ 26″ (Slats)
Tools
- measuring tape
- square
- pencil
- safety glasses
- hearing protection
- circular saw
- nailer
- sander
Step-by-step Instructions
Step 1
Headboard Panel. Fasten the center panel boards, shown in green and blue above, to the bottom trim piece, as shown above. I recommend using the 1 1/4″ nails and glue, and fastening from the back into the back side of the bottom trim piece. Measure and cut the bottom trim piece to fit. Then if you are choosing to have an arch, cut out the arch and fasten the header to the center panel. If you do not want an arch, you can use a 1×2 board for the header.
Step 2
Inside Legs. Fasten the inside leg pieces to the sides of the center panel, as shown above. Use the 2″ screws and fasten to the header and the bottom trim, and the side panel piece.
Step 3
Outside Legs. Use the 1 1/4″ nails to fasten the full leg piece to the inside leg piece from step 2. Then use the 2″ nails to fasten the outside leg piece to the header and bottom trim.
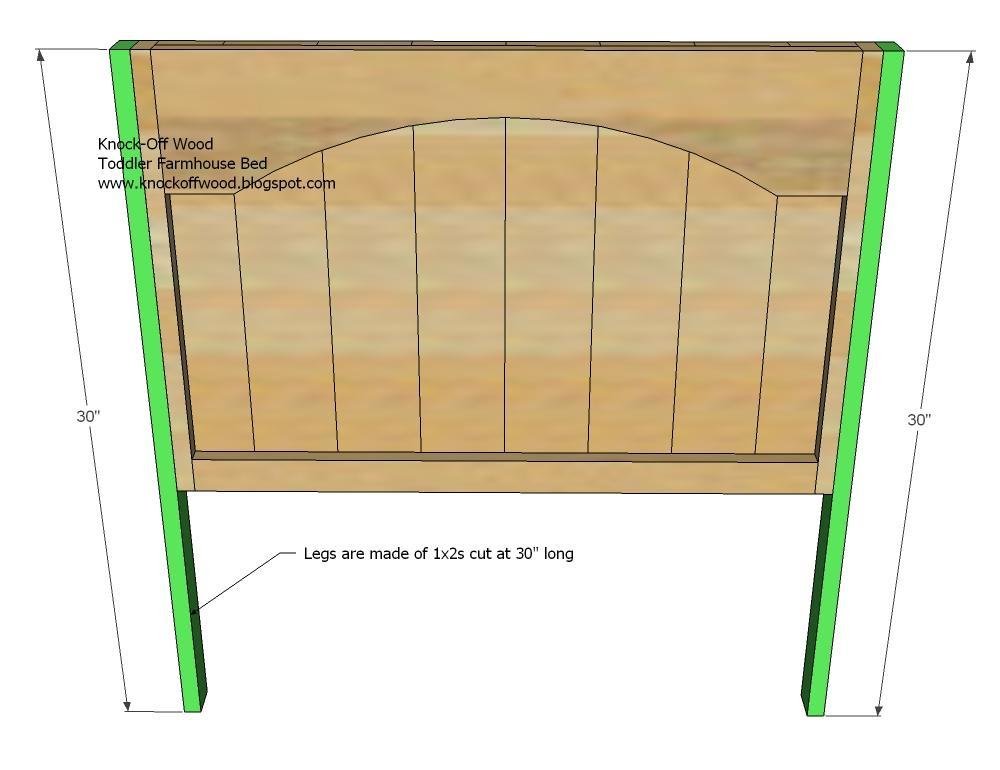
Step 4
Top of the Panel and Legs. Use the 2″ nails to fasten the top piece, G, to the headboard. Measure and cut to fit.
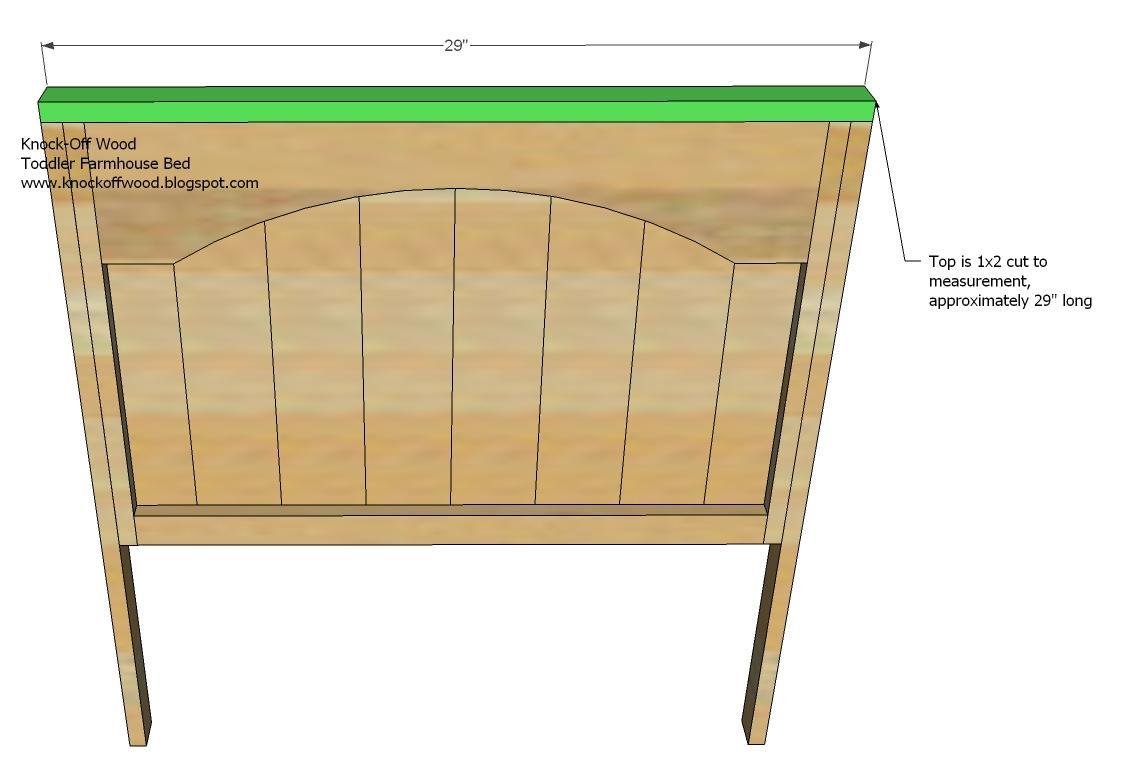
Step 5
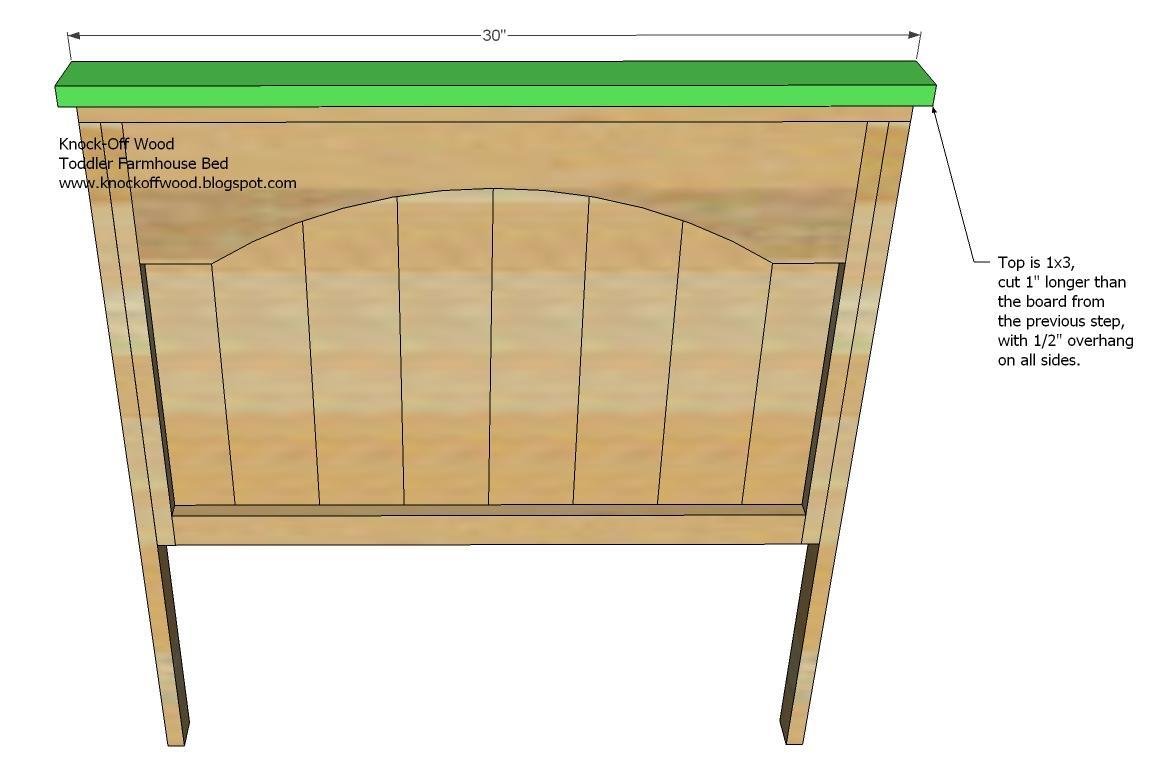
Step 6
Bottom Leg Pieces. Measure your 1×6 board to make sure it is exactly 5 1/2″ wide. Then use the above diagram to create a notch for the side rails. Use the 1 1/4″ nails and glue.
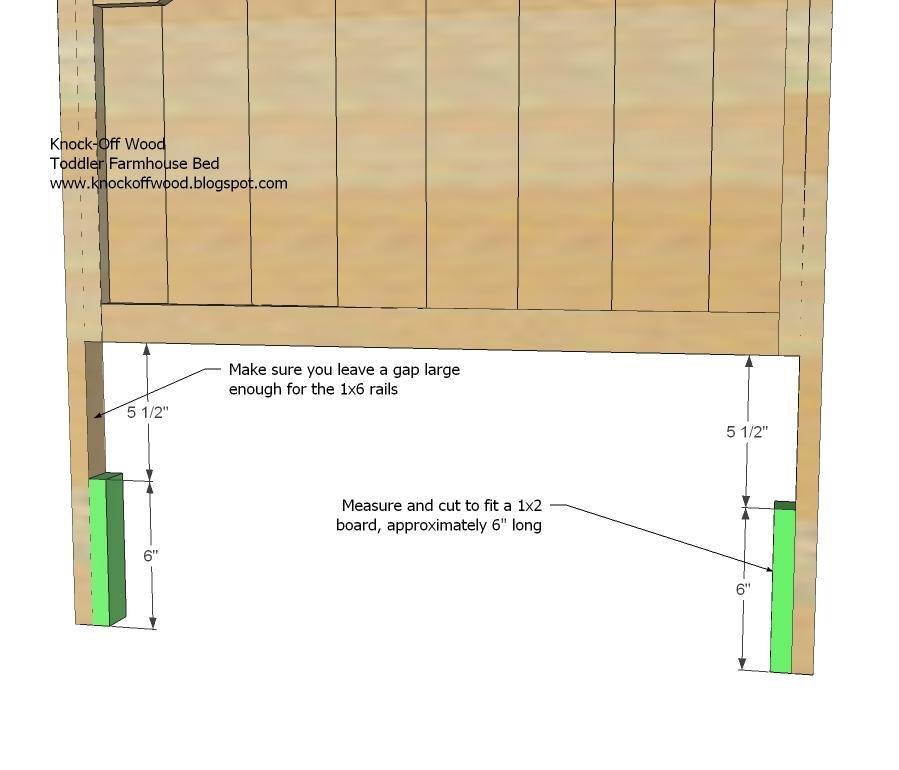
Step 7
Footboard Panel. Build the footboard panel, shown above, as you built the headboard panel in step 1.
Step 8
Inside Legs. Attach the inside legs using screws to the footboard panel as you did with the headboard panel in step 2.
Step 9
Outer Legs. Fasten the outside legs in place, as you did with the headboard panel. Use 1 1/4″ nails, and 2″ nails where there is more than 2″ of backing.
Step 10
Top of Footboard Panel and Legs. Measure and cut the top of the panel and legs, and fasten in place using the 2″ nails and glue.
Step 11
Top of Footboard. As you did with the headboard, fasten the top piece to the footboard as shown above.
Step 12
Side Rails and End Plate. Begin by fastening the side rails to the end plate using 2″ screws. Then use the 1 1/4″ screws to fasten the end plate to the footboard. Then use the 2″ screws to fasten the siderails to the headboard. The siderails will fit into the opening on the headboard.
Step 13
Cleats. Fasten the cleats to the inside of the siderails, as shown above. Use glue and the 1 1/4″ nails.
Step 14
Slats. As directed above, lay the slats on top of the cleats. Fasten in place with screws.
Finishing
Sand all surfaces, starting with a medium grit and finishing with fine. Wipe off the dust, fill any holes or gaps with wood filler, and sand smooth once dry. Apply primer if you're painting, then finish with your choice of paint or stain and seal with a durable clear topcoat. For outdoor projects, use exterior-rated primer, paint or stain, and sealer so the piece stands up to the weather.
Source (temporary): https://www.ana-white.com/woodworking-projects/toddler-farmhouse-bed-using-crib-mattress-free-plans