Toy Bin Box with Cubby Shelves
Modern Farmhouse Toy Bin Shelf – Included Tidy up in style with this beautifully functional toy bin shelf, designed to blend effortlessly into modern farmhouse and neutral-themed homes. Featuring a triple-compartment top cubby section, integrated label holders, and a large lower bin, this versatile piece is perfect for organizing everything from books and plush animals to blankets and baskets. Crafted from affordable lumber, its angled sides and clean-lined profile give it a built-in look while remaining compact enough for small spaces like nurseries, playrooms, or entryways. Build It Yourself – This toy shelf isn’t just beautiful—it’s totally buildable. walk you through every step of the process with clear diagrams, dimensions, and a full material list. No advanced skills required—just basic tools and a free weekend. Features: – Three open cubbies with optional label holders – Slanted design for easy toy access – Large lower bin perfect for pillows, stuffed animals, or soft storage – Finished in white with neutral styling suggestions – included for DIYers Organize smarter and build something lasting—with both a stylish piece and the satisfaction of making it yourself.
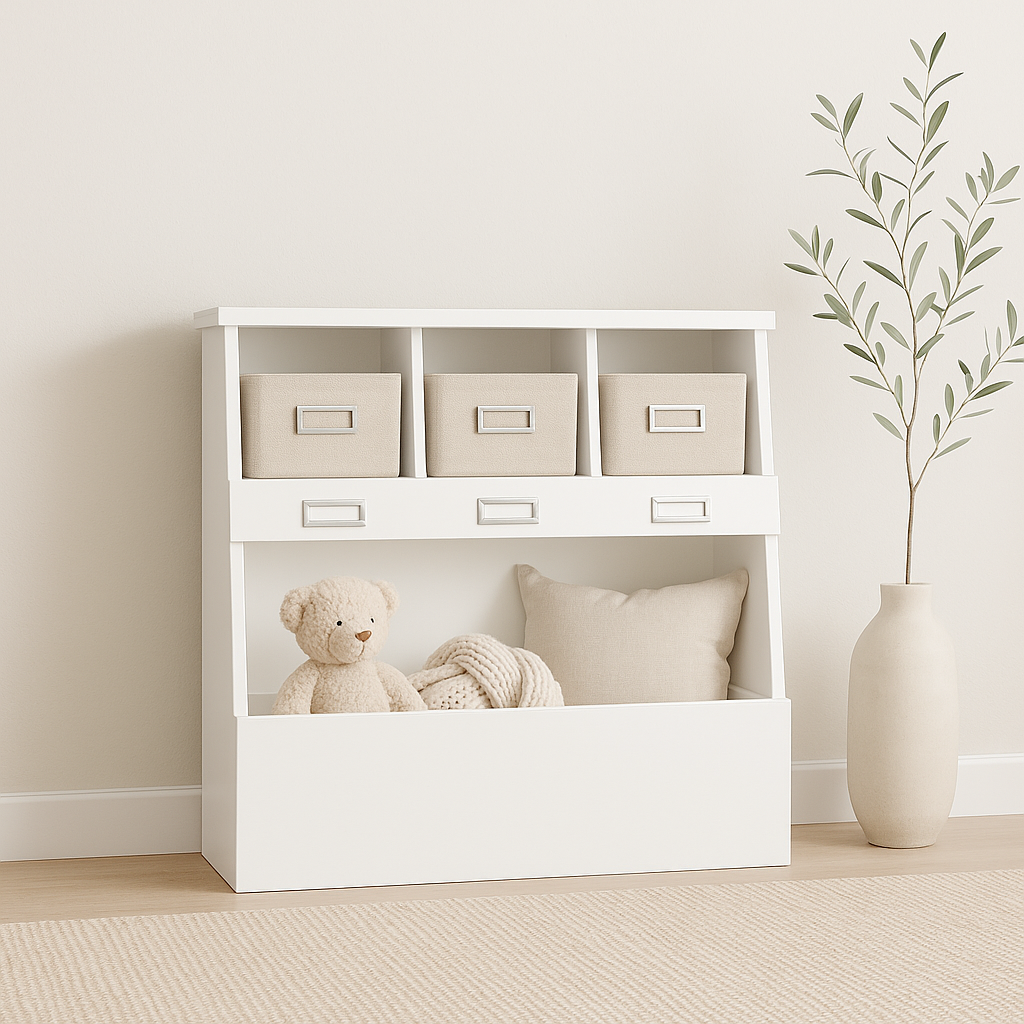
Specifications
| Project type | Toy box Plans |
|---|---|
| Room | Storage Solutions |
| Style | Cottage Style Furniture Plans |
| Difficulty | Intermediate |
| Estimated cost | $50 - $100 |
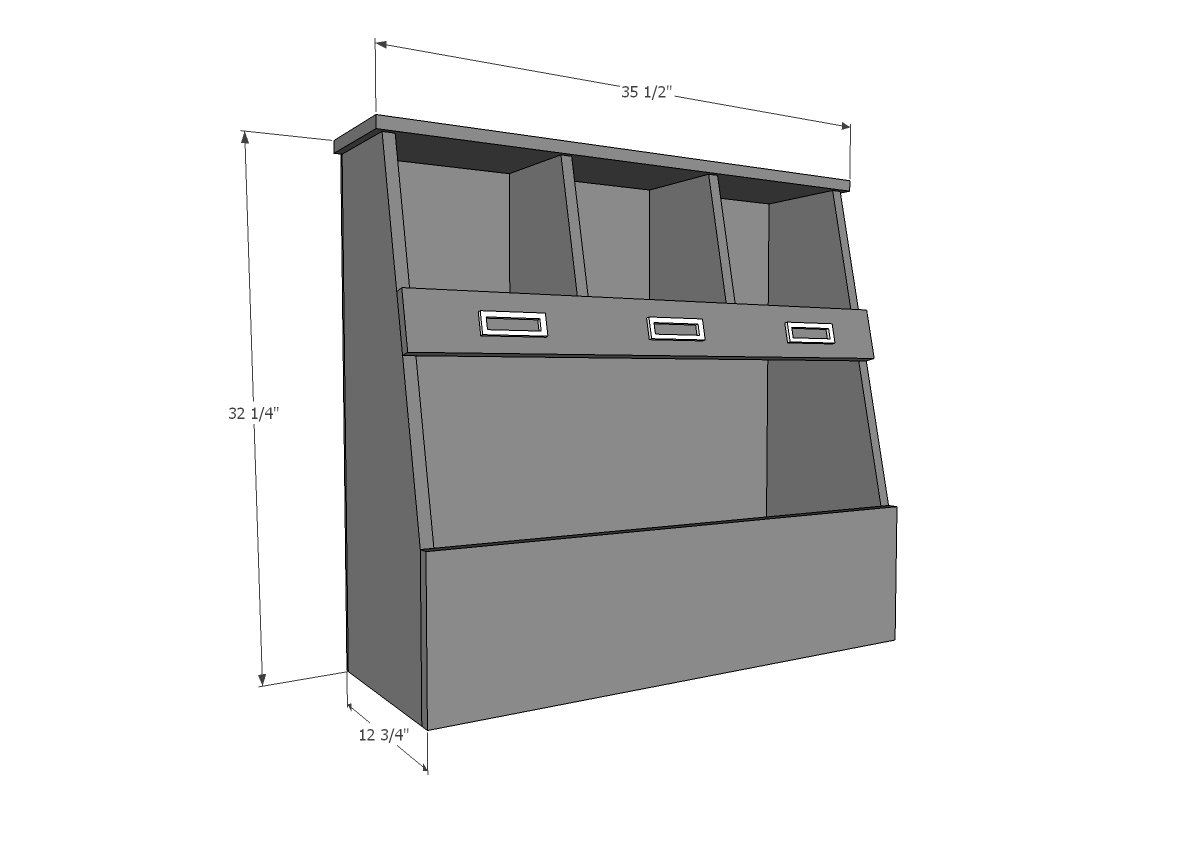
Dimensions
Use the size-specific shopping and cut lists below.
Shopping List
- 1 - 1x12 @ 8 feet long
- 1 - 1x10 @ 8 feet long
- 1 - 1x8 @ 3 feet long
- 1- 1x4 @ 3 feet long
- half sheet of 1/4" thick plywood or other hardboard for back (can also use a wainscoating panel if 32" tall)
Cut List
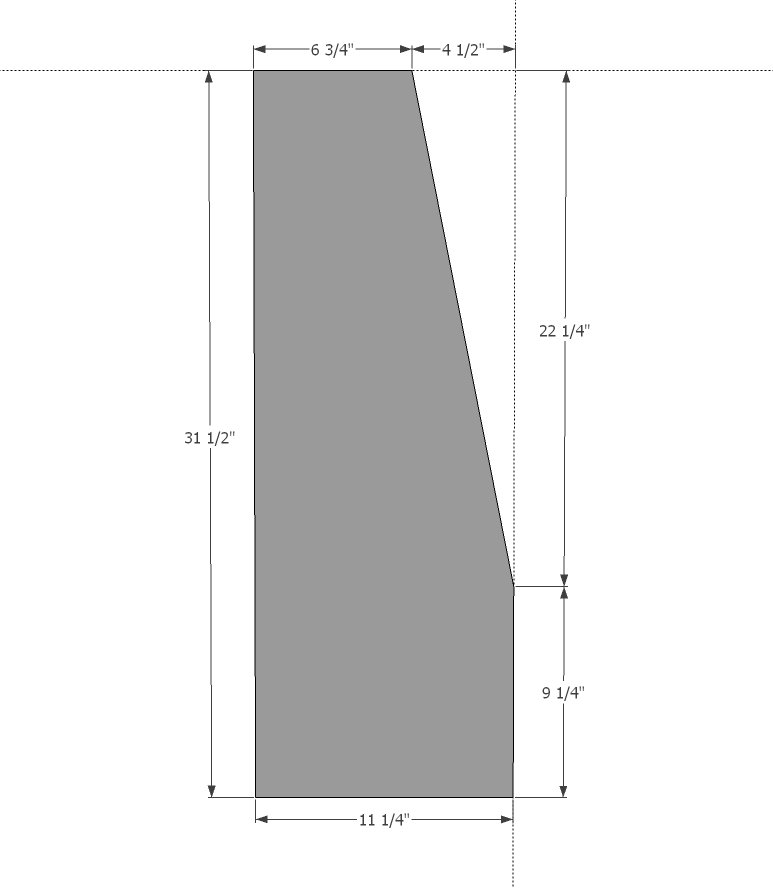
- 2 - 1x12 @ 31-1/2" - sides
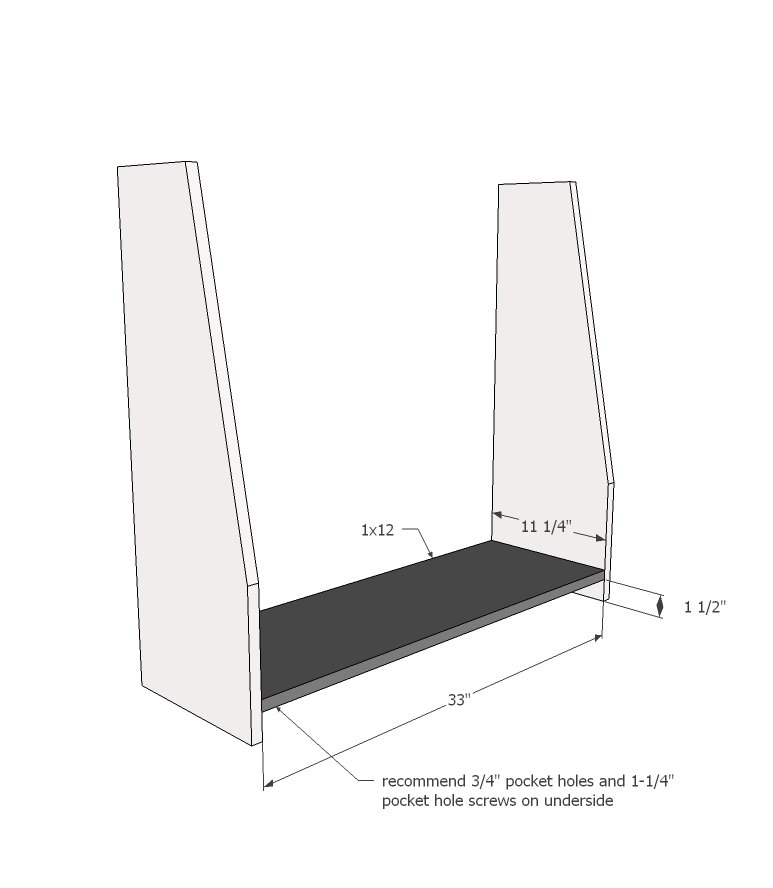
- 1 - 1x12 @ 33" - bottom
- 1 - 1x8 @ 35-1/2" top
- 1 - 1x10 @ 33" - shelf
- 2 - 1x10 @ 12-1/4" - cubby dividers
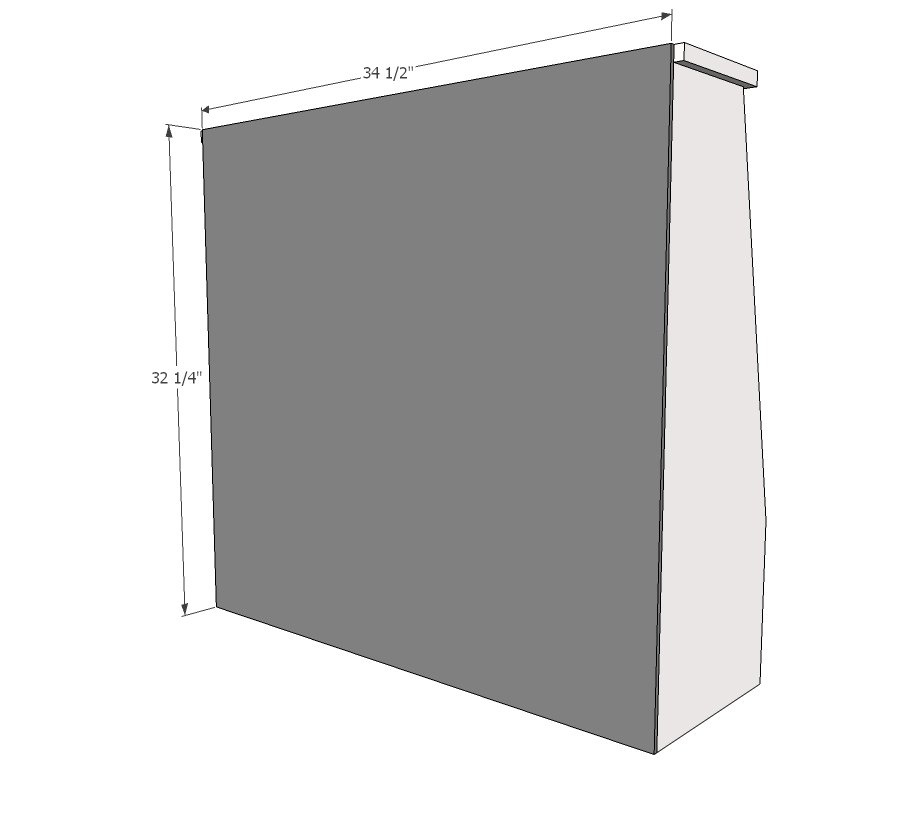
- 1 - 1/4" plywood @ 34-1/2" x 32-1/4" - back
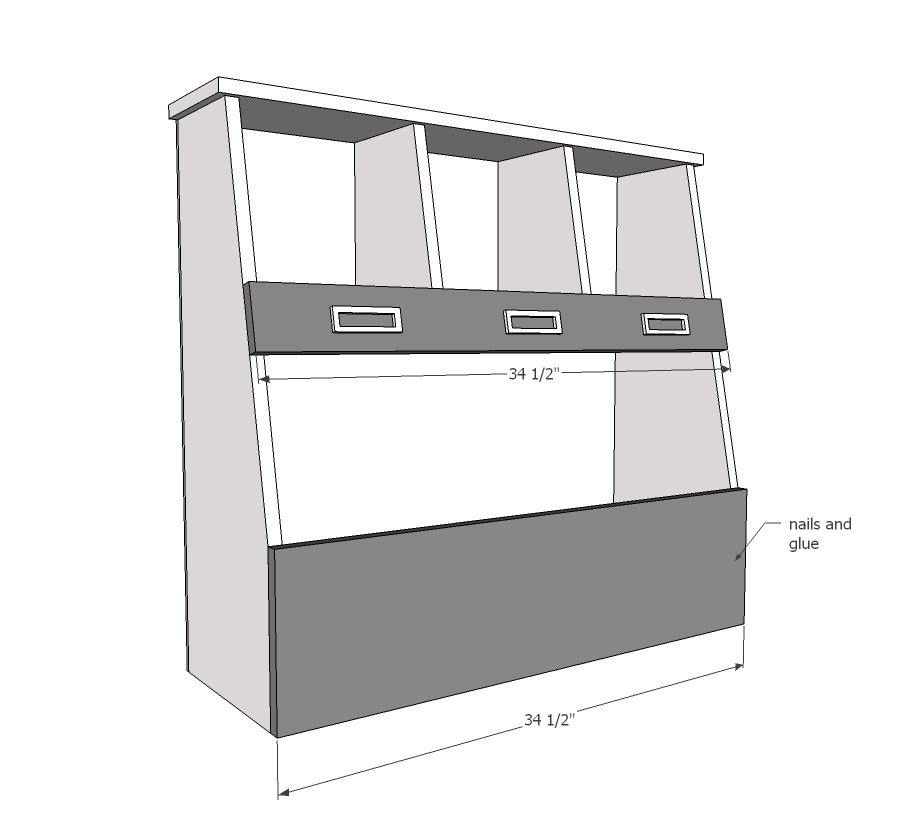
- 1 - 1x10 @ 34-1/2" - front apron
- 1 - 1x4 @ 34-1/2" - cubby front - NOTE: I kinda wish I had used a 1x6 here. It would have made it difficult to store books in there, but the 1x4 just doesn't provide a big enough lip for containing small things like legos and little cars.
Tools
- measuring tape
- square
- pencil
- safety glasses
- hearing protection
- circular saw
- compound miter saw
- nailer
- sander
Step-by-step Instructions
Step 1
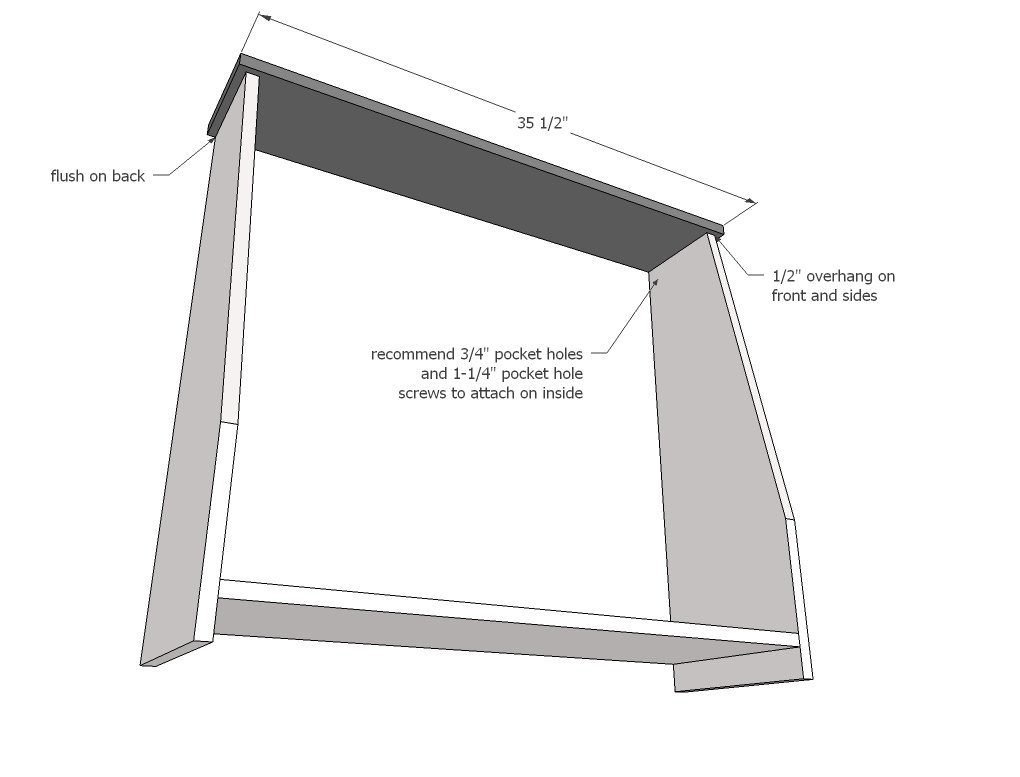
The first step is to take your side boards, carefully mark as pictured above, and cut off with a circular saw. As I do in the video, start on the shorter end - it will be easier to start than trying to start the circular saw at a steep angle. Make sure you clamp your boards securely to a work surface so you can concentrate on your cut and not keeping the boards steady. I used the first board as a pattern to cut the second. That worked pretty good for me. Then I sanded the cut edges lightly so they matched and were smooth. It's easier to do this now than when it's part of the project. TIP: If you are using pocket holes to build, drill 3/4" pocket holes on the insides (the two sides are in mirror) of the top for attaching the top in step 3.
Step 2
Now attach the bottom. You can use pocket holes if you are lucky enough to have a Kreg Jig. You can also nail this project with glue, because the project is reinforced with a full back and the front aprons. A trick I do in the video is elevate the bottom shelf up on 2x2s to get the 1-1/2" gap, and then attach the sides.
Step 3
The top overhangs the sides and front by 1/2". I nailed mine to the sides with glue. If using the pocket holes, attach with 1-1/4" pocket hole screws.
Step 4
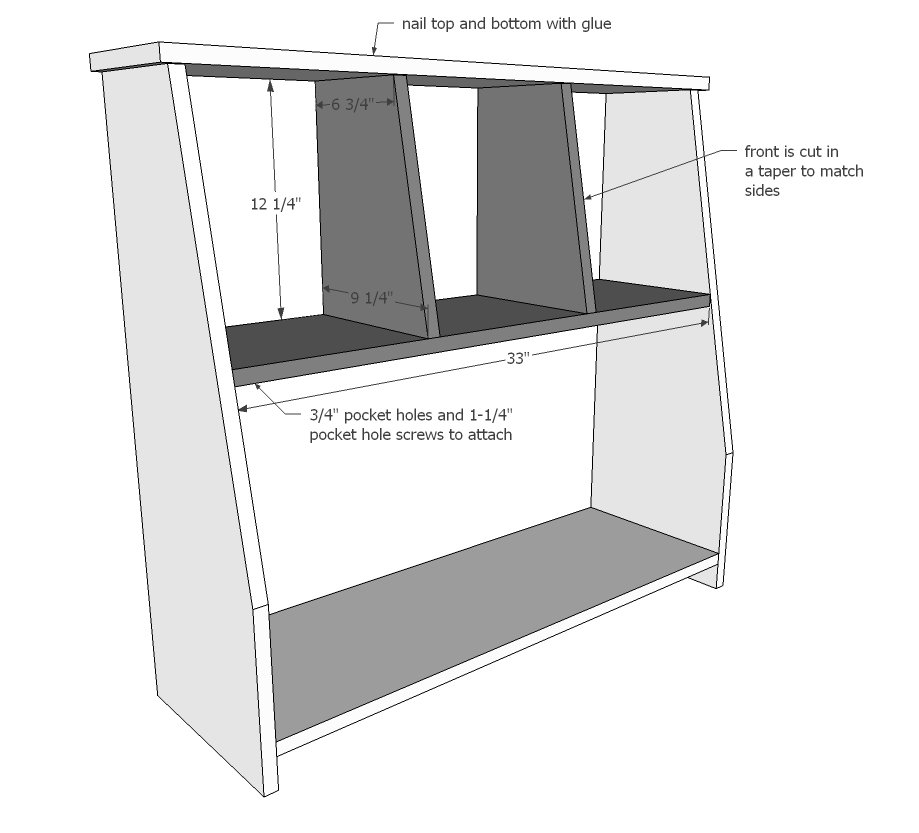
First take the dividers and place next to the sides. Trace the cut side profile on to the dividers and cut with a circular saw. Then place the dividers back inside the project, next to the sides to use as a spacer to find the placement of the middle shelf. Then attach middle shelf to the sides with either pocket holes or nails from outside (I use 1-1/4" nails and ample wood glue). Then nail the dividers in place, with an even spacing between the dividers and sides.
Step 5
Step 6
Finally the front aprons!!!! Load your nailer back up with 1-1/4" nails, spread the glue, and attach to the sides and shelves. Wouldn't it be fun to personalize the toybox with a kid's name?
Finishing
Sand all surfaces, starting with a medium grit and finishing with fine. Wipe off the dust, fill any holes or gaps with wood filler, and sand smooth once dry. Apply primer if you're painting, then finish with your choice of paint or stain and seal with a durable clear topcoat. For outdoor projects, use exterior-rated primer, paint or stain, and sealer so the piece stands up to the weather.
Source (temporary): https://www.ana-white.com/woodworking-projects/toy-bin-box-cubby-shelves-free-plans