Ultimate Easy to Build Craft Table
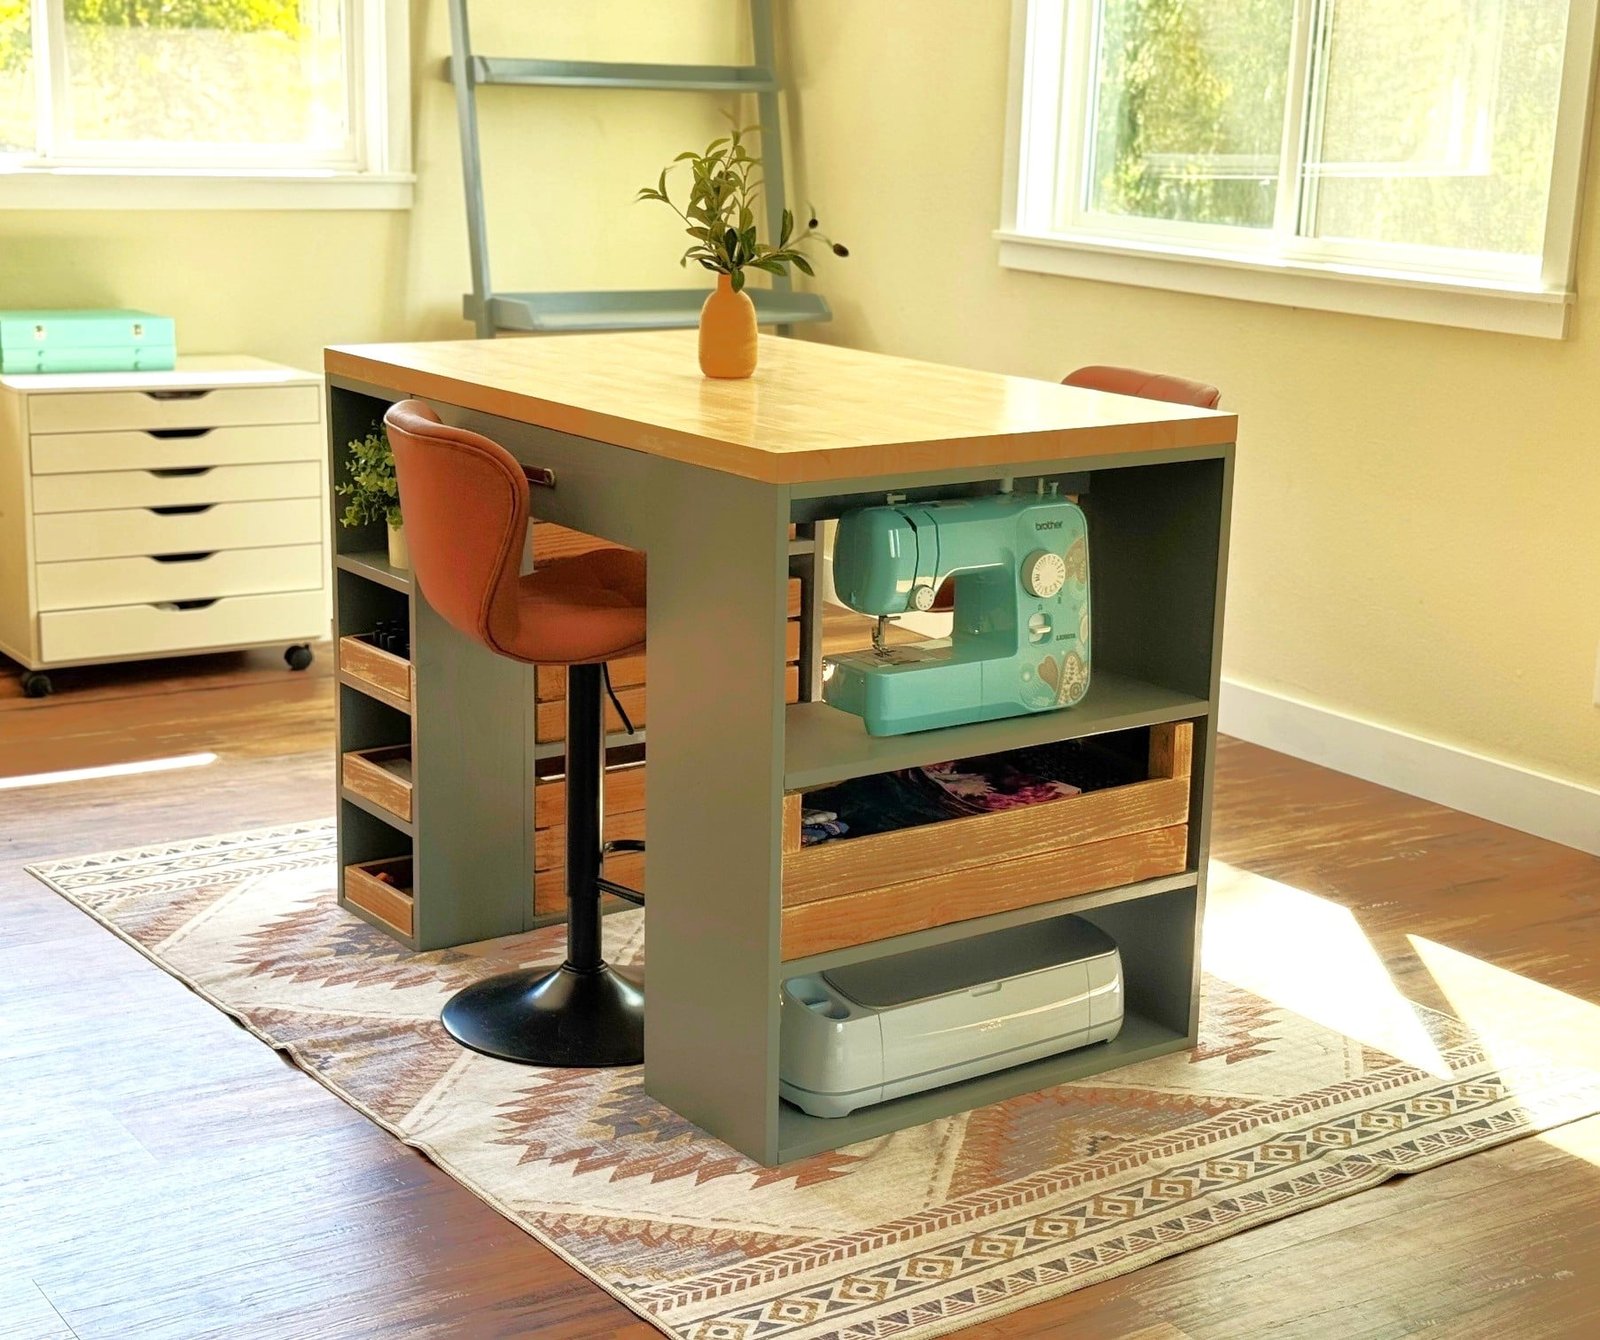
If you’ve been dreaming of a craft table that does it all, this new plan is for you! This ultimate DIY craft center is designed with versatility in mind—whether you’re sewing, designing with your Cricut, love a home nail salon, or just needing a sturdy space to spread out your projects. The base is built to hold custom fence picket crates for easy storage, and the open design makes it simple to tailor the table to your own creative needs. From the smooth worktop to the clever shelving, every detail is crafted to keep your tools organized and your projects within reach. This plan makes it easy to build a workspace that’s as hardworking and stylish as you are.
Specifications
| Project type | Desk, Desk Systems and Project Table Plans |
|---|---|
| Room | Craftroom |
| Difficulty | Intermediate |
| Estimated cost | $150 - $200 |
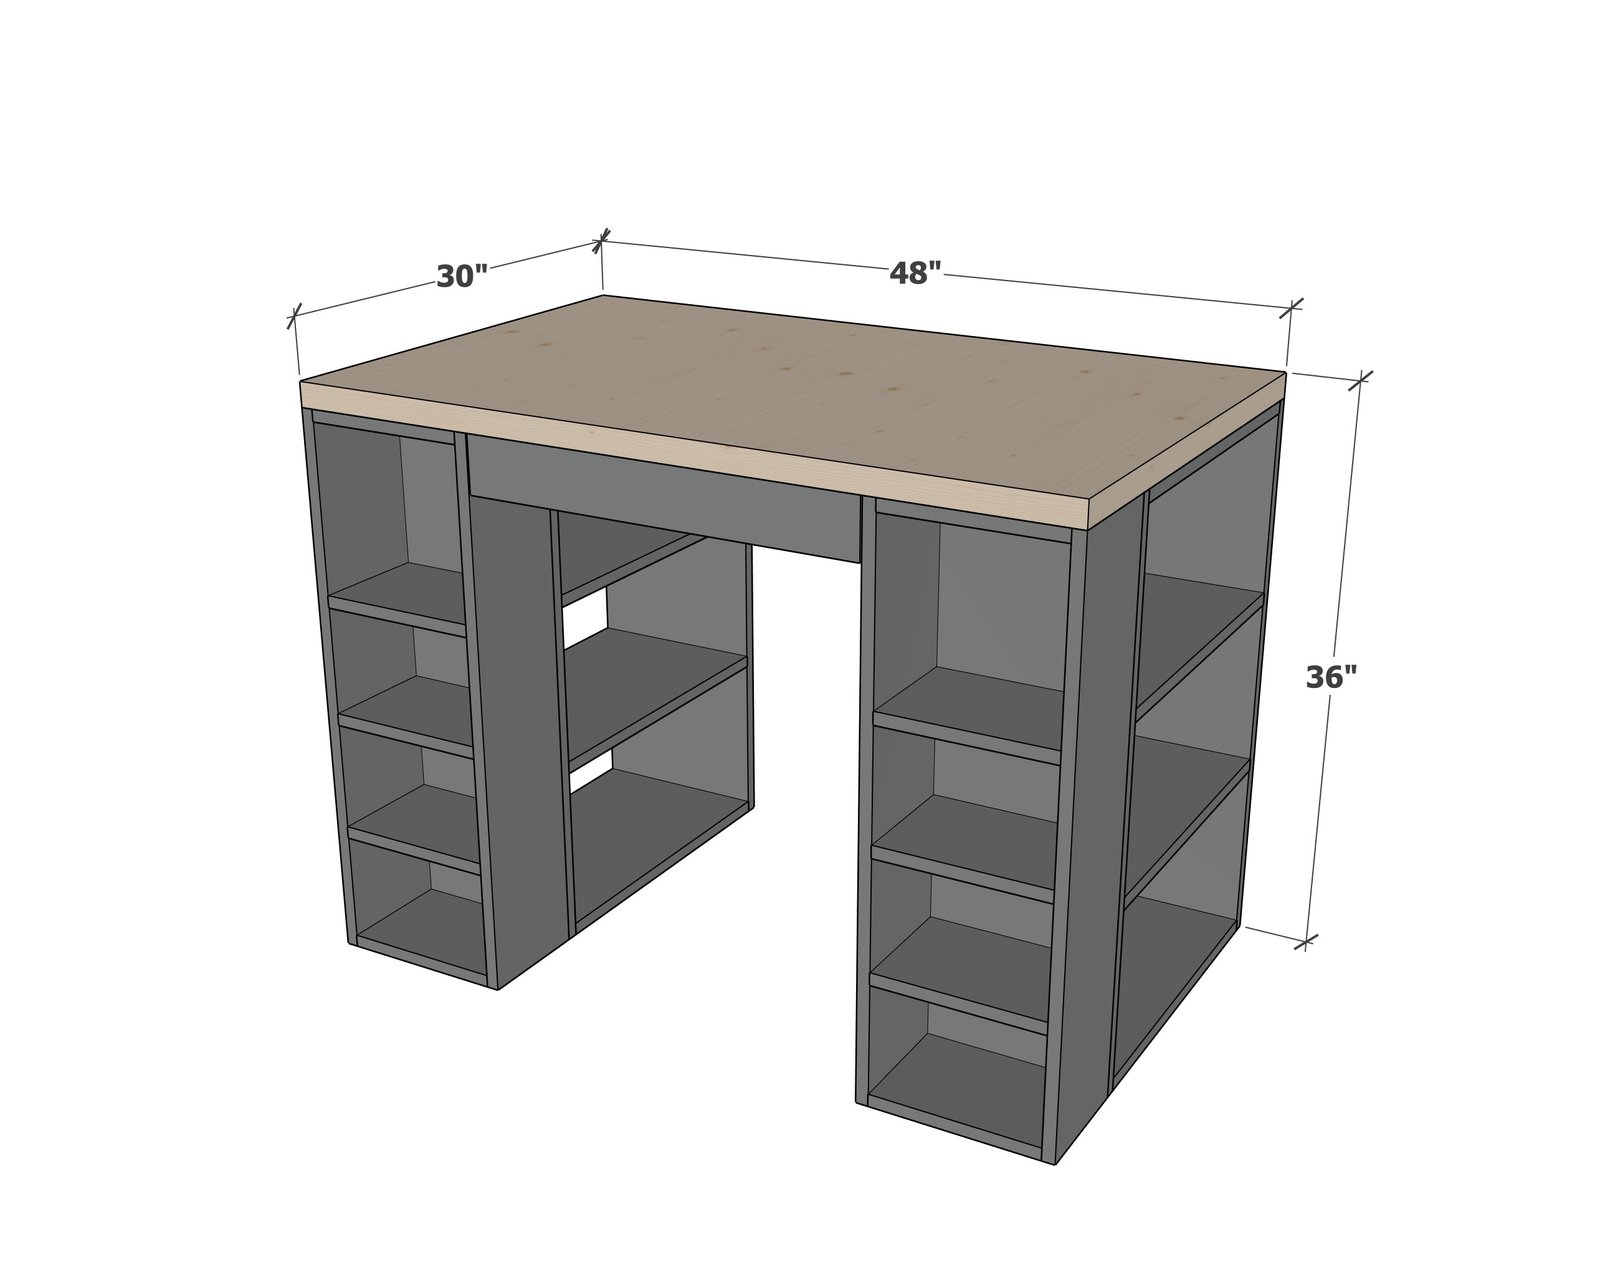
Dimensions
Use the size-specific shopping and cut lists below.
Shopping List
- 2 - 1x8 @ 8 feet long - cut the 34.5" pieces from these, then cut the remaining 10.25" pieces
- 1 - 1x8 @ 6 feet long - cut 10.25" pieces from these
- 2 - 1x12 @ 6 feet long - cut the 34.5" pieces from these
- 2 - 1x12 @ 8 feet long - cut the 21.25" pieces from these
- 1 -1x4 @ 8 feet long
- 1- 1x3 @ 8 feet long
- 1 - 1x3 @ 4 feet long
- 1 - 1/4" plywood @ 24" x 24"
- 2 - 12" drawer slides (full extension side mount)
- 3/4" and 1-1/4" brad nails
- 1-1/4" pocket hole screws recommended
- 30" x 48" Butcher block tabletop
Cut List
1x8 Front Towers (cut list is per two shelves)
- 4 - 1x8 @ 34-1/2" - sides
- 10 - 1x8 @ 10-1/4" - shelves
1x12 shelves (cut list is per two shelves)
- 2 - 1x12 @ 34-1/2" - sides
- 8 - 1x12 @ 21-1/4" - shelves
- 2 - 1x4 @ 21-1/4" - back supports
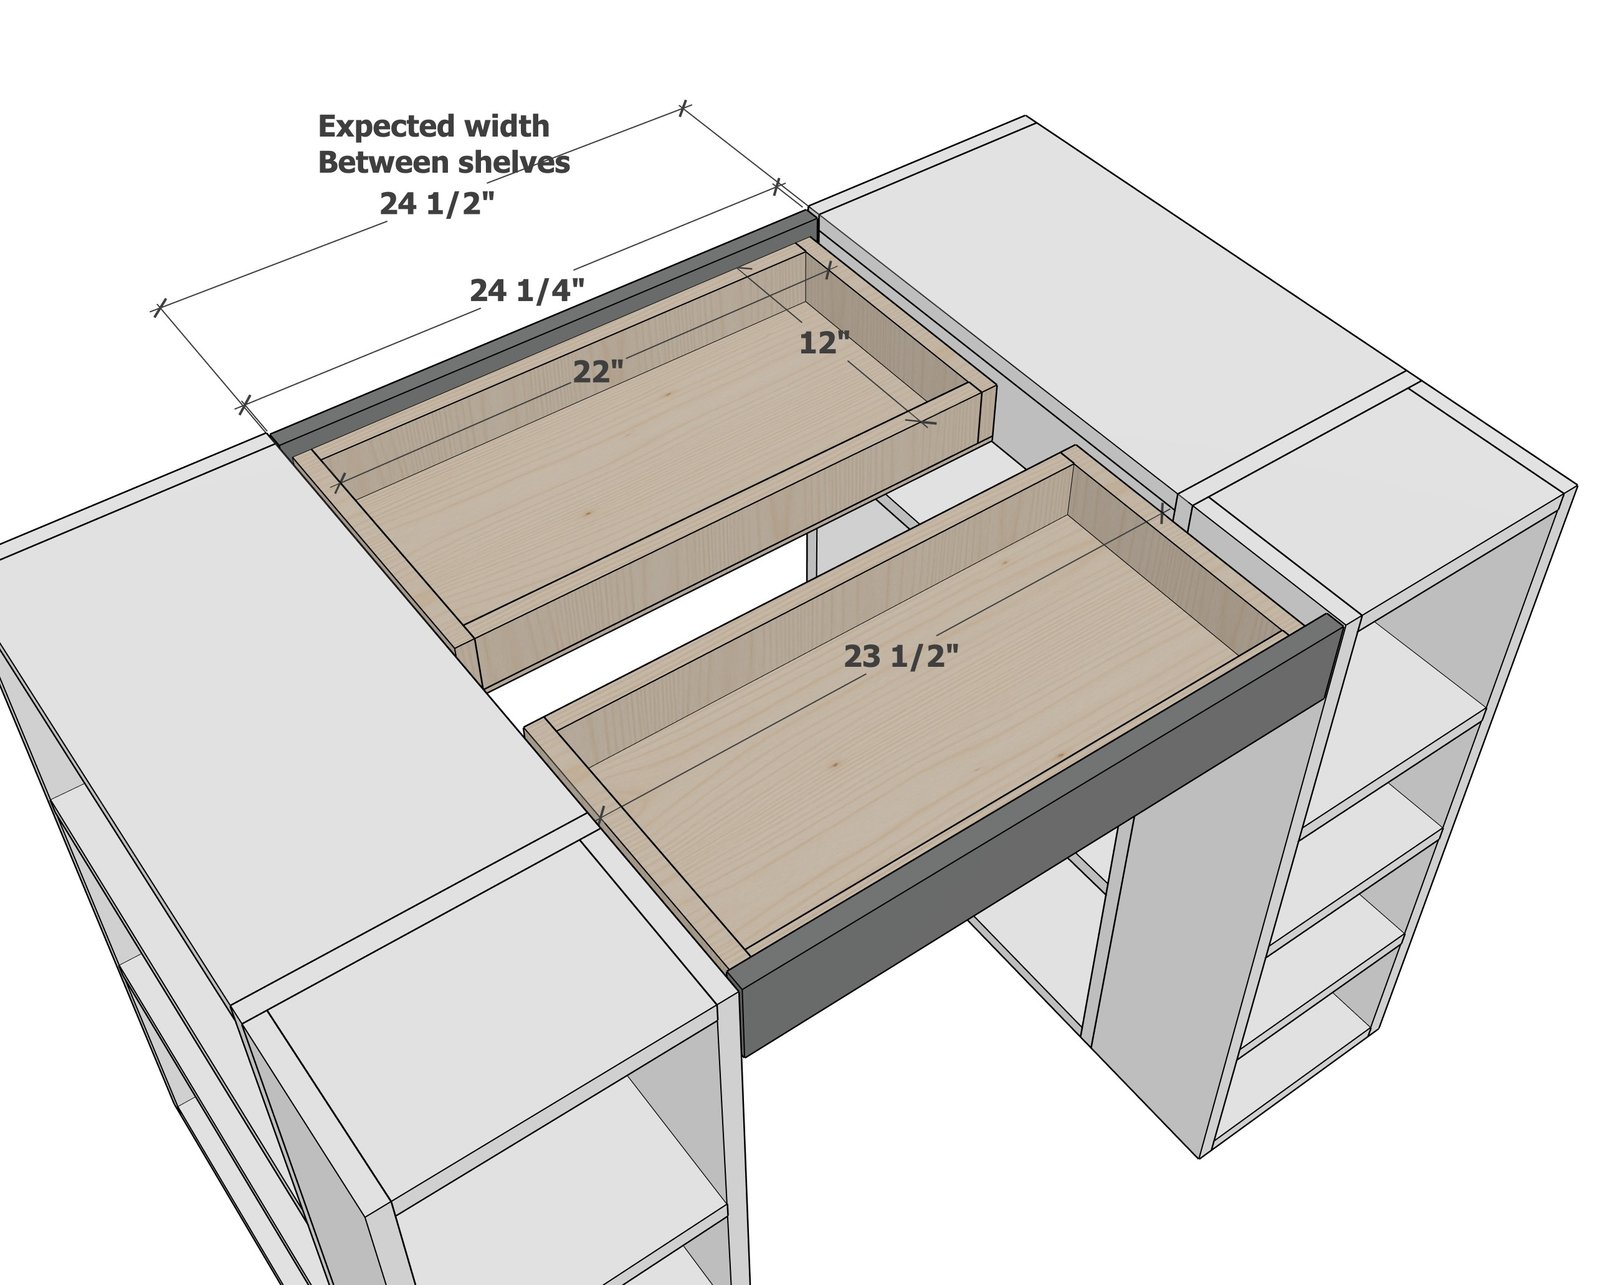
Drawers (cut list is for two drawers, the drawers should be measured and cut to fit, cuts are approximate)
- 4 - 1x3 @ 12" - drawer sides
- 4 - 1x3 @ 22" - drawer box front and back
- 2 - 1/4" plywood @ 12" x 23-1/2"
- 2 - 1x4 @ 24-1/4" - drawer faces
Tools
- measuring tape
- square
- pencil
- safety glasses
- hearing protection
- kreg-jig
- drill
- circular saw
- nailer
- sander
Step-by-step Instructions
Step 1
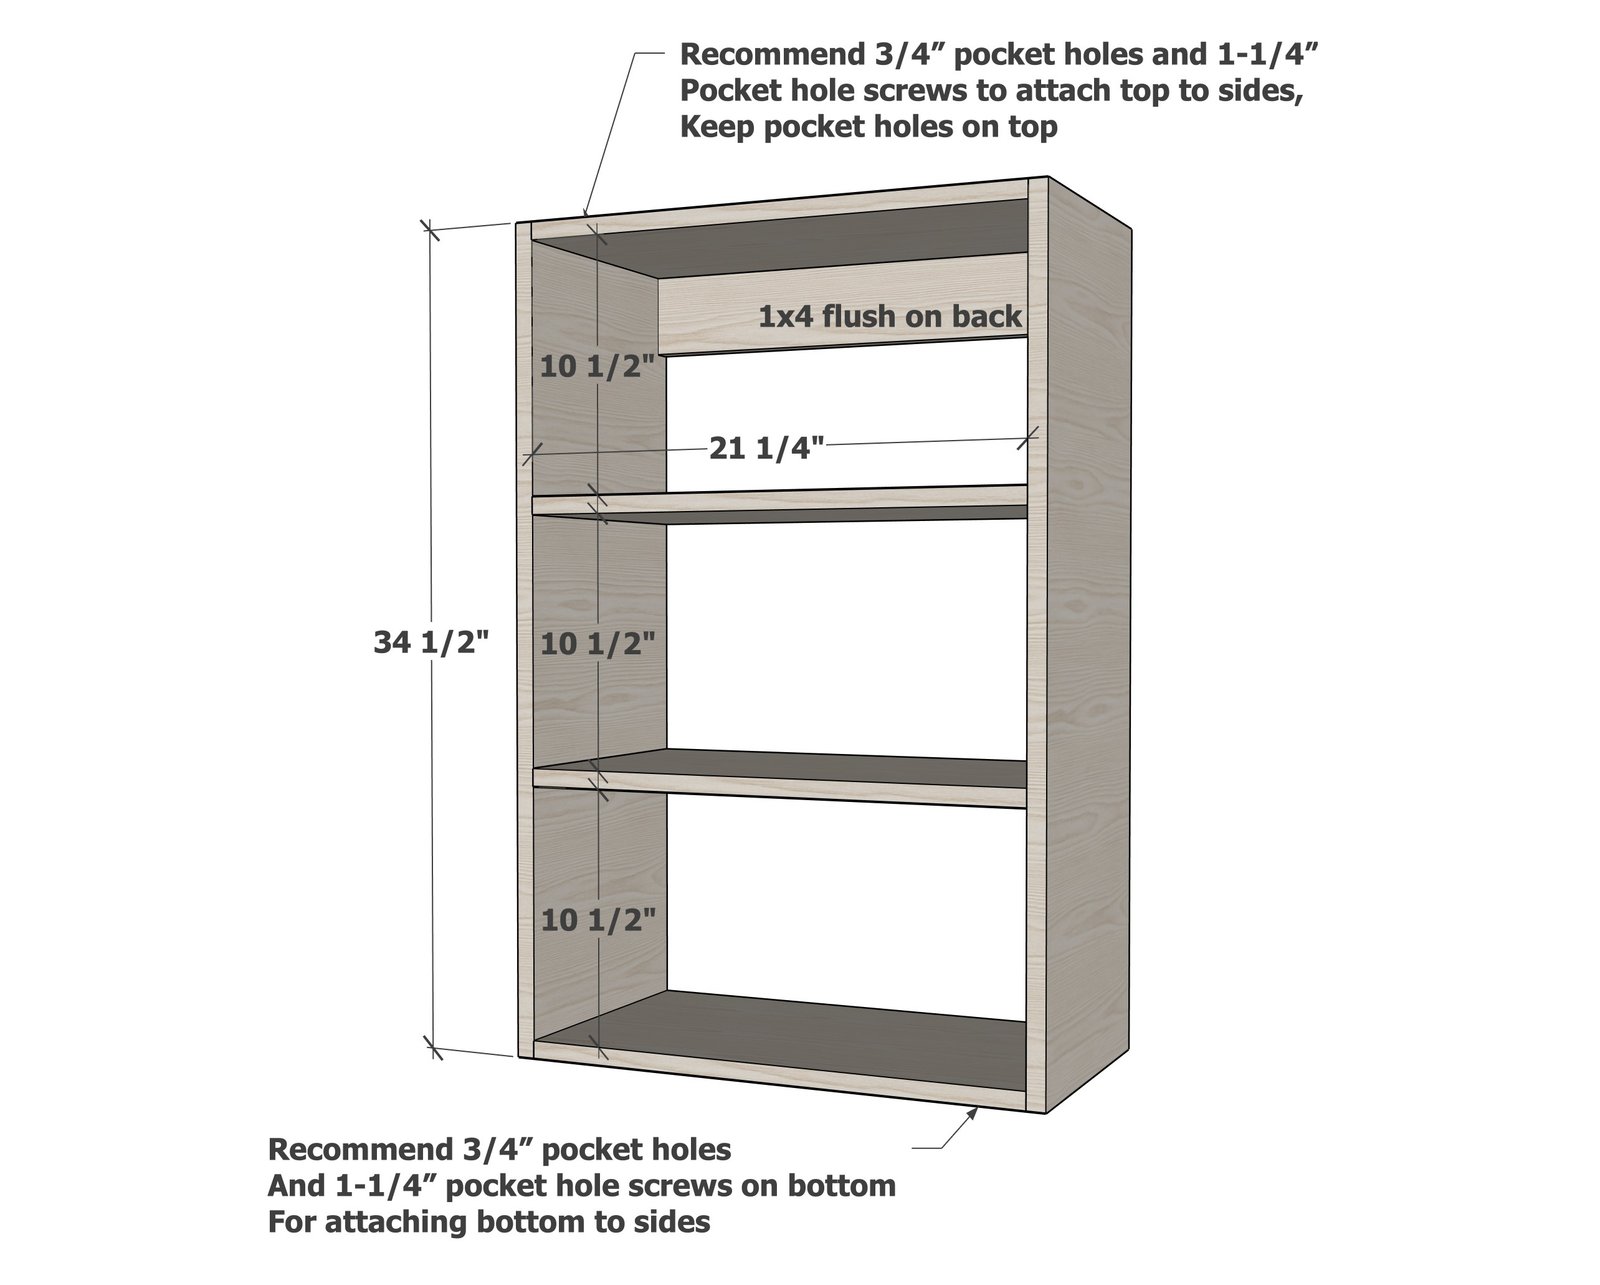
Start by building the 1x12 side shelves as shown in the diagram. The recommended joinery is 3/4" pocket holes and 1-1/4" pocket hole screws, but 2" self tapping screws can be used instead with glue. Brad nails are not recommended, as this may not hold up over time. Add the 1x4 board, at the top back, inset in the shelf. This piece is important for both adding structure to the shelf and for securing a drawer slide too. NOTE: In the photos, one of the side shelves runs the entire length of the table, instead of having the 1x8s in front. This is an easy modification, just make the shelves 28-1/2" long and omit the 1x8 front shelf.
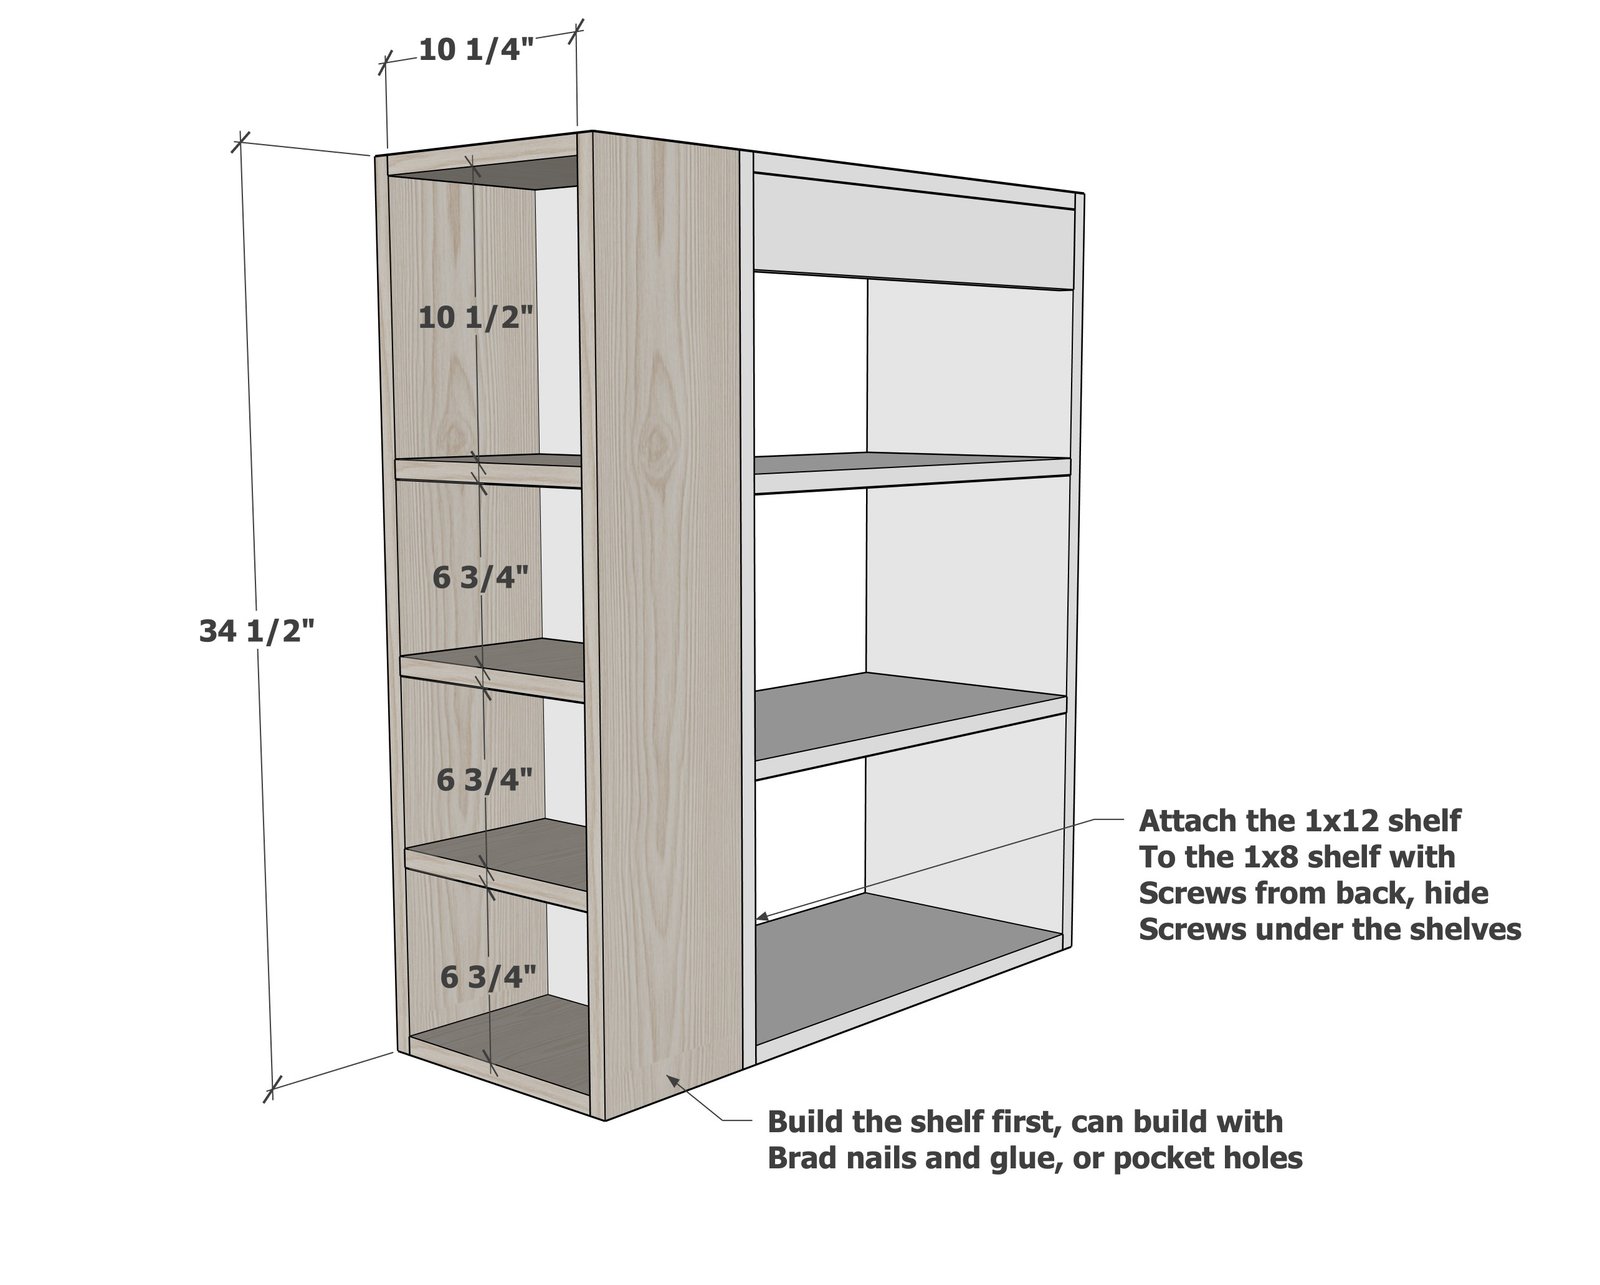
Build the 1x8 front shelves.
Attach to the 1x12 shelf at the front with screws. This is a good time to paint the shelves.
Step 3
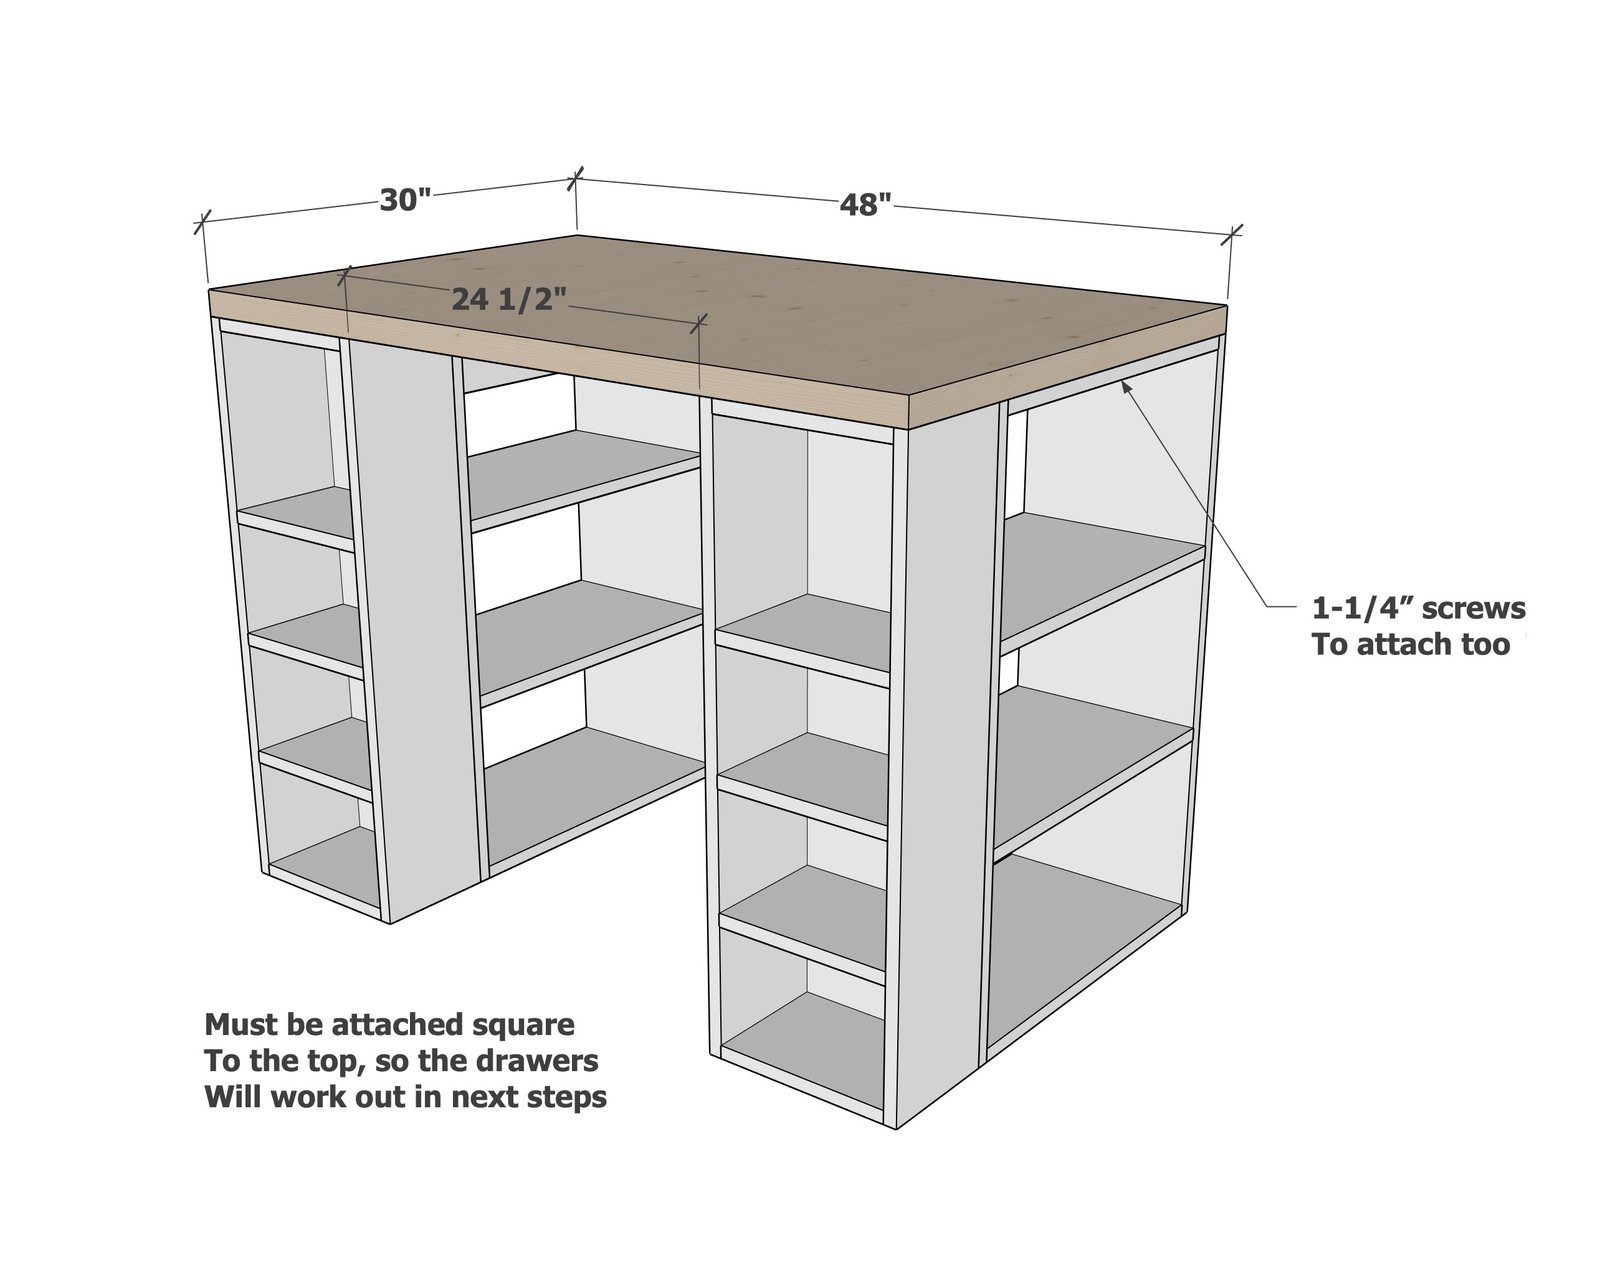
Carefully attach the shelves to the underside of the countertop, so the spacing in the middle is 24-1/2" (so the drawers work out). Use screws to attach.
Step 4
Build the drawers to fit inside the space as shown. Here is a video on building drawers.
Finishing
Sand all surfaces, starting with a medium grit and finishing with fine. Wipe off the dust, fill any holes or gaps with wood filler, and sand smooth once dry. Apply primer if you're painting, then finish with your choice of paint or stain and seal with a durable clear topcoat. For outdoor projects, use exterior-rated primer, paint or stain, and sealer so the piece stands up to the weather.
Source (temporary): https://www.ana-white.com/woodworking-projects/ultimate-easy-build-craft-table