Wood Christmas Tree Decor DIY
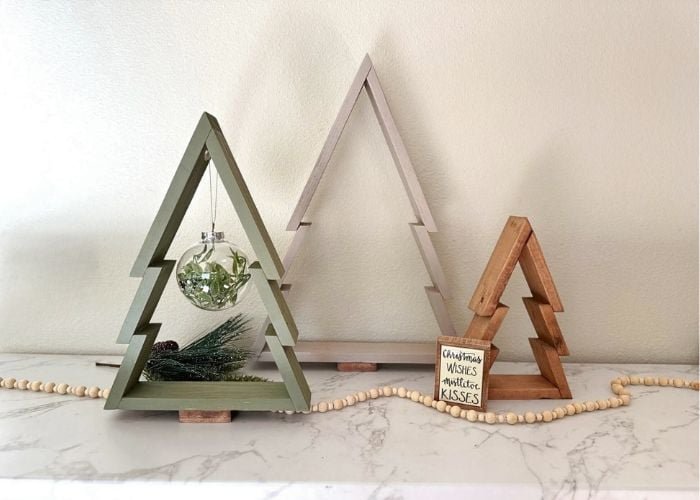
Build wooden Christmas tree decor using 1x material. This plan is available in 3 sizes. Build each tree for about $2 in materials! This design also allows you to stack and store away! Time to get festive with free
Specifications
| Project type | Home Decor |
|---|---|
| Room | living room |
| Difficulty | Beginner Projects |
| Estimated cost | Under $20 |
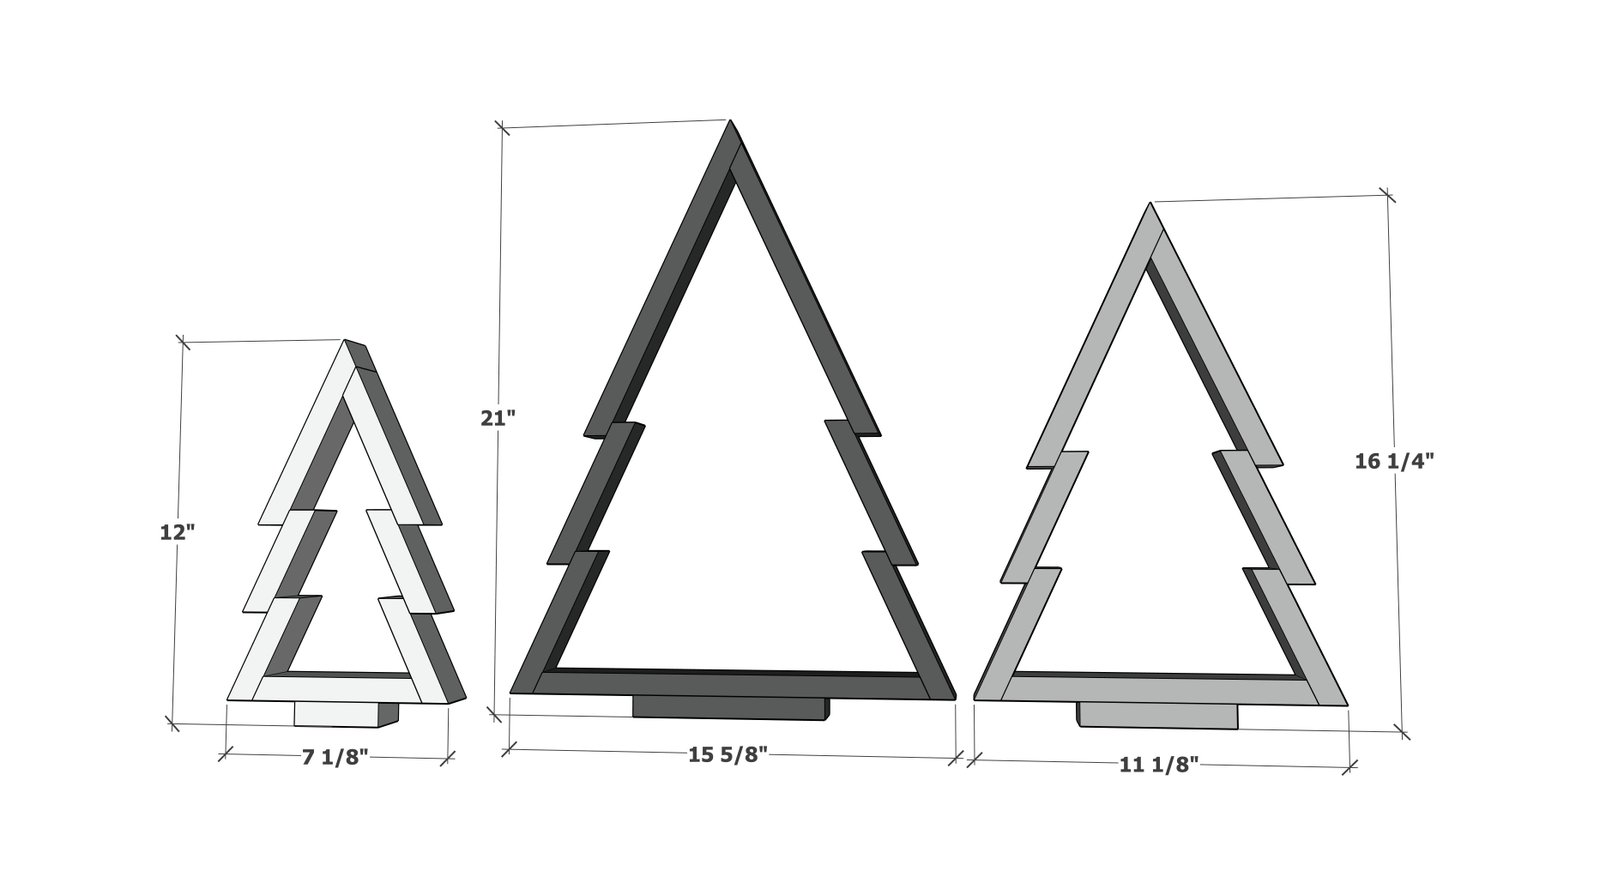
Dimensions
Use the size-specific shopping and cut lists below.
Shopping List
Small Christmas Tree
- 3 feet of 1x boards (can be 1x2, 1x3, 1x4 or even larger)
- wood glue
- 1-1/4" brad nails
Medium Christmas Tree
- 4 feet of 1x boards (can be 1x2, 1x3, 1x4 or even larger)
- wood glue
- 1-1/4" brad nails
Large Christmas Tree
- 6 feet of 1x boards (can be 1x2, 1x3, 1x4 or even larger)
- wood glue
- 1-1/4" brad nails
Cut List
Small Christmas Tree
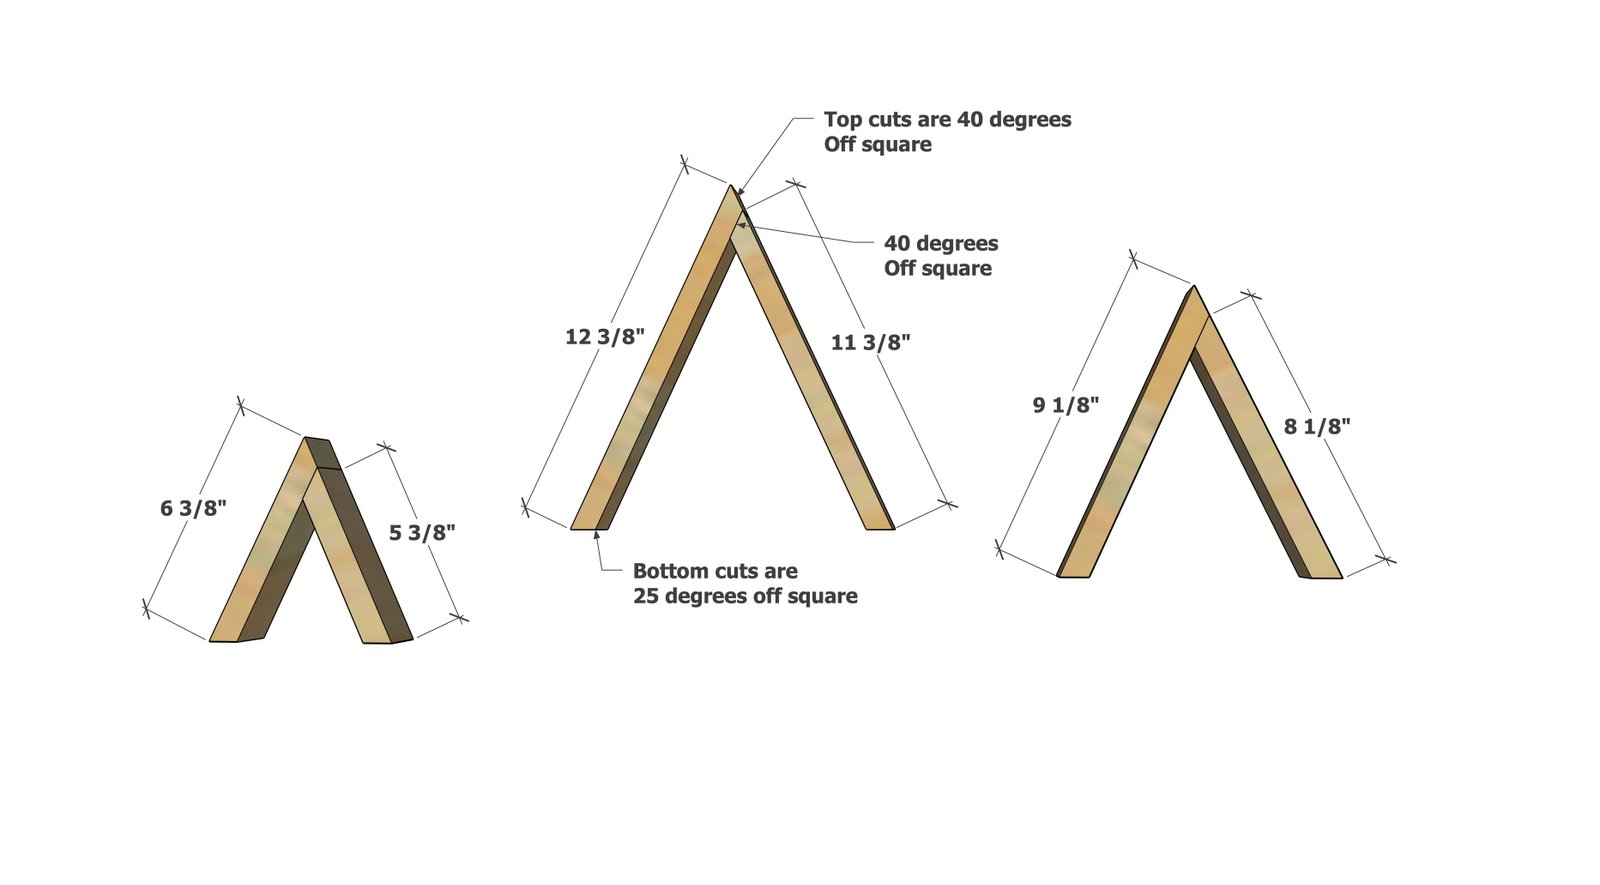
- 1 - 1x board @ 6-3/8" - long point to long point, one end cut at 40 degree off square, the other end cut at 25 degrees off square
- 1 - 1x board @ 5-3/8" - long point to long point, one end cut at 40 degree off square, the other end cut at 25 degrees off square
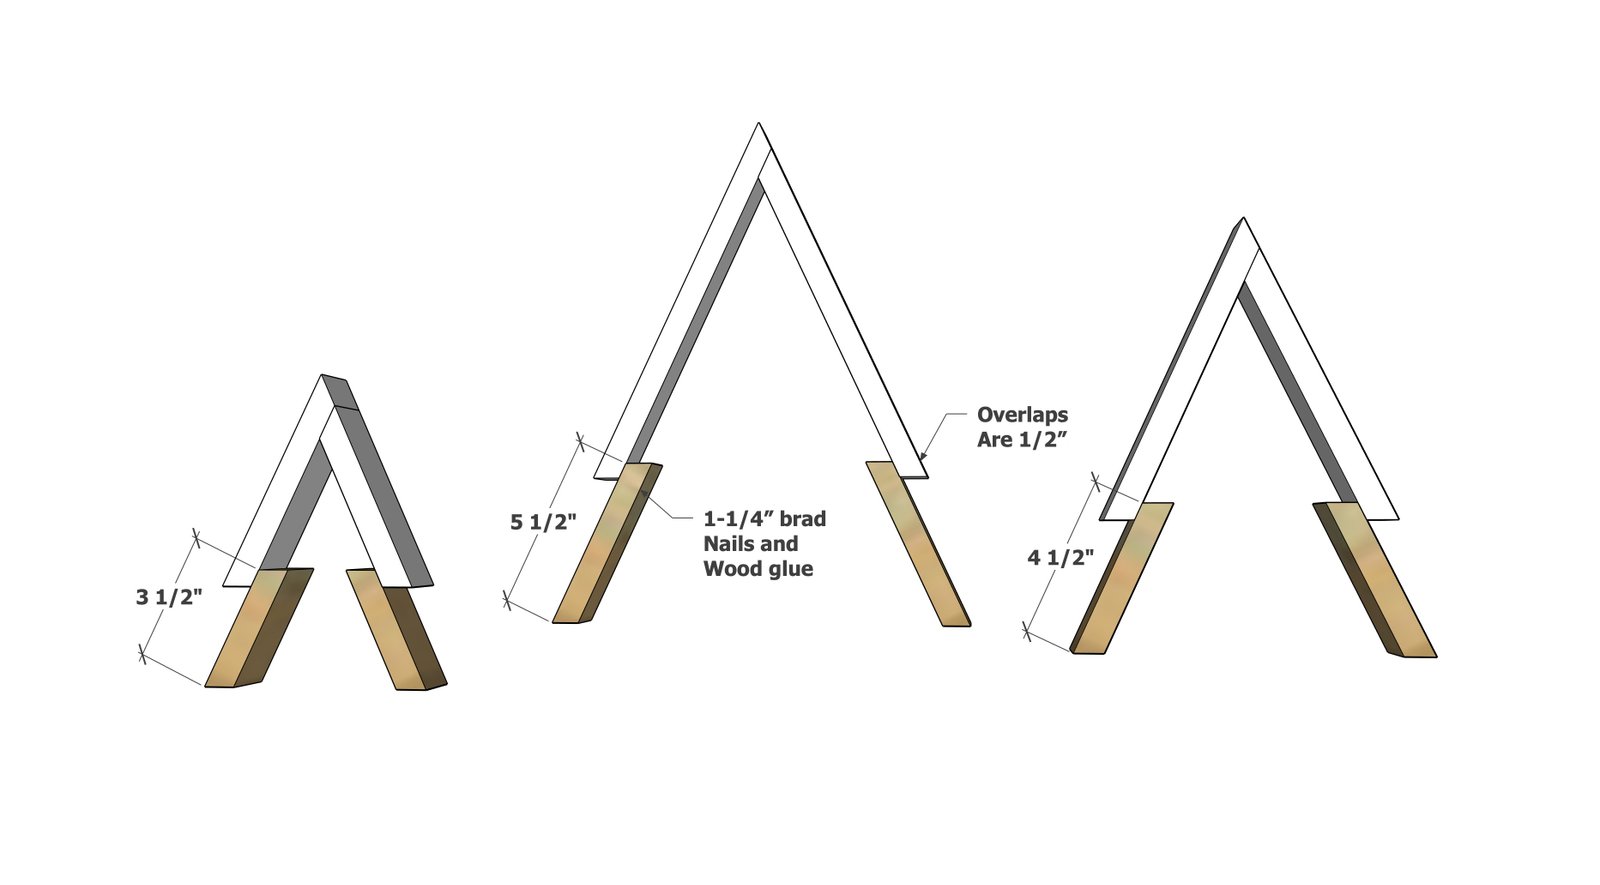
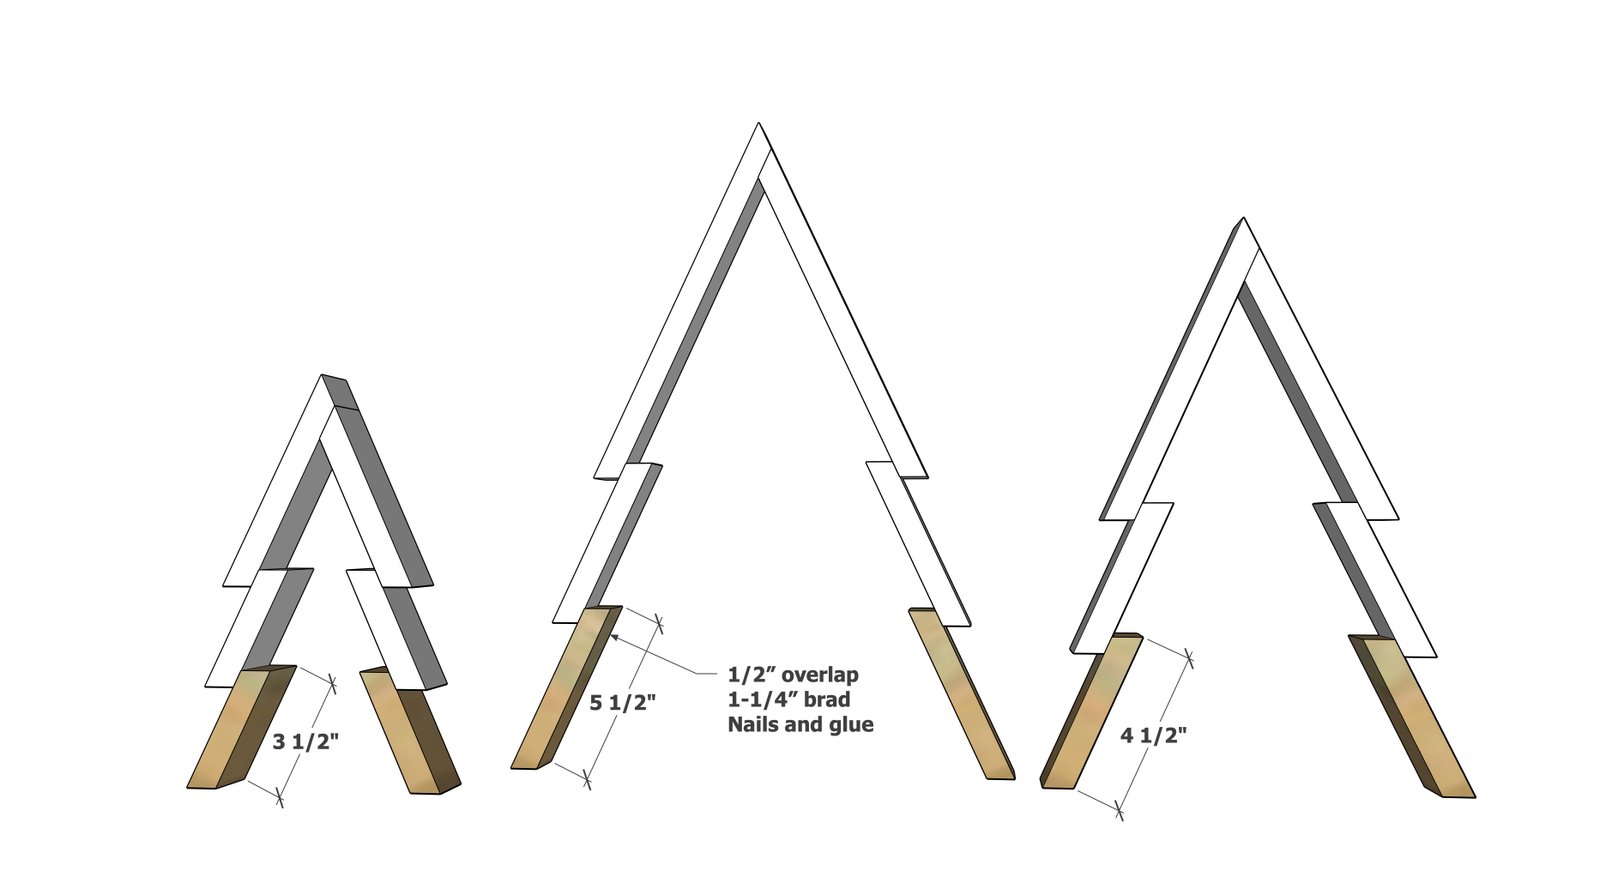
- 4 - 1x boards @ 3-1/2" - long point to short point measurement, ends are parallel, both ends cut at 25 degrees off square
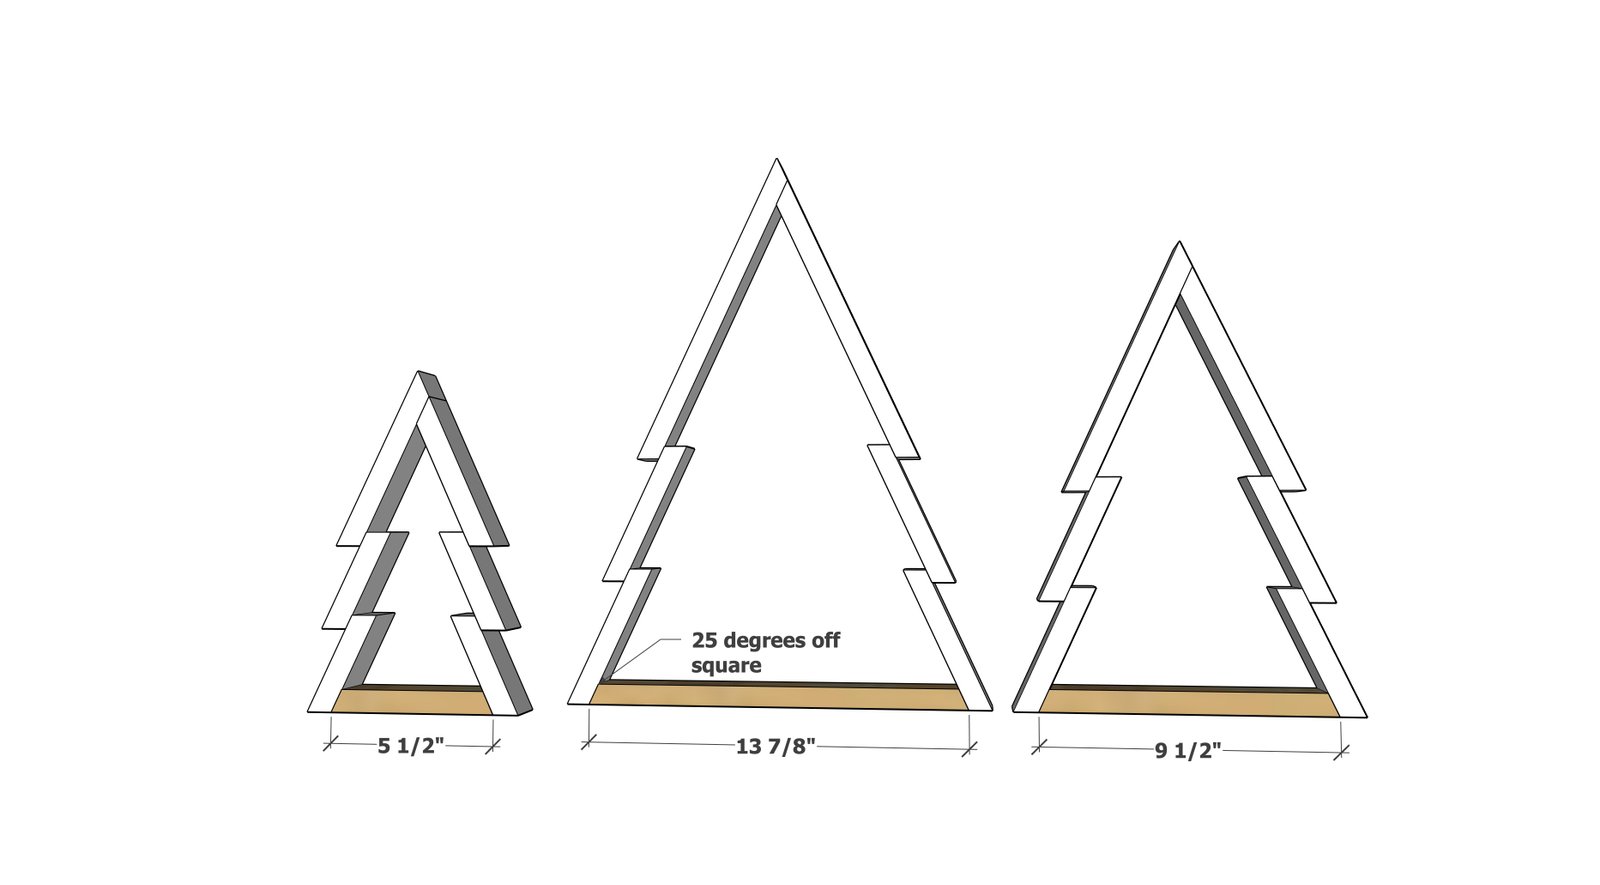
- 1 - 1x board @ 5-1/2" - long point to long point measurement, ends NOT parallel, both end cut at 25 degree off square
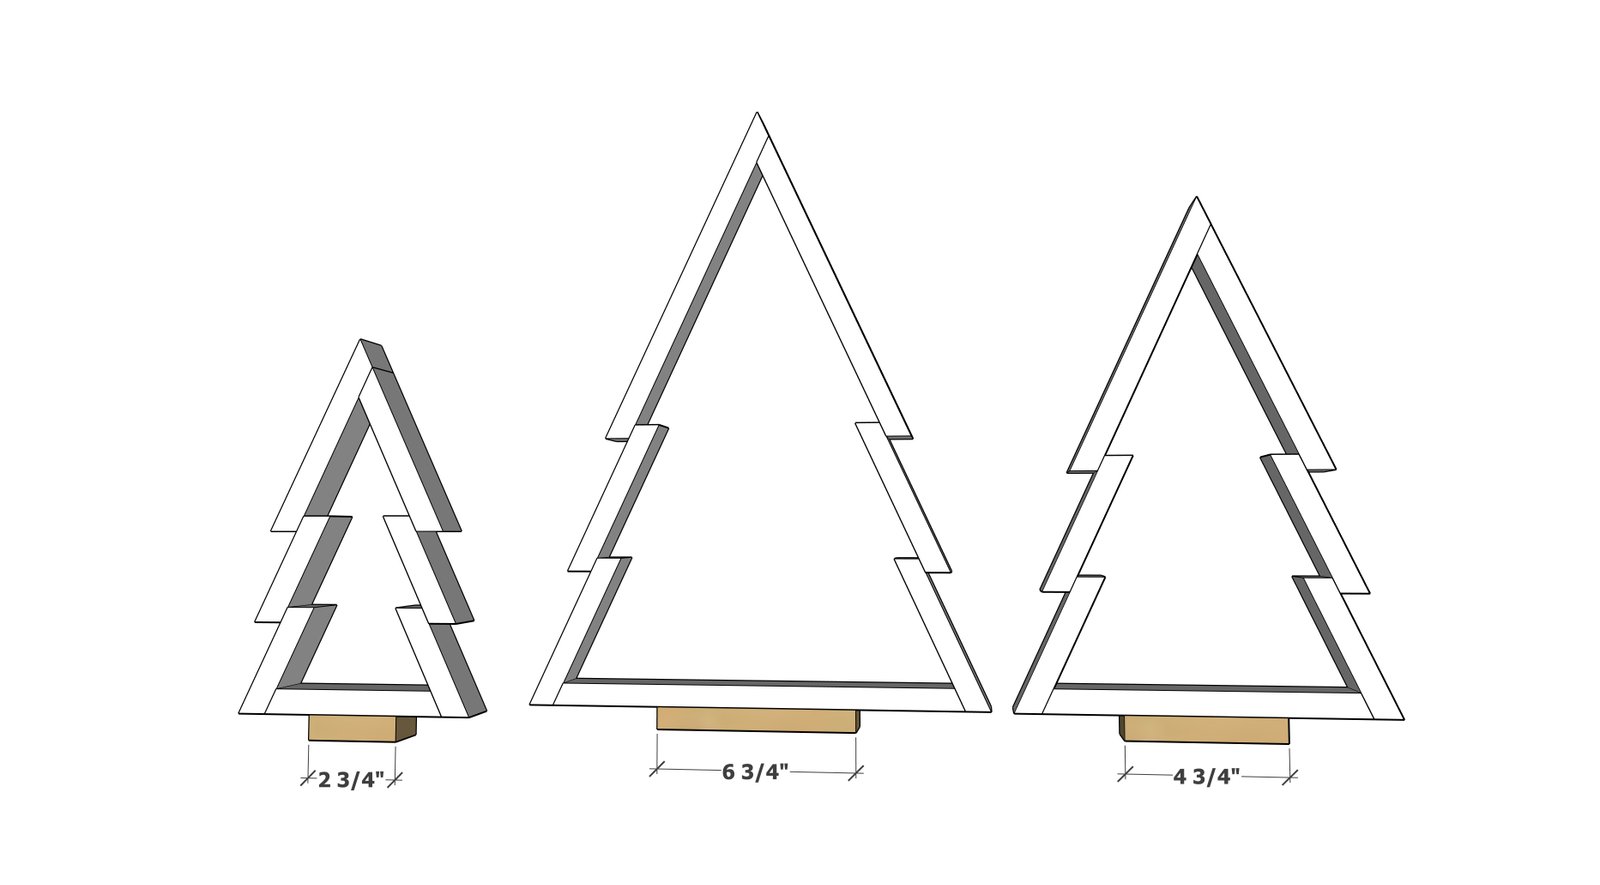
- 1 - 1x @ 2-3/4"
Medium Christmas Tree
- 1 - 1x board @ 9-1/8" - long point to long point, one end cut at 40 degree off square, the other end cut at 25 degrees off square
- 1 - 1x board @ 8-1/8" - long point to long point, one end cut at 40 degree off square, the other end cut at 25 degrees off square
- 4 - 1x boards @ 4-1/2" - long point to short point measurement, ends are parallel, both ends cut at 25 degrees off square
- 1 - 1x board @ 9-1/2" - long point to long point measurement, ends NOT parallel, both end cut at 25 degree off square
- 1 - 1x @ 4-3/4"
Large Christmas Tree
- 1 - 1x board @ 12-3/8" - long point to long point, one end cut at 40 degree off square, the other end cut at 25 degrees off square
- 1 - 1x board @ 11-3/8" - long point to long point, one end cut at 40 degree off square, the other end cut at 25 degrees off square
- 4 - 1x boards @ 5-1/2" - long point to short point measurement, ends are parallel, both ends cut at 25 degrees off square
- 1 - 1x board @ 13-7/8" - long point to long point measurement, ends NOT parallel, both end cut at 25 degree off square
- 1 - 1x @ 6-3/4"
Tools
- measuring tape
- pencil
- safety glasses
- compound miter saw
- nailer
Step-by-step Instructions
Cut the pieces for the tree top.
Note that the top angle will be 40 degrees off square and the bottom angle is 25 degrees off square. Cutting - Cuts are easy to do with a miter saw, just rotate the saw to the correct degrees and then cut the boards vertically. If you have a compound miter saw, you can do bevel cuts. Different Sizes - If you want to make different sized trees, you can easily do this by starting at the tree top, cutting the two pieces, with one 1" shorter than the other. Attach the two pieces together with 1-1/4" brad nails and wood glue. Clamping is very helpful here.
Step 2
Measure and mark down 1/2" and add the first row of tree branches with glue and brad nails.
Step 3
Measure and mark and add the third row.
Step 4
Attach the base to the bottom.
Step 5
Add the tree trunk to the base.
Step 6
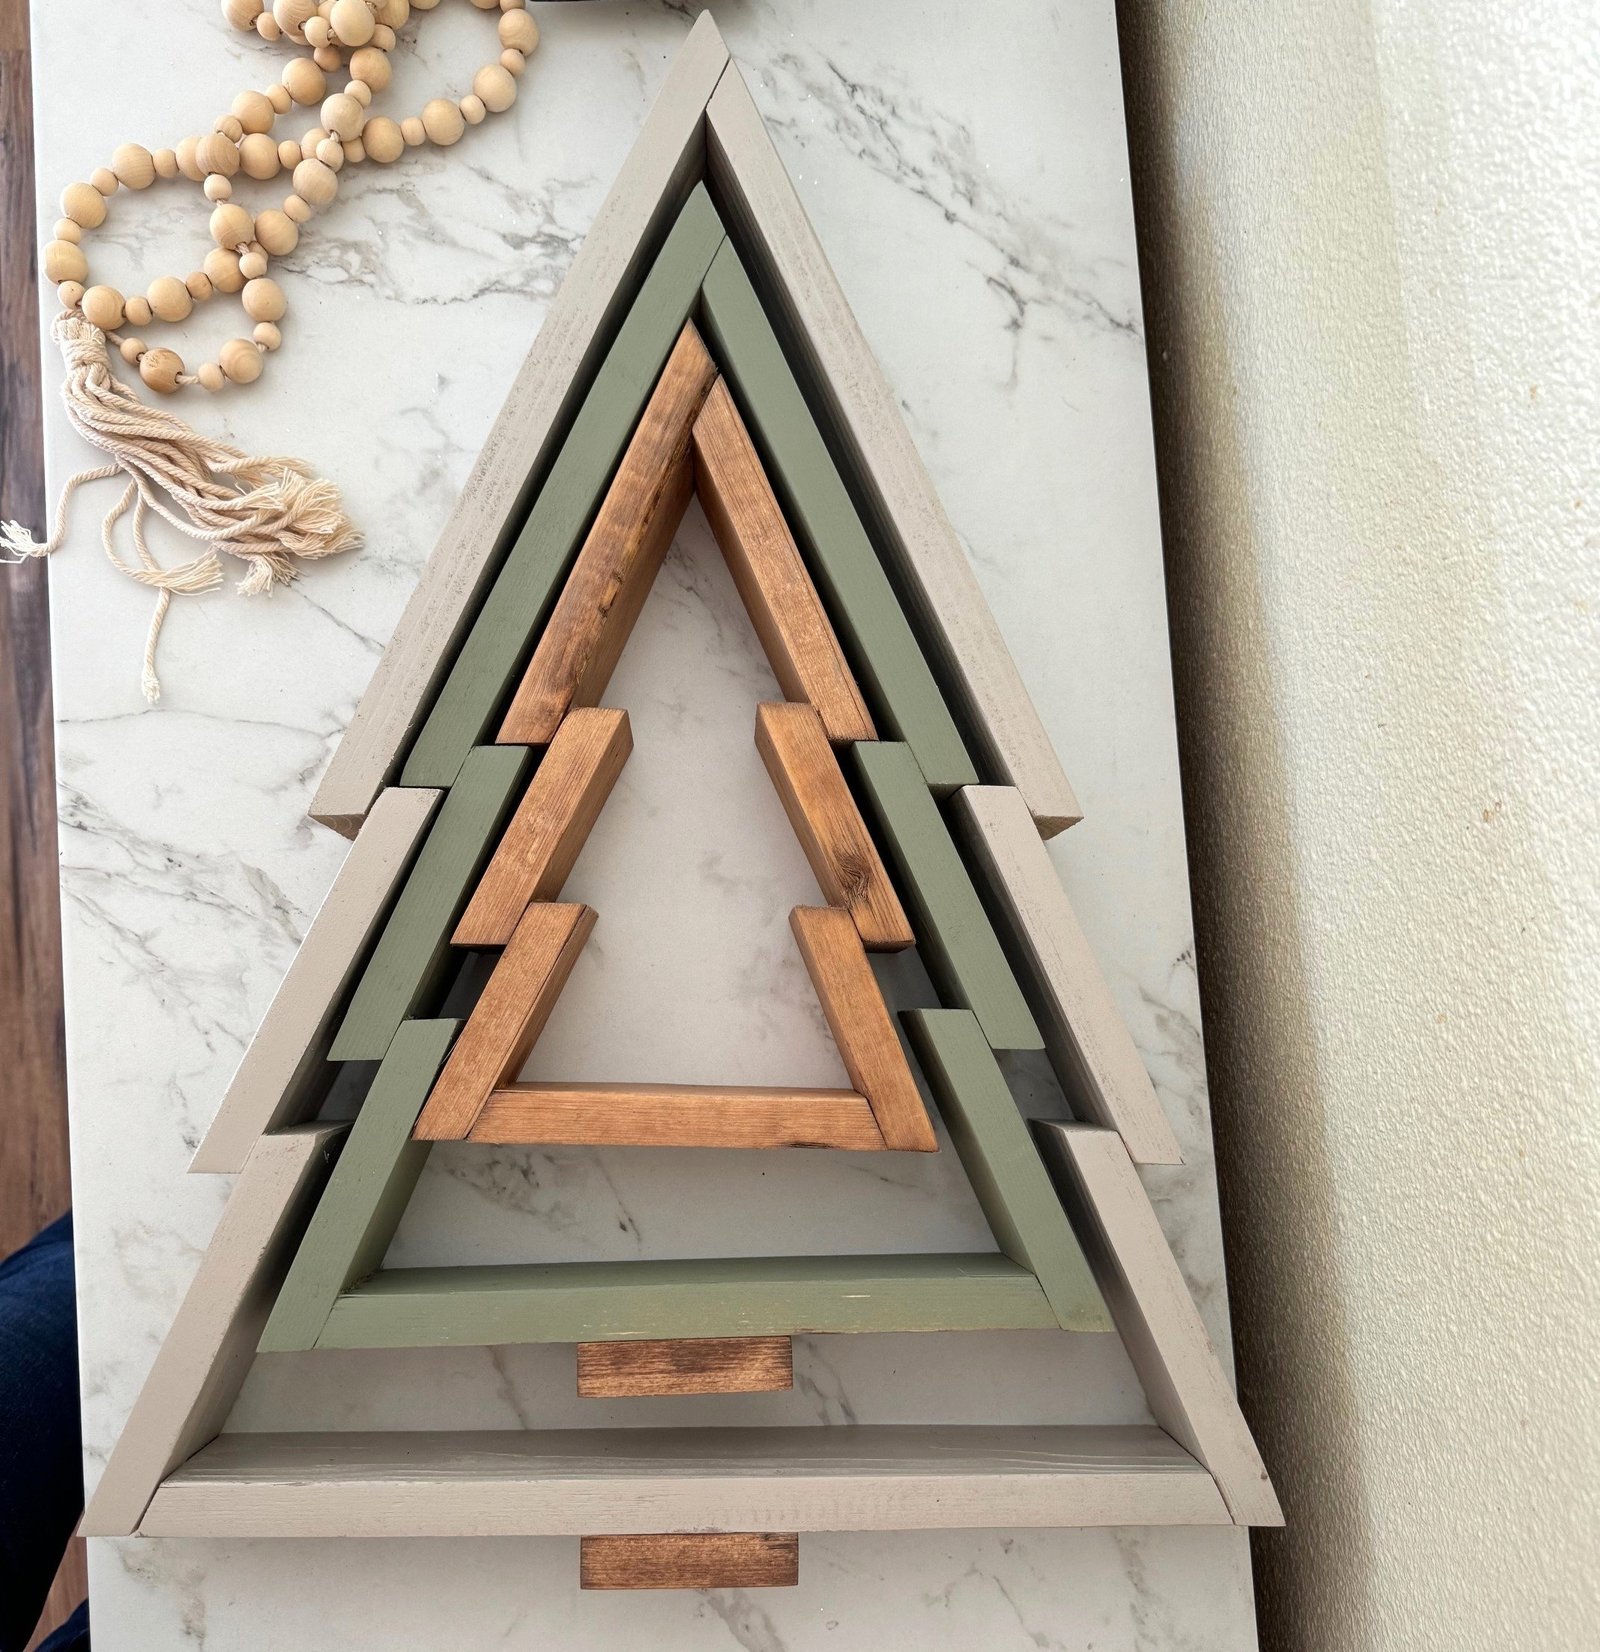
The trees are designed to nest together for easy storage.
Finishing
Sand all surfaces, starting with a medium grit and finishing with fine. Wipe off the dust, fill any holes or gaps with wood filler, and sand smooth once dry. Apply primer if you're painting, then finish with your choice of paint or stain and seal with a durable clear topcoat. For outdoor projects, use exterior-rated primer, paint or stain, and sealer so the piece stands up to the weather.
Source (temporary): https://www.ana-white.com/woodworking-projects/wood-christmas-tree-decor-diy